Add-on Kalliope
Kalliope FAX
Description
The fax service lets Kalliope users send and receive faxes from their user portal on the web GUI or by email.
The service requires the purchase of a KPBX-V4-FAX license. Each license channel allows the configuration of one fax entity. A fax entity is conceptually equivalent to a physical fax machine that one or more users can access.
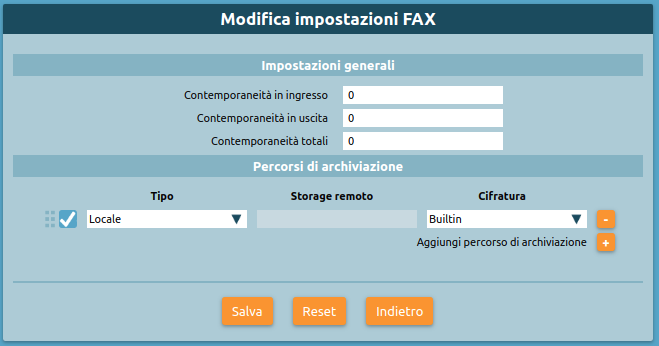
Configuration To configure the service, it is necessary to define the general settings for simultaneous use and storage of received/sent files (including reports). This configuration is done in the panel FAX → FAX Settings.
FAX Settings
In the FAX settings edit panel it is possible to set the configurations common to all FAX instances in the system.
Account settings
Parameter |
Description |
Value |
|---|---|---|
Simultaneous inbound FAXes |
Maximum number of inbound FAXes allowed |
Numeric (0 = infinite) |
Simultaneous outbound FAXes |
Maximum number of outbound FAXes allowed |
Numeric (0 = infinite) |
Total simultaneous FAXes |
Maximum number of FAXes allowed in both directions |
Numeric (0 = infinite) |
Archival paths (ordered list)
Parameter |
Description |
Value |
|---|---|---|
Enabled |
Checkbox |
|
Type |
Type of storage: local or remote |
Local / Remote |
Remote storage |
Storage name |
Dropdown |
Encryption |
The encryption algorithms to use for the assets on the archival path |
None / Built-in |
FAX Instances
Next you need to configure the specific FAX instance in the FAX panel → FAX Instances. The FAX Instance panel defines the attributes associated with a FAX entity. A FAX instance must correspond to a numbering plan selection (such as an extension), have a name, and commit a channel of a Kalliope FAX Module license.
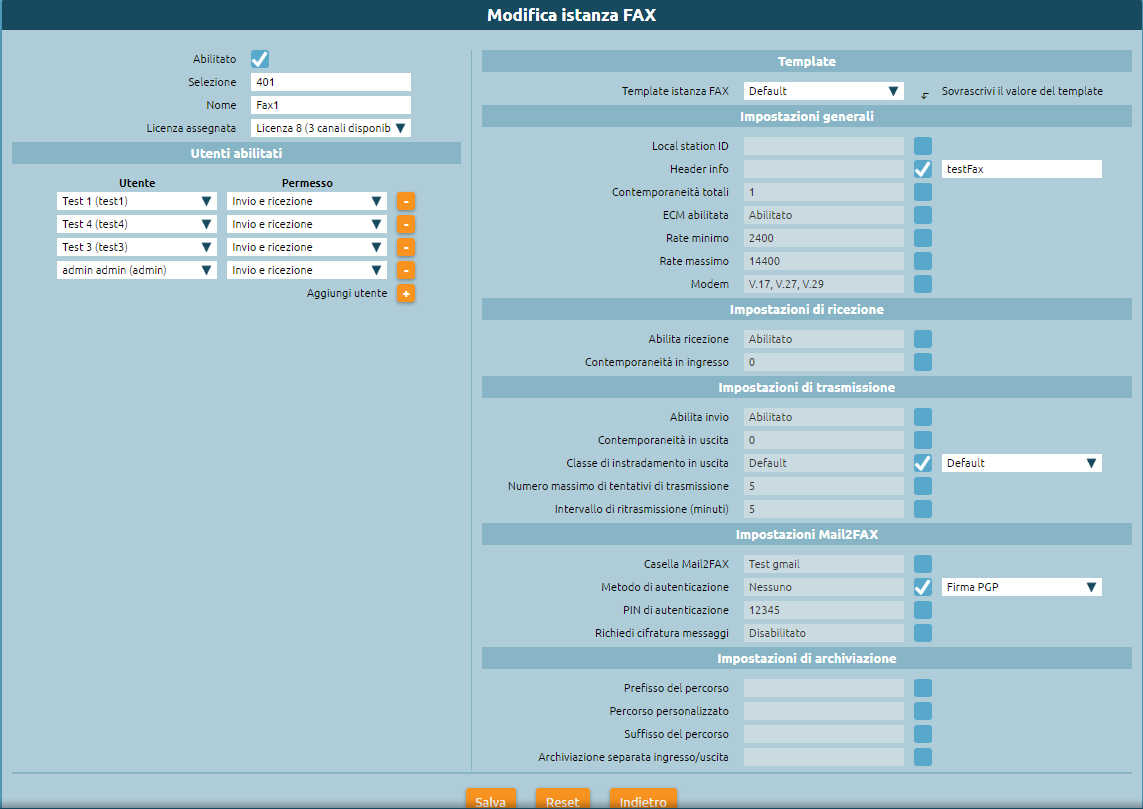
Parameter |
Description |
Value |
|---|---|---|
Enabled |
Checkbox |
|
Selection |
The numbering plan selection that corresponds to the fax entity |
Numeric |
Name |
Entity name |
Alpha-numeric |
Enabled users (list) |
||
User |
The user to which the permission will be assigned |
Drop-down |
Permission |
The permission that will be assigned to the user |
Reception only / Sending only / Sending and reception |
Template |
||
Fax entity template |
The template that will be used for the configuration of the instance |
Drop-down |
General settings |
||
Local station ID |
The fax identifier that will be sent to the remote device |
Alpha-numeric |
Header info |
The text string that will be included in the upper margin of each sent page |
Alpha-numeric |
Total simultaneous faxes |
Maximum number of faxes allowed in both directions |
Numeric |
ECM enabled |
Enable Error Correction Mode |
Checkbox |
Minimum rate |
Minimum transfer speed |
Numeric |
Maximum rate |
Maximum transfer speed |
Numeric |
Modem |
Standard supported modem |
Alpha-numeric |
Reception settings |
||
Enable reception |
Enable inbound faxes |
Checkbox |
Simultaneous inbound faxes |
Maximum number of inbound faxes allowed |
Numeric |
Transmission settings |
||
Enable sending |
Enable outbound faxes |
Checkbox |
Simultaneous outbound faxes |
Maximum number of outbound faxes allowed |
Numeric |
Outbound routing class |
The routing class used for outbound faxes |
Drop-down |
Maximum number of transmission attempts |
Maximum number of transmission attempts after which the FAX will be considered failed |
Numeric |
Re-transmission interval (minutes) |
The interval between a transmission attempt and the next |
Numeric |
MAIL2FAX settings |
||
Mail2Fax box |
Name of the mail2fax box |
Alpha-numeric |
Authentication method |
Authentication method with which the fax is saved and received |
Drop-down |
Authentication PIN |
PIN with which the fax is authenticated, inserted in the text of the mail |
Numeric |
Request message encryption |
Enable or disable message nercyption |
Drop-down |
Archival settings |
||
Path prefix |
The prefix that will precede the custom path of the archived file |
Drop-down |
Custom path |
The custom path to which the archived file will be saved |
Alpha-numeric |
Path suffix |
The suffix that will follow the custom path of the archived file |
Drop-down |
Separate inbound/outbound archival |
If and how to archive inbound and outbound documents separately |
Before the prefix / After the suffix |
Note
Always remember to select the outbound routing class.
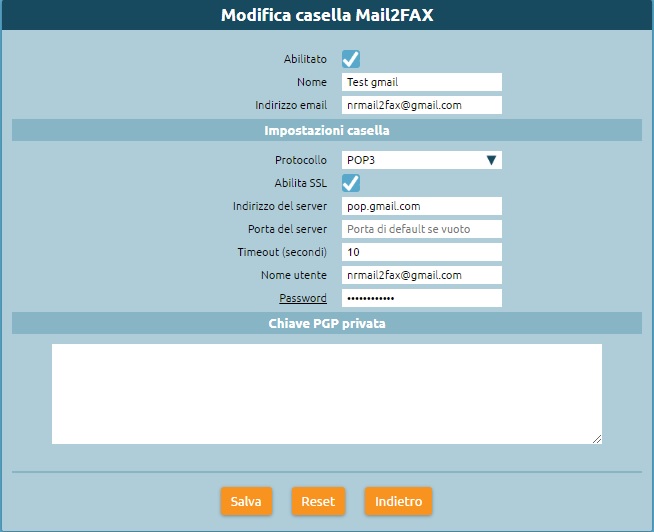
Mail2Fax
If you want to configure also the MAIL2FAX service you have to select from the panel FAX → FAX Instances, Mail2Fax boxes list and add a new Mail2Fax box.
Parameter |
Description |
Value |
|---|---|---|
Enabled |
Enable the Mail2FAX box |
Checkbox |
Name |
Name of the Mail2FAX box |
Alpha-numeric |
Email address |
Email address associated with the mailbox |
Alpha-numeric |
Box settings |
||
Protocol |
Protocol |
Drop-down |
Enable SSL |
Enable SSL |
Checkbox |
Server address |
Address of the mailbox server |
Alpha-numeric |
Server port |
Port number of the mailbox server |
Numeric |
Timeout |
Numeric |
|
Username |
Mail address of the user |
Alpha-numeric |
Password |
Password associated with the mail address of the user |
Alpha-numeric |
Private PGP key |
||
Insert only if sending encrypted faxes |
Save the settings and apply the changes.
Fax Register
Each user assigned send/receive permission on a FAX instance displays the FAX panel -> FAX Register
In this module, you can:
view the status of all received faxes and download the received file
view the status of all sent faxes and download the sent file and the sending report

Sending a fax
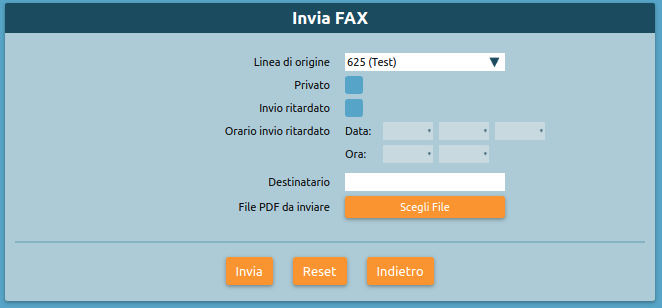
Each user with send permissions for one or more fax entities can view the Fax -> Send fax page.
Accedendo a questo pannello è possibile impostare le opzioni di invio del FAX:
From this page, you can set the options for sending faxes:
origin line (corresponds to the created entity)
time of sending if required (otherwise the fax will be sent immediately)
addressee
pdf file to be sent (pdf, doc, docx, odt are supported)
Selezionando Invia il fax viene inviato.
Click on Send fax to send the fax.
You will be notified via email for each sent fax with the report attached.
Sending MAIL2FAX
Each fax entity must have an associated Mail2Fax box. In the fax entity settings page, select the Mail2Fax settings:
Mail2FAX box: name of the previously created mailbox
- Authentication method:
None: the fax is sent and received only by checking the sender’s email address
PIN: the FAX request is also authenticated by a pin that must be inserted in the text of the email
PGP signature: the identity of the sender of the email is authenticated using a PGP key
Request message encryption: The email attachment must be encrypted using the sender’s PGP key; in this case, it is necessary to load PGP public keys in the settings of each user authorized to use the service.
To send FAXes through mail2fax service, the sender email must be one of the users enabled to use the service (NOTE: the sender email control is case-sensitive, like the one of the mailbox used to collect the fax request). Then, from the “Users and Roles” panel, you have to insert for the user who manages the fax instance, the email address from which the FAX mail is sent. Select “edit user” and enter the email in the proper field. It is important that the same email address is not present for more than one user (even those belonging to different tenants) to avoid that the email is not correctly sent and/or received.
It is now possible to send an email with the fax attached from the email box. The email must have:
in the “SUBJECT” field, the telephone number where to send the fax. It is also possible to insert the instance to which the fax should be sent by filling in the subject with PhoneNumber@istance
in the “TO” field, the address of the mail2fax box; the fax line used for sending is (unless it is explicitly specified in the SUBJECT field) the first one to which the mail2FAX box is associated
- in the “BODY” of the mail, any PIN associated with the FAX instance, if this authentication mode has been chosen.
The body of the mail (in text format only) must contain only the string “FAXPIN:12345” (where 12345 is the PIN assigned in this example).
The fax file (supported formats are pdf, doc, docx, odt) must be attached.
If the fax is successfully sent, the Fax module page will display the outcome of the transition and an email will be sent to the sender.
Receiving a fax
Each user receiving permission for a fax entity will receive an email notification with the document attached.
When the FAX is received, an email gets sent. It includes a pdf file of the received FAX as an attachment and, as a subject, a string formatted as follows:
Subject: [SERIAL NUMBER] FAX successfully received from 0XXXXXXXX where 0XXXXXXX is the calling number preceded by 0 of the commitment line.
The following line shows an example of email notification of a FAX sent from the phone number 0501234567.
Subject: [KPBX40299999] FAX successfully received from 050123456
where 0501234567 is the phone number from which comes the FAX.
We also show an example of the email body (containing more information):
FAX received from 0501234567
Date and time: 12/03/2020 11:51:38
Transmission time : 34 seconds
Number of pages: 1
The pdf file attached to the email has the following naming pattern:
F<0calling_number>_T<reached_number>_YYYY-MM-DD_HH_MM_SS_FAXID.pdf
The following line shows the potential name of the pdf file attached to the mail of the received fax.
F00501234567_T0509655637_2020-03-12_11_51_38_211.pdf
They can also view the status of all received faxes and download the document from the Fax module.
Kalliope Hotel
Note
This service is tied to optional licenses and is available from firmware version 4.9.4 onwards.
Description
The Kalliope Hotel module is an add-on of KalliopePBX, which can be activated through a special license. It offers a set of specific functions for hospitality. The functions included are:
Receptionist panel: this panel is used by the hotel receptionists for the ordinary management of the rooms and related services, including the occupancy status, the guest name, any notes and the next set of alarms. For each room, it is possible to access a detailed status panel, in which the room data can be viewed in detail and related operations can be carried out (activation of an alarm clock, check-in/check-out, setting the name of the main guest, etc.).
Check-in/check-out service: this service changes the occupancy status of a specific room from “free” to “occupied” and the other way around. The status change events are time-stamped and are used to generate the debits documentation report for calls made from the room telephone, according to the configured rates (available from firmware 4.9.6). Using the Enabling Classes mechanism, it is also possible to differentiate access to telephone services in each of the “free” and “busy” states of the room.
Alarm clock service: this service allows to generate a call at a predetermined time to the extension associated with a room; the response from the guest can be answering the call or by explicit confirmation before or after listening to the wake-up message; in case of no warranty, the system can repeat the ring several times, according to the configuration made for the service. The programming of the alarm can be done via web through the receptionist panel; for each room can be active more alarms, even at different times for each day.
Room cleaning service: this service allows the room to be marked as clean/dirty and to switch its status either from the Receptionist panel of the GUI or by telephone via a service code from the person who cleans the room. The cleaning status of all occupied rooms is automatically set to the value “dirty” during the night and can then be reset to “clean” in manual mode.
Configuration
The Hotel Module is configured in the “Hotel Module” “Configuration” panel. The visibility of the panel and its tabs is conditional on the activation of the License. The configuration panel has four tabs:
Room List
Rooms Template List
Default values of room templates
Global settings
Global settings
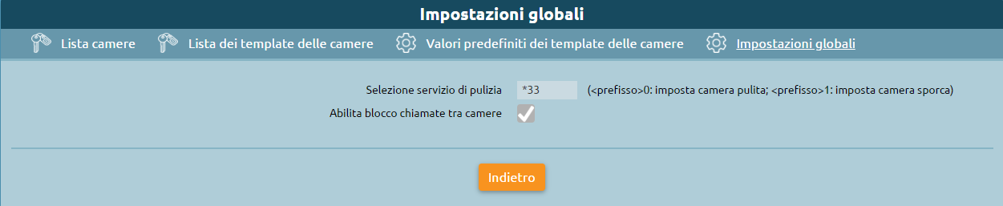
In this panel, you can set the prefix of the numerical selection that you need to type to set a clean/dirty room by telephone. From inside each room, it’s possible to call this prefix followed by the number 0 to mark the room as clean or by the number 1 to mark the room as dirty. For example, if the code *33 is configured as a prefix, it is sufficient to call *330 from the room telephone to mark the room as clean. When the service is enabled, the relative selection will be displayed in the numbering plan in read-only mode. The other option allows to enable or disable the blocking of direct calls between rooms. With the active block, it will not be possible to make direct calls from one room to another; the rooms will still be able to call the other extensions of the central unit (or be called by them) or other selections of the numbering plan.
Rooms configuration
The configuration of the rooms is carried out in a similar way to what is done for the configuration of standard extensions. Also, there is a configuration mechanism based on templates to manage the settings common to multiple rooms and a panel in which to specify the default values that will be used each time a new room template is created. The workflow involves first configuring the default values of the templates (creating one or more room templates) and finally making the actual rooms with their extension numbers. As for the standard extensions, it’s possible to assign one or more SIP accounts to those of the rooms and it can be used on one or more room extensions; unlike the extensions, there is no particular distinction for the SIP accounts used in the room extensions, so before proceeding to the creation of the rooms it is possible to create the necessary accounts through the usual SIP account management panel, in the “PBX” menu > “Extensions and Accounts”. As for the extensions, to facilitate the creation of many rooms, it is possible to use the massive import procedure by XLS/CSV file, using as a template the file available by clicking on the link “Massive import of rooms”.

Selecting “Add new room” it is possible to add a room to the list and configure it. As indicated above, rooms’ configuration follows the extensions’ configuration by replicating the principle of configuration using templates; the parameters available for the configuration of the rooms are a subset of those of the standard interiors. The configuration parameters of a room are:
Extension: the telephone number associated with the room;
Name: The name of the room. Not necessarily the same as the room number, it is listed along with the extension on the receptionist dashboard;
Add existing account / create account: allows you to associate one or more previously created SIP accounts with the extension, or to create one in line with the room configuration;
Extension template: indicates the template containing the default parameters to be used for the selected extension type. All the other attributes present in the panel import the default values but it is possible to overwrite them if necessary.

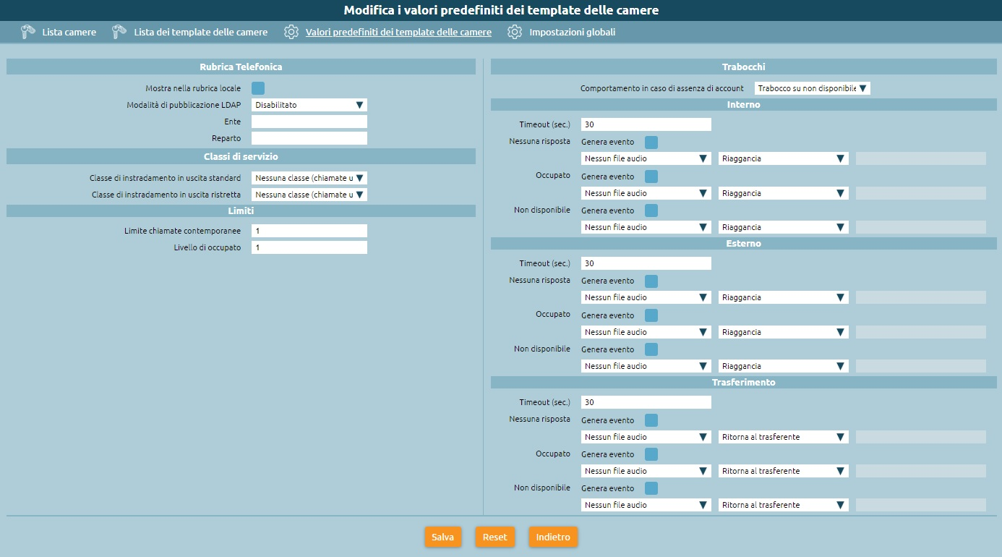
The following settings are a consequence of the assigned template (adjustable from the “List of Room Templates” panel, the same used for standard extensions templates) with the possibility of overriding each setting. When creating a new room template, default values are initialized to those specified in the “Default values of room templates” panel. The room configuration parameters that can be inherited from the template are:
Show in local phonebook: Enables or disables the display of the extension in the extension phonebook
Ldap publishing mode: Indicates how the extension is published in LDAP among the various options available, in a similar way as for extensions
Organization/Organizational unit: these two configuration attributes are used as filtering parameters within the Receptionist dashboard, where they are interpreted with the label “Building” and “Floor”
Standard/Restricted outbound routing class: as for extensions, these two classes define the type (and routing) of external calls allowed. When a room is in the “free” state (i.e. not occupied), the restricted class is assigned to it, while when it is in the “occupied” state (i.e. associated with a guest, after check-in), it is possible to select from the room management widget which of the two classes it uses. In this way, it is possible to prevent outgoing calls to the phones of the rooms, even if they are occupied, and eventually unblock them upon request of the guest
Calls limit/Busy level: identical to the same settings of the extension, they allow to define respectively the maximum number of simultaneous calls possible for the extension and the number of calls in progress on an extension upon reaching which this must be considered busy (and therefore any further attempt to call this extension will end with this result);
Failovers: as in the case of standard extensions, indicate how a call destined to the extension that ends with one of the three possible outcomes (not answered, busy, not available) should be handled for each of the three possible origins (internal, external or transfer to the extension).
Alarm clock service
The license of the Hotel module includes the enablement of the wake-up service. Before you can use the alarm clock service within the Hotel module, it is necessary to configure it in advance from the “PBX Applications” > “Alarm clock Service” panel. The alarm service allows setting one or more alarms for each room, in the form of date and time. At the scheduled time, KalliopePBX will make one or more calls to the room and optionally collect the confirmation of reception from the guest.
The general configuration of the service is done in the “Alarm Service Settings”; these include:
The explicit enabling of the service
The assignment of a Name (which will be used as Display Name for calls made by the service
The audio file to be played to the guest when they answer the wake-up service call
In addition to these necessary settings, there are other parameters with which to customize the way the service is used:
Number of call attempts: this is the maximum number of calls that PBX will make to the extension for each set alarm clock, if the guest doesn’t acknowledge the answer. By default, answering the call constitutes an answer confirmation, but you can request confirmation by typing a key before or after the alarm sound message is played
Timeout: is the time for which the destination extension is made to ring before considering the wake-up attempt failed. The system will repeat the call a maximum number of times equal to the value set in the previous step
Ask for confirmation answer: before playing the audio message, you must press key 1. Failure to press the key prevents the call from continuing; if you hang up, the alarm is considered “not confirmed” and a further call attempt (if there are any) is made by the control unit;
Ask for confirmation of listening: similar to the previous one, but at the end of the playing of the alarm message (in this case you are asked to press button 9)
At the end of the number of call attempts without confirmation (according to the configured modalities described above), the alarm will be “not answered” and a warning will appear in the dashboard of the receptionist for information purposes. These alerts can be acknowledged (and therefore deleted) by the receptionist after he has carried out the necessary actions (manual call to the room, etc.). The two tabs in the panel “List of wake-up calls” and “List of finished wake-up calls” contain the list of active and finished wake-up calls. The first panel contains those programmed in the future, currently active or finished without confirmation of reception; the second panel contains the list of completed alarms with answers or those not answered but manually taken over by the receptionist (following the cancellation of the alert on the receptionist panel). In both cases, for each alarm it is possible to visualize the complete list of events related to each call attempt with the relative timestamps.
Receptionist panel
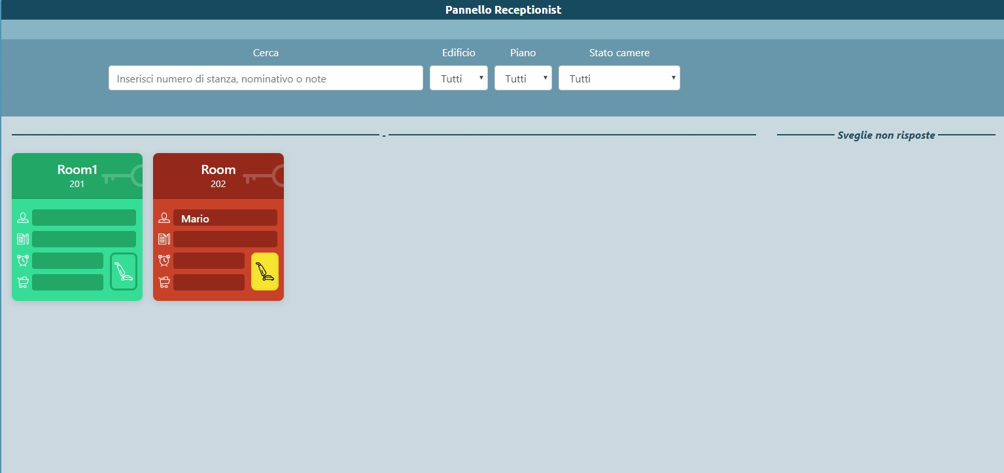
This panel collects all the rooms and is used by the hotel receptionists to manage the rooms and related services. It is divided into two parts: the column on the right that contains notifications for unanswered alarms from guests and the main area on the left, where all rooms are displayed in matrix form, grouped according to the attributes “building” and “floor” of location. The “no answer alarm” alerts appear automatically when all the call attempts associated with the alarm of a room end unsuccessfully; the alert shows the name and number of the room and the time at which the alarm was programmed. By clicking on the X inside the alert, it will be deleted; simultaneously, the corresponding alert will be moved from the panel of the active alerts to the panel of the terminated alerts (see the previous section on the alarm service). Each room configured in the central unit appears in the left section of the dashboard as a widget (or box); the color of the widget indicates the room occupation status: a “green” room is free while a guest occupies a “red” room. In the latter case, the four text fields inside the room box indicate in order:
The name of the guest(s)
Any notes associated with the room
The first scheduled alarm clock for that room
The total cost of the calls made by the room from the time of check-in to the current time (available starting with Firmware 4.9.6).
The top bar allows you to apply real-time filtering in the room view based on:
Building and/or floor
Cleanliness status
Free text matching on the “guest names” and “notes” fields of the room
Finally, inside the widget, there is a button with a vacuum cleaner icon: this button has the dual function of indicating and being able to switch the cleaning status of the room
In the case of a dirty room, the button is on (yellow). By clicking on the button the receptionist can switch the status from “dirty” to “clean” and vice versa. The cleaning status of the rooms is updated every 10 seconds, any change in the status via telephone code from the room is reflected in real time on the status displayed on the panel.
Clicking inside the widget of a room, you can enter the detail status panel, where you can perform check-in and check-out operations and view room data more broadly.
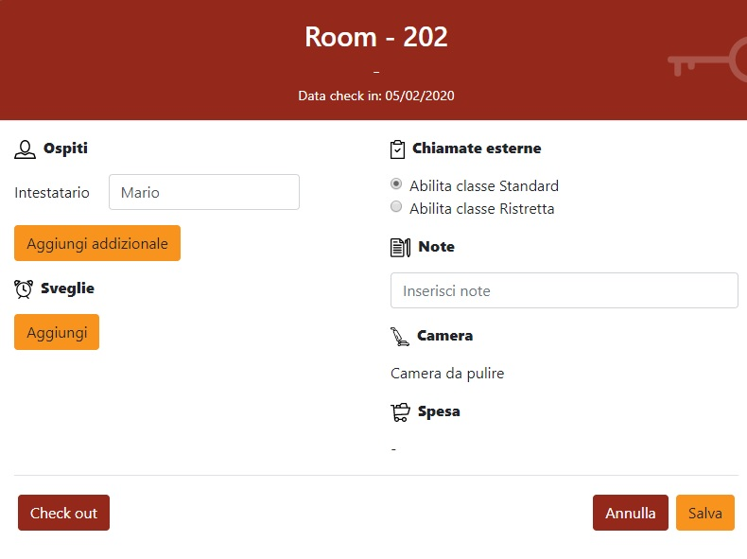
Selecting a free room, it is possible to check-in by clicking on the button with the same name. During check-in, it is necessary to indicate the name of at least one guest in the room, but it is also possible to add the names of additional guests, and any textual notes. Together with the check-in, it is possible to choose the two enabling classes (to external calls) to attribute to the room. This setting is editable afterward, going back to the detail panel of the room.
During the check-in operation, it is possible to enter the following data associated with the room:
Owner (required): name of the person to whom the room is registered. Additional guests can be added by selecting “Add Additional”. When filtering the rooms from the dashboard, the free text search operates on all the names entered
Alarms: date and time to set the room alarm if the owner requested it. You may add one or more alarms by selecting “Add”. This service can only be set by the operator
External calls: enable external calls from rooms with standard or restricted class. This service generates of a detailed reporter of the calls made from a room phone since the moment of check-in, including the cost calculated from the duration according to a specific rate configurable.
Notes: free text, allows you to enter reminders. When filtering rooms from the dashboard, the free text search also operates on the content of this field.
Once the configuration is completed, clicking on “Save” the check-in is performed (the widget changes from green to red), and the relative timestamp is associated with the room to calculate the calls competence. In addition to these settings, in the detail panel of the room, it is possible to see the cleaning status of the room and (from firmware 4.9.6) the cumulative count of the cost of the calls made from inside the room from the check-in moment until the current moment. If you select an occupied room, you can click on the “Check out” button to perform the corresponding action (after confirmation), after which the room status returns to available (“free”).
Reservation History List
In this panel it is possible to view the history of reservations for each room, displaying the date and time of check-in and check-out, the name of guests, and any notes. For each room, it is also possible to download the XLSX report with the list of calls made by the guests of the specific room within the period of occupancy. The panel contains both the current occupations (the check-out timestamp is empty) and the past ones. The guest information and notes present at the check-out time are saved in the reservation history.

Documentation of debits (Billing Service)
The Debit Documentation service present on KalliopePBX (currently available as a component included in the Hotel Module license), allows the calculation of the costs of calls made from each extension associated with a room, through the definition of a cost profile that can be differentiated according to the destination (with a specific prefix, exact numbers, all other numbers) and the outgoing line used. Learn more through this page:
Kalliope LAM
Note
This service is tied to optional licenses and is available starting with firmware version 4.11.X and subsequent updates.
Description
alliope LAM Module is an add-on of KalliopePBX. You can get it by a speciific license that offers a set of functions to support the business continuity of a company, regardless of the location of its employees and customers. KalliopeLAM allows you to organize virtual meetings in a physical meeting room just as you would. Based on an open-source engine and entirely in the cloud, it is a web-based platform (click and go), meeting participants access the meeting through their web browser by clicking on the link contained in the invitation email. The mobile app version for Android and iOS operating systems is also available and can be downloaded for free from Google Play and the App Store. For more information:
Configuration
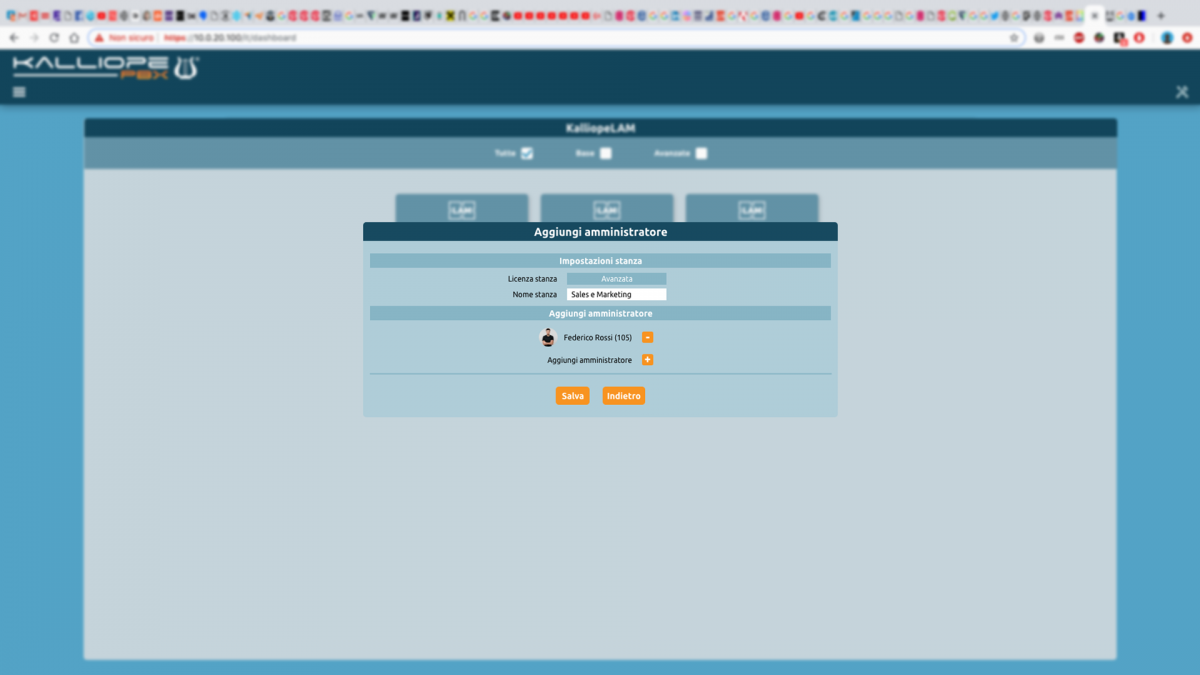
The management of the KalliopeLAM platform by users, for the creation of events or the assignment of permissions, is fully integrated into the web interface of the PBX. The KalliopeLAM solution is not licensed for users but for rooms, each license enables a videoconference room, a real virtual meeting room for which it will be possible:
Give the room a specific name
Define the ownership of the room: assign its use to one or more users. There is no limit to the number of administrators for each room, as long as they are internal to the PBX. The user who has management permissions for the entire KalliopeLAM service has a complete overview of the virtual meeting rooms; he can choose a room.
The user can:
Access the “meeting schedule calendar” for a particular room and choose to schedule a meeting
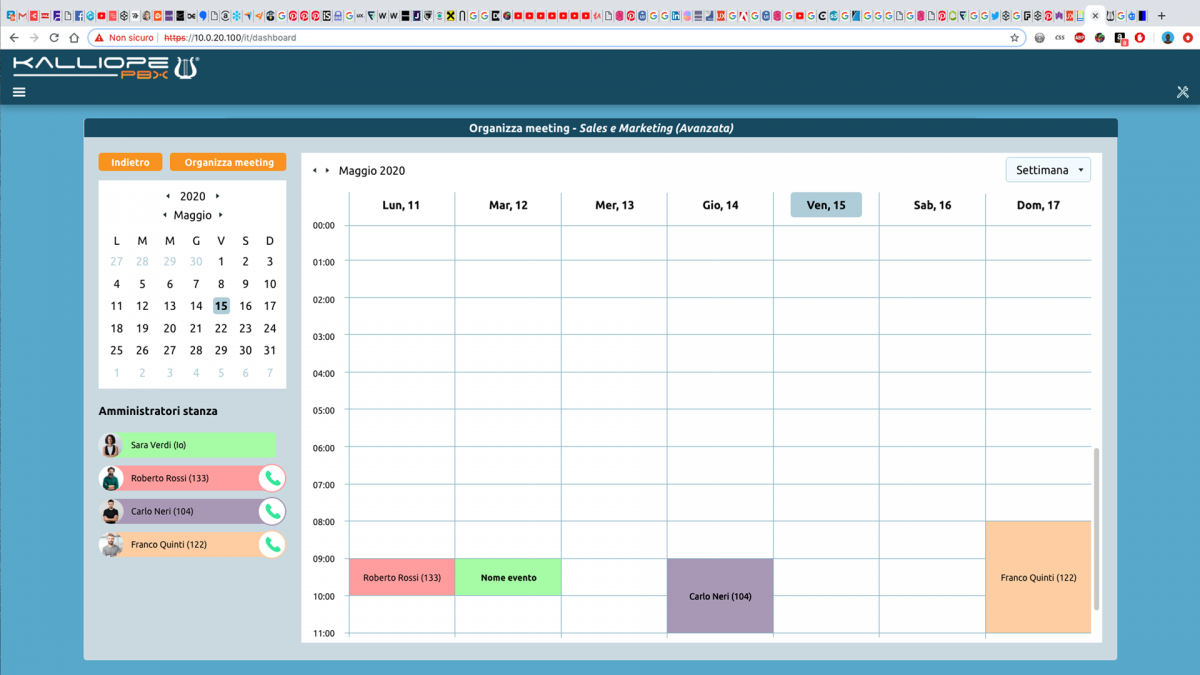
Create a new meeting by entering the following fields: meeting name, time, login password (optional), list of attendees
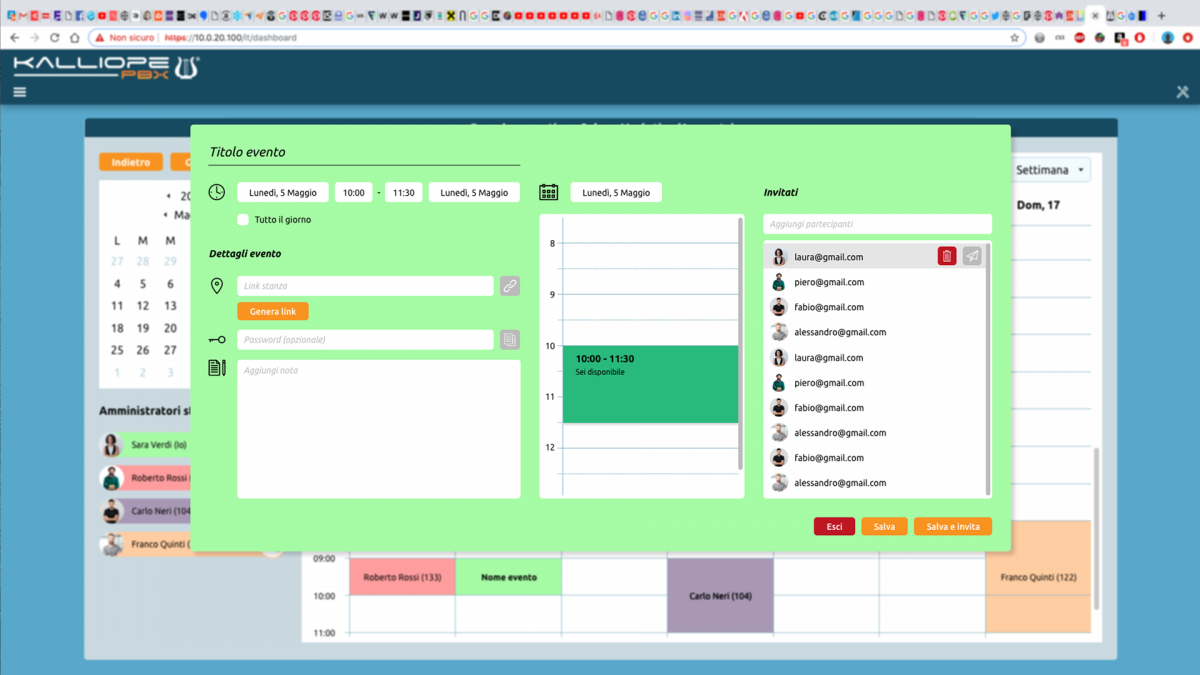
Send invitations and calendars to all participants of a meeting by clicking the “Save and Send” button
Main features
Webconference
Meeting protection with password
Waiting-room
Desktop sharing
Chat
Raise a hand
Partner statistics
YouTube video sharing
Protecting the privacy of your meetings
Several mechanisms have been implemented to ensure the privacy and protection of your meetings on the KalliopeLAM platform.
New videoconference instances for each new meeting: the different istances will be valid only in the period indicated for the booking, start and end of the meeting. These instances (represented in the meeting sharing URL) consist of 42 alphanumeric characters, and in the case of a moderator invitation, there will be an additional 493-character token at the end of the URL
Waiting room enabled by default: the moderator is notified that a guest has requested to enter and can decide to accept or not. The moderator can disable the waiting room on a metting-by-meeting basis.
Definition of password protection for access to the meeting : The password can be defined in two different moments: either during the scheduling of the meeting and during the conference itself
If the moderator leaves the meeting, guests are disconnected
The moderator can elect other users as “moderator”