Kalliope Administration Guide
Basic concepts
Basic Features
SIPv2 (UDP, TCP, TLS, and WebSocket; RTP and SRTP)
Supported audio codecs (with transcoding): G.711 (A.law, u.law), G.726, GSM, G.722 (wideband), G.729, Opus
Supported video codecs (passthrough, no transcoding): VP8 H.264, H.263+, H.263, H.261
Fax support (audio or T.38 passthrough)
Busy Lamp Field
ENUM support
Access control list for extensions (ACL)
SNMP (v1/v2c) read access support (Net-SNMP daemon)
LDAP support (both client and server)
Extensions and SIP accounts
Extensions are the primary telephone entities. An extension is a logical entity identified by its number, which is used as the identifier for all calls made by the extension and is the number dialed by other users who wish to contact the extension. Each extension has a number of attributes that define its permissions (for outgoing calls from the extension) and behavior (for incoming calls to the extension), as well as a few identity records (first and last name of the person to whom the extension is assigned, its organizational unit, and so on).
SIP accounts are “service” entities. They are the credentials (username and secret) that need to be configured on a SIP terminal (hardphone or softphone) so that it can authenticate to the PBX. Authentication is performed by the devices with two procedures: “SIP registration” and the execution of a new call.
The relationship between extensions and SIP accounts is one-to-many: each extension can be linked to multiple SIP accounts, which all behave as the same telephone entity in terms of identity, presentation, permissions, etc.
It is also possible to create a unique user for each extension; different permissions and roles can be granted to these users, in order to allow them to access their personal web page, perform some administrative or configuration tasks, use the KalliopeCTI applications (desktop or mobile), and invoke the available REST APIs. Please see the users and roles page for more details.
SIP registration and multiple devices per extension
SIP registration informs the PBX of the current location of a SIP account, i.e. the IP address and port (plus the protocol, e.g. UDP, TCP, TLS, or WebSocket) where the SIP account can be reached when the PBX needs to send it a message (e.g. an INVITE related to an incoming call). Registration is performed by the device at boot time (if the account is correctly configured) and then refreshed periodically before its validity expires; each periodic registration requires the repetition of the authentication procedure. The lifetime of the registration is established during the registration procedure itself. The device inserts a “Proposed Expiry” value (in seconds, usually defaults to 3600) in its REGISTER request; upon successful authentication, the PBX responds with a “200 OK” message that notifies the actual registration lifetime to the device, which must then send a new registration before the timeout expires (usually this new registration is performed at about half time, to allow for re-transmission in case of failures). If the registration timeout expires without the reception of a registration refresh, then the location of the account is discarded by the PBX and the calls destined to that account will fail due to it being “unavailable”.
KalliopePBX stores a single location for each configured SIP account; if the same SIP account is configured on multiple devices, all active at the same time, the periodic registration messages from each continuously change the location stored in KalliopePBX. A call to the SIP account is therefore presented only to the device that registered last. It is however possible to have multiple devices which behave as a single extension by defining one SIP account for each of the desired devices, and linking all these SIP accounts to the same extension.
Extension attributes and templates
Each extension has its own set of attributes that describe its identity and behavior. Some of these attributes are specific to each device and have to be individually configured, while others can be common to all or a subset of extensions. The former include the extension number itself (which must be unique within the PBX, or within each tenant for a multi-tenant PBX) as well as personal details such as first and last name, email address, and the personal PIN code used for authentication when accessing certain PBX services. The latter include call limits and permissions, and the failover actions to be executed on a failed call to the extension, based on the origin of the call and the cause of failure.
To ease the management of these common attributes, KalliopePBX introduces the concept of an extension template: a collection of attributes and settings that can be assigned to multiple extensions. Defining multiple templates (with different settings based on the extension type) reduces the number of settings that need to be specified for each single extension and helps quickly edit the same setting for all the extensions that share the same template simply by changing the value of the setting in the corresponding template.
In the configuration panel of each extension, it is possible to override any setting inherited from the associated template if a specific exception is needed. The overridden settings are not affected by changes to the template.
SIP account attributes
As with extensions, SIP accounts have some specific attributes (mainly the username, which must be unique within the PBX, and the SIP secret), while others may be common to a “class” of accounts. These include supported transport protocols, media, or codecs, the authorized ACL, and others; similarly to extensions, SIP account templates can be used to define classes of SIP accounts with common settings.
Extensions configuration
The extensions page contains the attributes of each KalliopePBX user. The main attribute that identifies each user is the telephone extension. If multiple devices (Accounts) are linked to the same user, these will share the telephone identity defined on this page. This means that, for example, all calls to an extension will be presented to all devices linked to the user, and all calls made from any of these devices will be made under the same telephone identity.
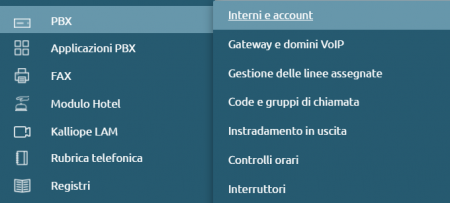
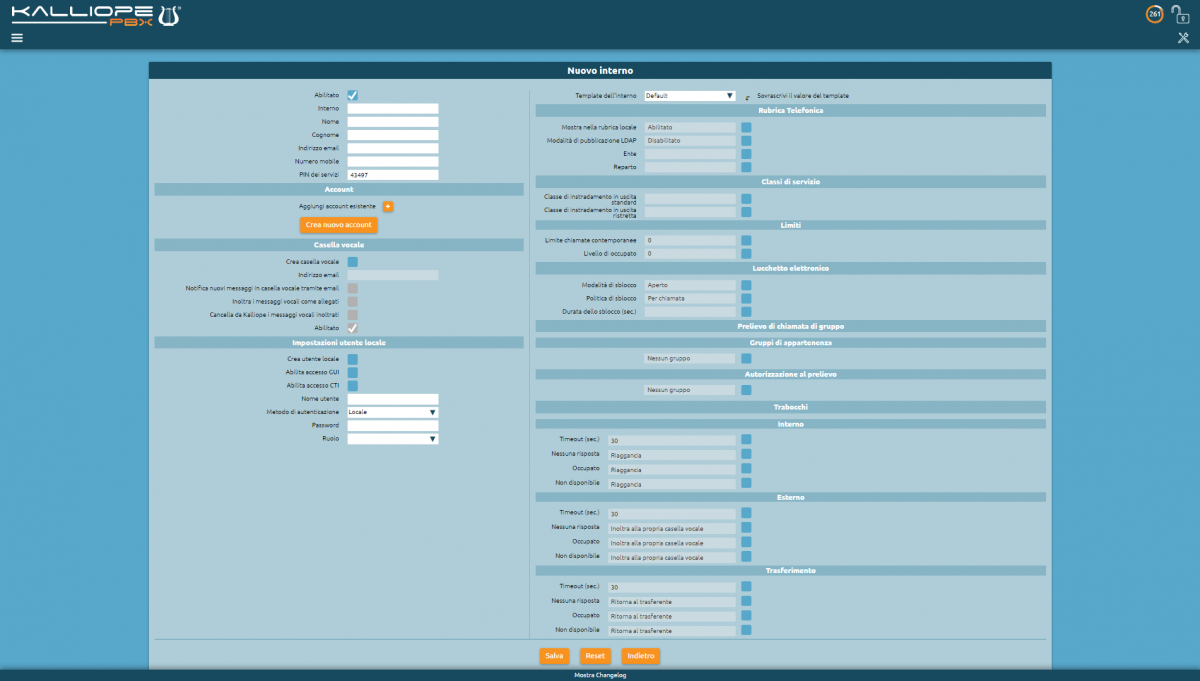
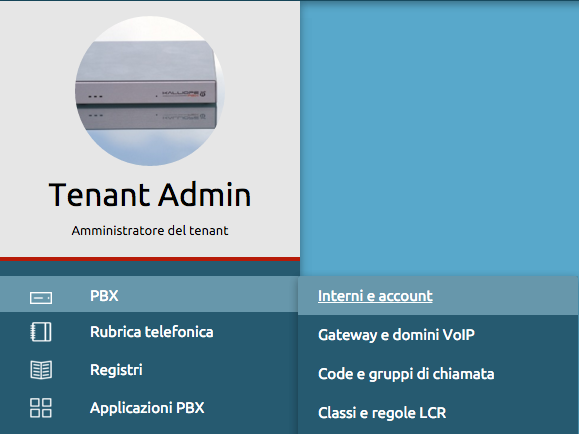
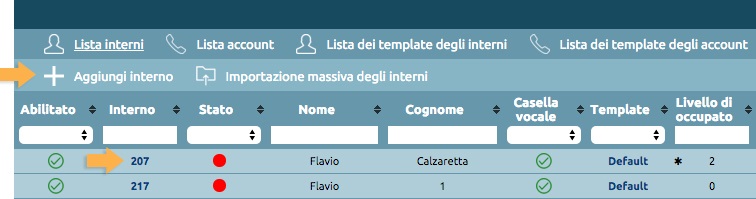
To configure extensions just open the operating menu and click on PBX > Extensions and Accounts. To create a new extension proceed by clicking on “Add new extension”.
Enabled: Lets you disable an extension without losing its configuration.
Extension: The internal phone number linked to the user.
Name: Part of the name displayed to other users and shown in the phonebook.
Last name: Part of the name displayed to other users and shown in the phonebook.
Email address: Displayed in the phonebook.
Mobile number: Displayed in the phonebook and used for Fork2Mobile and FastTransfer services.
Service PIN: The code needed to access telephone services that require authentication (voicemail, switches, paging, electronic lock).
Account
Parameter |
Description |
Value |
|---|---|---|
Add existing account |
Lets you link an existing SIP account to the extension |
Account |
Create account |
Lets you create a new SIP account to link to the extension |
Account |
Voicemail
Parameter |
Description |
Value |
|---|---|---|
Create voicemail box |
Lets you create a voicemail box for the account |
Yes / No |
Email address |
The address to which new message notifications are sent (optionally with audio file attached) |
|
Email notifications for new messages in voicemail box |
If this option is enabled, the user will receive email notifications for new voicemail messages. |
Yes / No |
Forward audio messages as attachments |
If this option is enabled, audio files containing recorded messages will be sent as email attachments |
Yes / No |
Delete forwarded messages from Kalliope |
If this option is enabled, forwarded messages will be deleted from KalliopePBX once the email is sent and will no longer be accessible from the phone and the KalliopeCTI mobile app |
Yes / No |
Enabled |
Lets you enable and disable voicemail without losing its settings and recorded messages |
Yes / No |
Local user settings
Parameter |
Description |
Value |
|---|---|---|
Create local user |
Lets you create a local user for KalliopePBX in order to enable GUI or CTI access |
Yes / No |
Enable GUI access |
Allows the user to access the web GUI as a standard tenant user. The role of the user can be changed on the users management page |
Yes / No |
Enable CTI access |
Allows the user to use the KalliopeCTI clients. In order to use KalliopeCTI Pro or Phone, you will need to add the license from the users management page |
Yes / No |
Username |
Username used for logging into the GUI or KalliopeCTI |
Alphanumeric |
Password |
Password used for logging into the GUI or KalliopeCTI |
Alphanumeric |
Template
Parameter |
Description |
Value |
|---|---|---|
Extension template |
The template that contains the default parameters to use for the selected extension type. All attributes on the page will be changed to the default values, but it is possible to overwrite them if necessary |
Extension template |
Phonebook
Parameter |
Description |
Value |
|---|---|---|
Show in local phonebook |
Choose whether or not the extension is shown in the local phonebook |
Yes / No |
LDAP publishing mode |
How the extension is published to LDAP, among the available options. The general LDAP publishing rule is set in the LDAP settings page |
Disabled / LDAP publishing rule / Show the number below / LDAP publishing rule applied to the extension below |
Custom LDAP extension |
Extension to which the LDAP publishing rule is applied. This field will only be shown if the option LDAP publishing rule applied to the extension below is selected |
Numeric |
Custom LDAP number |
Phone number linked to the user in the LDAP phonebook. This field will only be shown if the option Show the number below is selected |
Numeric |
Organization |
Used when publishing the phonebook (corresponds to the organization attribute when publishing to LDAP) |
Alphanumeric |
Department |
Used when publishing the phonebook (corresponds to the organizationUnit attribute when publishing to LDAP) |
Alphanumeric |
Service classes
Parameter |
Description |
Value |
|---|---|---|
Standard outbound routing class |
The routing class applied to the user when the electronic lock is disabled. If the unlock mode is set to Open, this will be the class applied to all calls |
Outbound routing class |
Restricted outbound routing class |
The routing class applied to the user when the electronic lock is enabled. If the unlock mode is set to Open, this will never be applied |
Outbound routing class |
Limits
Parameter |
Description |
Value |
|---|---|---|
Concurrent call limit |
The maximum number of allowed concurrent inbound and outbound calls on all accounts linked to the extension. Setting this limit to 1 will prevent the extension from accessing services such as attended transfer as the call on hold waiting to be transferred will still be considered active |
Numeric (0 = no limit) |
Busy level |
The number of calls on all accounts linked to the extension after which the user is considered busy (the PBX will not present the call to the user’s devices and answer with a 486 Busy Here SIP Message). Setting this limit to 1 for a single account will prevent inbound call notifications even if call waiting is enabled on the device |
Numeric (0 = no limit) |
Electronic Lock
Parameter |
Description |
Value |
|---|---|---|
Unlock mode |
The unlock mode for the extension. Open –> The electronic lock is always disabled. Code –> Code – The electronic lock can be disabled with the unlock code specified in the numbering plan. Password -> The electronic lock can be disabled with the unlock code followed by the service PIN for the extension. |
Open / Code / Password |
Unlock policy |
The unlock policy for the extension. Per call –> The lock must be disabled before making each call. Automatically block after the number of minutes below –> The lock will be automatically enabled after the specified duration. Automatically block after the number of minutes below –> Once the lock is disabled, it will remain so until enabled again by the user. |
Per call / Automatically block after the number of minutes below / Unlocked until locked by the user |
Unlock duration (sec.) |
Length of time during which the lock is disabled. Only applicable if the unlock policy is Automatically block after the number of minutes below. |
Numeric |
Group call pickup
Parameter |
Description |
Value |
|---|---|---|
Group membership |
List of groups that this extension belongs to (calls to this extension can be picked up by any extension authorized to pick up calls from one of these groups). |
Pickup groups |
Pick up authorization |
List of groups from which this extension is authorized to pick up calls (the extension can pick up calls to any extension that belongs to one of these groups) |
Pickup groups |
Failover
Parameter |
Description |
Value |
|---|---|---|
Extension |
Failover action on calls from an extension (including remote extensions) |
|
External |
Failover action on calls coming from external numbers |
|
Transfer |
Failover action on call transfers |
|
Timeout (sec.) |
Length of time after which the failover action will be executed in case of no answer |
Numeric |
No answer |
A call is considered not answered after the timeout time has passed. |
Hang up / Custom selection / Ask for selection / External number / Extension / Group / Queue / Checktime / IVR / Voicemail / MeetMe room |
Occupied |
The extension is considered occupied if it has reached the Busy Level set for the extension or if the terminal sends a 486 Busy Here SIP Response |
Hang up / Custom selection / Ask for selection / External number / Extension / Group / Queue / Checktime / IVR / Voicemail / MeetMe room |
Not available |
The extension is considered not available if the terminal is not registered, unreachable at an IP level, or if the terminal sends a 480 Temporarily Unavailable SIP Response |
Hang up / Custom selection / Ask for selection / External number / Extension / Group / Queue / Checktime / IVR / Voicemail / MeetMe room |
Account configuration
In the Account panel are defined the SIP credentials that can be used by a device to register and make/receive calls through the KalliopePBX. To these credentials are associated attributes to increase security and changes in the behavior of the KalliopePBX in terms of signaling and audio streams to be associated to a specific device. These attributes are defined at account level and not at extension level because two accounts associated to the same extension but to different devices may have different requirements.
Example: I can associate to an extension an account used on a physical phone and one used on a softphone. While for the physical phone I can use codecs with higher bandwidth consumption e.g. G711a for the softphone that is used for example in teleworking I can choose to use codecs such as G729 that optimize the use of bandwidth.
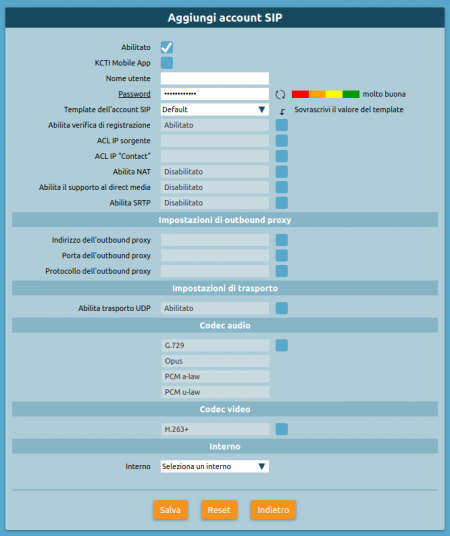
To configure accounts just open the operating menu and click on PBX > Extensions and Accounts. To create a new account, click on “Accounts” in the top bar and then on “Add SIP Account”.
Enabled: Lets you disable an account without losing its configuration.
KCTI Mobile App: Lets this account be used with the KalliopeCTI mobile app, enabling push message sending for call signaling.
Username: The username used for the SIP authentication of the device.
Password: The password used for the SIP authentication of the device.
Account template: The template that contains the default parameters to use for the selected account.
Enable registration verification: When this setting is enabled, KalliopePBX will verify that the call setup request (SIP INVITE) comes from the same IP port as the registration request (SIP REGISTER).
Enabled address: The IP address or subnet from which KalliopePBX accepts registration and call setup requests.
Enabled subnet mask: Completes the ACL information on base IP for registration and call setup request.
Enable NAT: When this setting is enabled, KalliopePBX will ignore IP addresses in the SIP and SDP headers and always answer from the IP address and port from which it received the request. This setting must be enabled only for devices that are one NAT behind KalliopePBX and do not solve the NAT traversal issue (through STUN / ICE / ALG SIP).
Enable direct media: This setting lets you establish audio flows between two PBXs in direct visibility conditions (with no NAT). If this setting is enabled, services that require RTP flow monitoring (e.g. call recording, call transfer and parking with KalliopePBX service codes) will be disabled.
Enable SRTP: This option lets you enable RTP encryption support. Since keys are exchanged within SIP / SDP messages in plaintext, it is best to use SRTP along with signaling encryption through TLS.
Outbound proxy settings
Parameter |
Description |
Value |
|---|---|---|
Outbound proxy address |
Lets you set the IP address/hostname of the outbound proxy |
Alphanumeric |
Outbound proxy port |
Lets you set the port of the outbound proxy |
Numeric |
Outbound proxy protocol |
Lets you set the protocol used to communicate with the outbound proxy. You can only set protocols that have been enabled in the SIP settings |
UDP / TCP / TLS / WS / WSS |
Transport settings
Parameter |
Description |
Value |
|---|---|---|
Enable UDP transport |
Lets you enable the UDP transport protocol for SIP signaling. This setting is not available if UDP transport is not enabled in the SIP settings |
Yes / No |
Enable TCP transport |
Lets you enable the TCP transport protocol for SIP signaling. This setting is not available if TCP transport is not enabled in the SIP settings |
Yes / No |
Enable TLS transport |
Lets you enable the TLS transport protocol for SIP signaling. This setting is not available if TLS transport is not enabled in the SIP settings |
Yes / No |
Enable WebSocket transport |
Lets you enable the WebSocket (HTTP) transport protocol for SIP signaling. This setting is not available if WebSocket (HTTP) transport is not enabled in the SIP settings |
Yes / No |
Enable secure WebSocket transport |
Lets you enable the secure WebSocket (HTTPS) transport protocol for SIP signaling. This setting is not available if secure WebSocket (HTTPS) transport is not enabled in the SIP settings |
Yes / No |
Audio codec
Parameter |
Description |
Value |
|---|---|---|
Add codec |
This section lets you select and organize the audio codecs usable by the account (which will be inserted into the SDP media description) |
PCM a-law / G.722 / G.726 / G.729 / GSM / Opus / PCM u-law |
Video codec
Parameter |
Description |
Value |
|---|---|---|
Add codec |
This section lets you select and organize the video codecs usable by the account (which will be inserted in the SDP media description) |
H.261 / H.263 / H.263+ / H.264 /VP8 |
Extension
Parameter |
Description |
Value |
|---|---|---|
Extension |
The extension to which the SIP account is linked |
Extension |
Licenses
The license page has three sections: Kalliope licenses, Retrieve licenses from the server and G729 licenses.
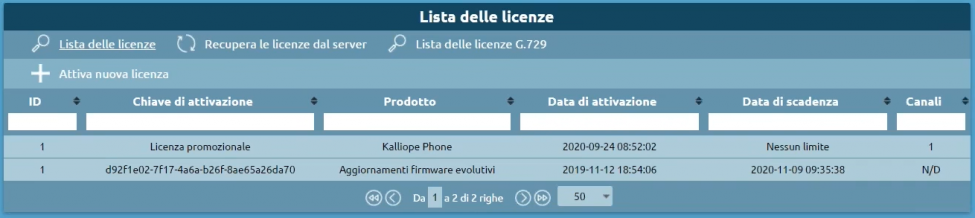
List of licenses
This section shows a list of already activated licenses with the following information:
ID
Activation key
Product
Activation date
Expiration date
Channels
By clicking on Activate new license you can access a page where you can insert a valid activation key.
In this section you can add licenses for: Kalliope Multi-Tenant, KalliopeCTI Pro, KalliopeCTI Phone, Kalliope Attendant Console CTI, Kalliope Attendant Console Phone, Kalliope Call Center, Upgrade Mini to Lite.
Retrieve licenses from the server
Here you can view which licenses have been previously activated on a given serial. This section is divided into:
Product licenses updated on the server
Product licenses that can be imported automatically
Product licenses that can be imported manually
List of G729 licenses
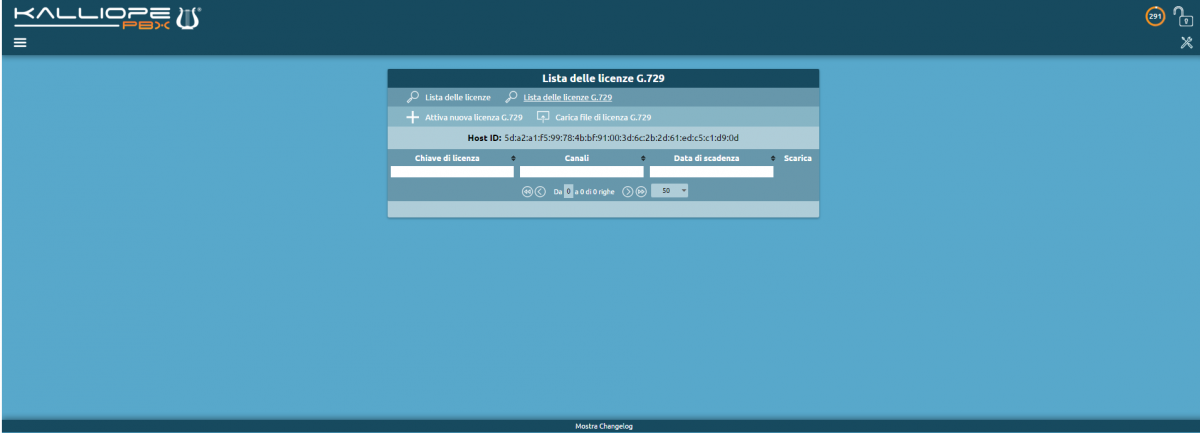
Similarly, the G729 licenses section shows a list of already activated licenses with the following information:
License key
Channels
Expiration date
Download
By clicking on Activate new G729 license you can access a three-step activation procedure:
Insert G729 activation key
Accept the terms and conditions
Insert personal information
Once you have provided the required information, you can click on Activate to complete the process.
Outbound and inbound lines
“Outbound and inbound lines” are all the SIP lines through which the PBX can make and receive calls to and from external numbers, i.e. not an internal service or extension (local SIP account).
Calls to external numbers
Calls to external numbers are not forwarded directly to the outbound lines, but are presented to the outbound routing engine. This engine decides whether the calling user/entity is authorized to perform the call (based on the destination number) and which outbound lines can be used.
Calls can reach the outbound routing engine from the numbering plan or directly as a failover action of a previous destination (e.g. an incoming call to an extension can be forwarded to an external number in case of no answer). In both cases, the requested outbound call has two associated parameters: the outbound identity and the outbound routing class.
Outbound identity
The outbound identity is the extension number used to derive the CLID for outbound calls (according to the corresponding calling number manipulation table). The Outbound Identity can be explicitly set for failover actions, while it is automatically assigned for call smade from a SIP account or for transferred/forwarded calls:
Calls made by a SIP account: the outbound identity is set to the extension linked to the SIP Account.
Calls forwarded by a device (telephone-driven call forwarding): same as above.
Calls forwarded using the KalliopePBX (unconditional) call forwarding service: the outbound identity is set to the forwarding extension number.
Transferred calls (using KalliopePBX star-codes or telephone functions): the outbound identity is set equal to the transferring extension number.
In all these cases, if the caller requests to present itself as anonymous (according to the different CLIR supported methods), the outbound identity retains the extension number throughout all the lifetime of the call, and the actual calling number restriction is performed when placing the call to the outbound line (or to the destination SIP accounts for local calls).
Outbound routing class
The outbound routing class defines the actual handling of the call, i.e. whether or not it is allowed, and if so the sequence of outbound lines to be used to perform the call.
Except when explicitly set by a failover action, the choice of outbound routing class is automatically derived from the outbound identity.
Configuration
Lines can be configured in the VoIP Gateways and Domains panel.
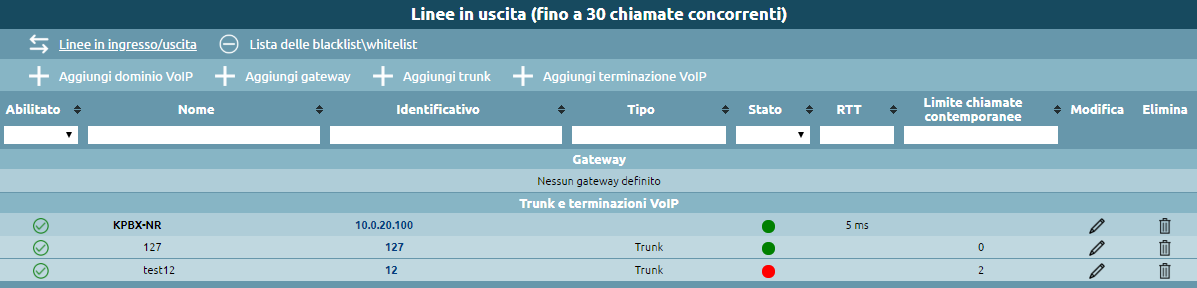
The “Gateways and VoIP Domains” screen collects the configuration of all input/output lines from the PBX.
KalliopePBX supports both physical gateways (which interconnect the internal telephone network to analog, ASDN, or GSM lines) and VoIP terminations and trunks, using the standard SIP protocol.
It is also possible to configure multiple gateways and VoIP terminations or trunks simultaneously. Through this page you can:
The difference between VoIP terminations and trunks is due to the fact that with the former every registration/authentication account corresponds to a single phone number, while with the latter it is possible to use a range of numbers with the same authentication credentials, which usually share a common root.
Note
To create a VoIP termination or trunk, it is necessary to first create a VoIP domain to link it to.
The following table shows the columns in the list of outbound lines.
Column |
Description |
Value |
|---|---|---|
Enabled |
Shows whether the outbound line is enabled or disabled |
Enabled / Disabled |
Name |
The name assigned to the line |
|
Identifier |
Unique identifier assigned to the line. For VoIP terminations or trunks, this is the username for authentication |
|
Type |
If it is not a physical gateway, this specifies the type of line |
Trunk / VoIP terminal |
State |
For physical gateways with inbound registration disabled the reachable/unreachable state shows whether or not the peer responds to SIP OPTIONS messages. If registration is enabled, it shows whether or not registration was completed successfully on the part of the gateway. For VoIP domains the reachable/unreachable state shows whether or not the peer responds to SIP OPTIONS messages. For VoIP terminations and trunks with remote registration enabled the reachable/unreachable state shows whether or not the registration was successful. If remote registration is disabled, the static state is shown. The suspended state will only be shown if an element has been added but not yet configured. |
Reachable / Unreachable / Suspended / Static |
RTT |
Round-Trip Time of a SIP packet between PBX and gateway or PBX and VoIP domain/server of the operator. |
Value in ms |
Show |
Visible if lock has NOT been acquired. Clicking the icon will show the line settings in read-only mode |
Magnification icon |
Edit |
Visible only if lock has been acquired. Clicking the icon will open the line modification page |
Pencil icon |
Delete |
Visible only if lock has been acquired. Clicking the icon will delete the line |
Trash icon |
Users and roles
Users
Access to the KalliopePBX GUI (as well as CTI services, LDAP phonebook, etc.) is granted to users. There are two kinds of users: built-in and custom users. Built-in users include administrative and service users, whose roles are usually predefined and not modifiable, whereas custom users are additional users that can be created and assigned to custom roles.
Each user has one or more associated access permissions among GUI, CTI, and API.
GUI: GUI access means that the user can log into the KalliopePBX web interface; GUI access also grants the user permission to access the integrated LDAP server.
CTI: CTI access allows the users to use Kalliope applications (CTI, Logger, Supervisor Panel) which connect to the PBX using the CTI socket and protocol.
API: API access allows the users to invoke the KalliopePBX REST APIs available at http[s]://<PBX IP>/rest/ (see REST API).
Built-in users
The first example of the built-in user is admin (whose default password is “admin”), used to access the GUI after the first firmware installation. This is the primary technical figure and is commonly used to perform the system configuration. Additional users may have the rights to perform configuration tasks, but they can be limited to specific GUI panels only, according to their granted Role.
The following table lists the built-in users along with their access permissions. (Note: (+) means that this access permission is assigned and cannot be revoked; (-) indicates that the consent can be granted or not.)
Username |
Access permissions |
Notes |
|---|---|---|
admin |
GUI (+), CTI (+), API (+) |
This is the main technical user. They have full privileges on PBX configuration both for system (network, network services) and telephony (entities, services, etc.). They have full access to logs and records, but they have some limitations regarding aspects related to the privacy of the users. Firstly, they cannot see the external telephone numbers in the CDR in full, but are only able to view them with last three digits replaced by “xxx”; secondly, the “admin” user does not have access to Call Recording configuration and files, which is limited to “privacyadmin” user (and delegated users). |
privacyadmin |
GUI (-), API (-) |
This user has full access to the external telephone numbers of the CDR, and is the only one who can configure call recording authorization. They can also access call recording records, download and listen to the recorded calls, as well as grant other users “privacy” permissions, which gives them access to full numbers in CDR and to the list of recorded calls and the corresponding files. |
phonebook |
GUI (-), API (-) |
This user has read access to the KalliopePBX phonebook. It has to be explicitly enabled from the “System Settings” -> “Users Management” panel, assigning it a password and the required access permissions. N.B.: GUI permission also grants the right to access the integrated LDAP server, where the KalliopePBX phonebook is published (according to the settings in “Phonebook”->”LDAP Settings” panel). The “phonebook” user is mainly useful to have a single identity (configurable through provisioning) used by telephones to access the KalliopePBX phonebook using LDAP. |
click2call |
GUI (-), API (-) |
This user is useful when using third party applications to send click-to-call commands (using the REST API /rest/phoneServices/c2c/{dest_exten}/{source_exten}) to KalliopePBX using a single user with limited privileges |
Multitenant
During Multitenant license activation, the PBX and the tenant entities, bundled under a single administrative entity, are separated and a new built-in user pbxadmin is created (with default password “admin”).
Management of the PBX as a system is granted to the new “pbxadmin” user, who has both GUI and CTI permissions, whereas the “admin” user retains control of the telephone service configuration for the tenant. Since multiple tenants can be created, each with its own “admin”, it is necessary to extend the username to specify the relevant tenant domain. The predefined existing tenant domain is “default”, so the predefined built-in users become admin@default, privacyadmin@default, etc.
For each new tenant created (e.g. with domain “sampledomain”), several new users are generated, namely admin@sampledomain, privacyadmin@sampledomain, phonebook@sampledomain, and so on.
The admin@default and admin@sampledomain users are completely independent and each one can only manage their own tenant.
Note
If a user does not specify the domain when logging in (e.g. uses “admin” instead of “admin@somedomain”), then it is assumed to belong to the default domain and authentication is performed accordingly.
Custom users
Additional users can be created. Currently, custom users must be associated with an Extension. Custom users can be created in the “Edit Extension” panel, defining a unique username (within the tenant) and assigning GUI, CTI and/or API access permissions. By default, all custom users are created with the standard “Tenant User” role, but a different one can be selected among those available. As detailed below, roles are managed in the “System Settings” -> “Roles Management” panel, where different access permissions (none/list/read/write) can be assigned for each panel of the GUI, allowing the admin to delegate some configuration tasks to selected users.
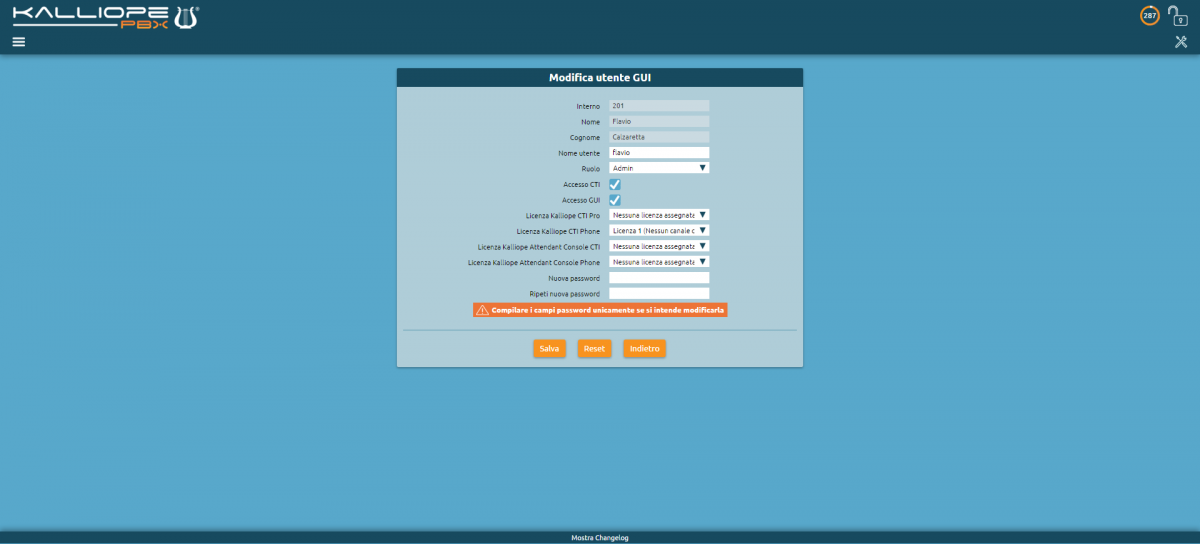
Users configuration
During the creation of an extension, the create local user box is selected and a new GUI user is automatically created with the credentials set during creation.
To edit and manage these users, you need to access the GUI users management in the System settings menu.
Through the users configuration page, you can:
edit the credentials (username and password) necessary to access the GUI and the clients;
assign a role and the relative read/write permissions;
enable/disable access to the GUI and the clients;
assign the following licenses: KalliopeCTI Pro, KalliopeCTI Phone, Kalliope Attendant Console CTI, Kalliope Attendant Console Phone.
Once created, custom users cannot be edited from the “Edit extension” panel, but they appear in the “System Settings” -> “Users Management” panel, along with the built-in ones.
User authentication
User authentication is performed with a password check, using one of the two available authentication methods.
The first method is “Local Authentication”: the user password is handled by the PBX, and its hash is stored in the internal database for authentication. This is the only available authentication method for the “admin” user.
KalliopePBX can also authenticate users with external services; the supported external authentication services are Microsoft Active Directory and LDAP servers. External authentication services are defined on a per-tenant basis, so they need to handle usernames of the form “user@tenant_domain”.
Roles
Each user is assigned a role, which determines their permissions in terms of access to the various panels. Since their permissions are fixed, built-in users have built-in roles (currently not assignable to custom users).
Custom users by default have the “Tenant User” (or simply “User”) role, which is built-in and not modifiable. This role grants the user the right to access their own CDR and the local, shared, and personal phonebooks.
Additional roles (“Power User” roles) can be created and assigned to the custom users. Each role has a priority attribute (an integer value between 1 and 99; standard users have priority 0, whereas tenant admin has 100) which is used to resolve contention of the Configuration Lock when multiple users need to perform configuration operations on the PBX. Users can acquire the Configuration Lock even if it is currently held by another user, provided that their role priority is higher than the one of the user currently holding the lock. Note that the action of acquiring the lock currently held by another user drops all the pending changes made by the first user.
Roles configuration
To configure a role, you must first set a priority from 0 to 99. Users with higher priority can acquire the lock from power priority users, and unsaved changes will be lost.
Custom roles can be configured by selecting the level of access to each panel from those available:
“none”: the user cannot access the panel and the link to the panel will not be displayed in the navigation menu (direct access to the panel URL is also blocked)
“list”: the user has read access to the panel with the list of related entities (for example, the extension list) but cannot access the details of each item or perform actions on them
“read”: the user can access both the list panel and those of the individual entries, but only in read mode
“write”: the user has full read/write access to the related entities
The following table lists the configurable parameters for each role.
Parameter |
Description |
Value |
|---|---|---|
Priority |
Priority assigned to the role |
Numeric (from 0 to 99) |
Description |
Role identifier |
Alphanumeric |
Permissions
Parameter |
Description |
Value |
|---|---|---|
Extension management |
Enable users to manage extensions with the selected permissions |
None / List / Read / Write |
Extension template management |
Enable users to manage extension templates with the selected permissions |
None / List / Read / Write |
Account management |
Enable users to manage accounts with the selected permissions |
None / List / Read / Write |
Account template management |
Enable users to manage account templates with the selected permissions |
None / List / Read / Write |
Queue management |
Enable users to manage queues with the selected permissions |
None / List / Read / Write |
Ring group management |
Enable users to manage ring groups with the selected permissions |
Nessuno / Elenco / Lettura / Scrittura |
Music on hold class management |
Enable users to manage music on hold classes with the selected permissions |
None / List / Read / Write |
VoIP domain management |
Enable users to manage VoIP domains with the selected permissions |
None / List / Read / Write |
Outbound line management |
Enable users to manage outbound lines with the selected permissions |
None / List / Read / Write |
Audio file management |
Enable users to manage audio files with the selected permissions |
None / List / Read / Write |
LCR rule management |
Enable users to manage LCR rules with the selected permissions |
None / List / Read / Write |
LCR class |
Enable users to manage LCR classes with the selected permissions |
None / List / Read / Write |
Checktime management |
Enable users to manage time checks with the selected permissions |
None / List / Read / Write |
Numbering plan management |
Enable users to manage the numbering plan with the selected permissions |
None / List / Read / Write |
Management of the custom selections in the numbering plan |
Enable users to manage custom selections with the selected permissions |
None / List / Read / Write |
Network configuration management |
Enable users to manage network configuration with the selected permissions |
None / List / Read / Write |
SIP setting management |
Enable users to manage SIP settings with the selected permissions |
None / List / Read / Write |
IVR menu management |
Enable users to manage IVR menus with the selected permissions |
None / List / Read / Write |
Audio conference room management |
Enable users to manage audio conference rooms with the selected permissions |
None / List / Read / Write |
Audio conference room operation management |
Enable users to manage audio conference room operation with the selected permissions |
None / List / Read / Write |
Role management |
Enable users to manage roles with the selected permissions |
None / List / Read / Write |
On-call service management |
Enable users to manage on-call services with the selected permissions |
None / List / Read / Write |
General setting management |
Enable users to manage general settings with the selected permissions |
None / List / Read / Write |
GUI user management |
Enable users to manage GUI users with the selected permissions |
None / List / Read / Write |
License management |
Enable users to manage licenses with the selected permissions |
None / List / Read / Write |
Audio setting management |
Enable users to manage audio settings with the selected permissions |
None / List / Read / Write |
Switch management |
Enable users to manage switches with the selected permissions |
None / List / Read / Write |
Provisioning template management |
Enable users to manage provisioning templates with the selected permissions |
None / List / Read / Write |
Provisioning device management |
Enable users to manage provisioning devices with the selected permissions |
None / List / Read / Write |
Diagnostic tool management |
Enable users to manage diagnostic tools with the selected permissions |
None / List / Read / Write |
Shared phonebook management |
Enable users to manage shared phonebook with the selected permissions |
None / List / Read / Write |
Call detail record viewing |
Enable users to view the call detail record. |
None / List / Read / Write |
SSL setting management |
Enable users to manage SSL settings with the selected permissions |
None / List / Read / Write |
LDAP setting management |
Enable users to manage LDAP settings with the selected permissions |
None / List / Read / Write |

Service configuration
- Traditional telephone services
- Call Hold and Music on Hold
- Call Pickup (direct and with invite)
- Calling Line Identification Restriction (CLIR)
- Group Call Pickup (direct and with invite)
- Wait queues (ACD)
- Numbering Plan
- Checktime and Switches
- Ring groups
- Unconditional Forward
- Call Parking
- Echo Sevice
- Speed Dial
- Attended Call Transfer and 3-Way Conference
- Blind Call Transfer
- Voicemail
- Advanced phone services
- Other services
- High Availability
- Scheduled Tasks
- Audit Log
- Auto-Provisioning
- Packet Capture
- Active Calls
- PBX Events
- Remote Filesystem Management
- Tenant Management
- Site Management
- Audiofile management
- SIP settings
- SSL Settings
- Forward On All Unreachable
- Interfacing with third party software via AMI
- Restricted operating mode
- Service Status
- Events Notification
- Call Detail Record (CDR)
- Provisioning Requests
- Phonebook
- Description
- Configuration
- Export and import
- Delegate the ability to manage in “write” the Shared phonebook
- LDAP settings
- System contacts
- Extensions
- LDAP client configuration
- Mapping of contact types in the shared phonebook in LDAP
- Importing remote phonebooks
- LDAP server settings
- Search settings
- Import Settings
- Import settings
- On Call Services
- Usage Statistics
- SNMP Support
- Recovery Mode
- Firmware Update
- Privacy Admin
Procedures
How to update the bootloader
To update the bootloader, begin by restarting the PBX from the recovery console.
Once the PBX has been booted in recovery mode, you can find available updates.
Warning
Only the bootloader can be updated from the recovery console. In order to update the firmware you must boot KalliopePBX from one of the two partitions.
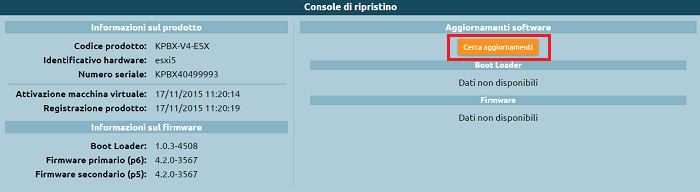
The system will download the list of released versions. The ones that cannot be installed (because they have already been installed or because they require an extra step) will be grayed out. Updates that are available for installation will instead appear in black font.
Clicking on a release will display the changelog for that version. If a bootloader update is available, the Apply this update button will be orange and selectable, as shown below.
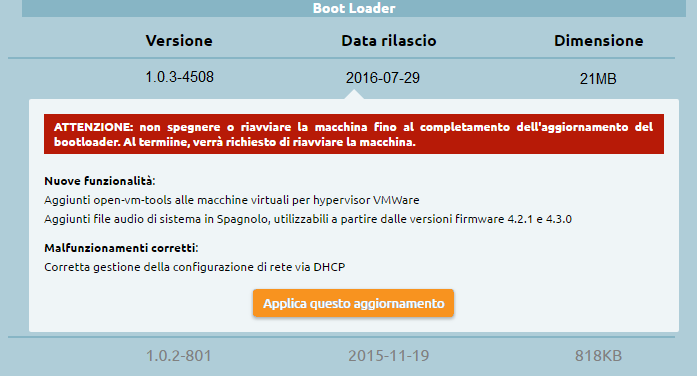
The bootloader will then be downloaded, extracted, and installed.
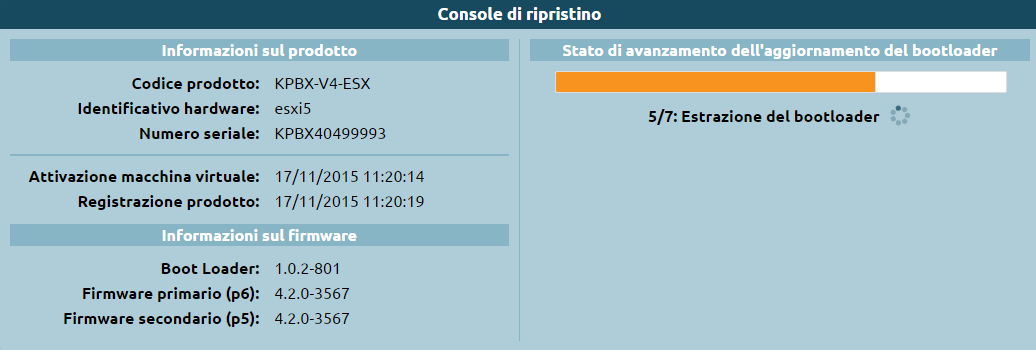
At the end of installation, you will need to restart the bootloader.

Once the bootloader has restarted the update is complete and you can install the firmware (if this is your first setup) or restart the PBX on the existing firmware.

How to create your first extension
To create or edit an extension you must first acquire the lock.
Go to the PBX -> Extensions and Accounts page.
To create a new extension, click on Add extension. To edit an existing one, click on its number.
To configure an extension, you must first select a template from the drop-down menu. The template can be the default one or one you have previously created.

Each setting has two columns: the one on the left shows values that have been manually edited, and the one on the right shows the values from the template.
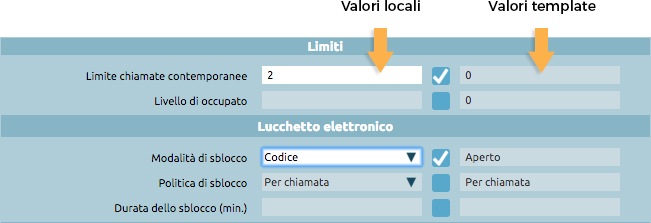
To overwrite a value from the template, you can simply select the checkbox and the item on the left will become editable.
Once configuration has been completed, click on Save to finish creating the extension.
By returning to the Extension list page you can edit existing extensions. To edit/delete a single extension you can click on the corresponding pencil or trash icon respectively.
You can select multiple elements and act on them through certain mass actions. You can:
Delete
Enable
Disable
Change template
When you change the template, the previous configuration will be overwritten with the values from the selected template.
How to create your first account
To create or edit an account you must first acquire the lock.
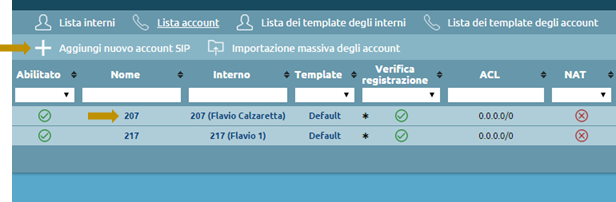
Go to the PBX -> Extensions and accounts page and click on Account list.
To create a new SIP account, click on Add SIP account. To edit an existing one, click on its name.
To configure a SIP account, you must first select a template from the drop-down menu. The template can be the default one or one you have previously created.

Each setting has two columns: the one on the left shows values that have been manually edited, and the one on the right shows the values from the template.
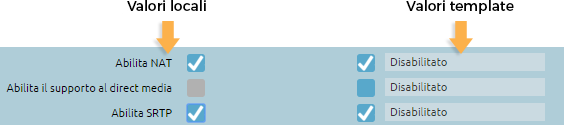
To overwrite a value from the template, you can simply select the checkbox and the item on the left will become editable.
Once configuration has been completed, click on Save to finish creating the account.
By returning to the Account list page you can edit existing account. To edit/delete a single account you can click on the corresponding pencil or trash icon respectively.
You can select multiple elements and act on them through certain mass actions. You can:
Delete
Enable
Disable
Change template
When you change the template, the previous configuration will be overwritten with the values from the selected template.
How to convert a backup from V3 to V4
KalliopePBX V4 comes with much improved PBX configuration logic. Because of this, V3 and V4 configurations are not directly compatible.
In order to aid migration, we have developed a built-in tool available for firmware version 4.2.0 or later. This tool converts a backup from V3 to V4, except for a few elements that cannot be remapped and must therefore be handled manually.
Requirements:
KalliopePBX V4 with firmware version 4.2.0 (or later) with factory settings
V3 configuration backup made with firmware version 3.12.3
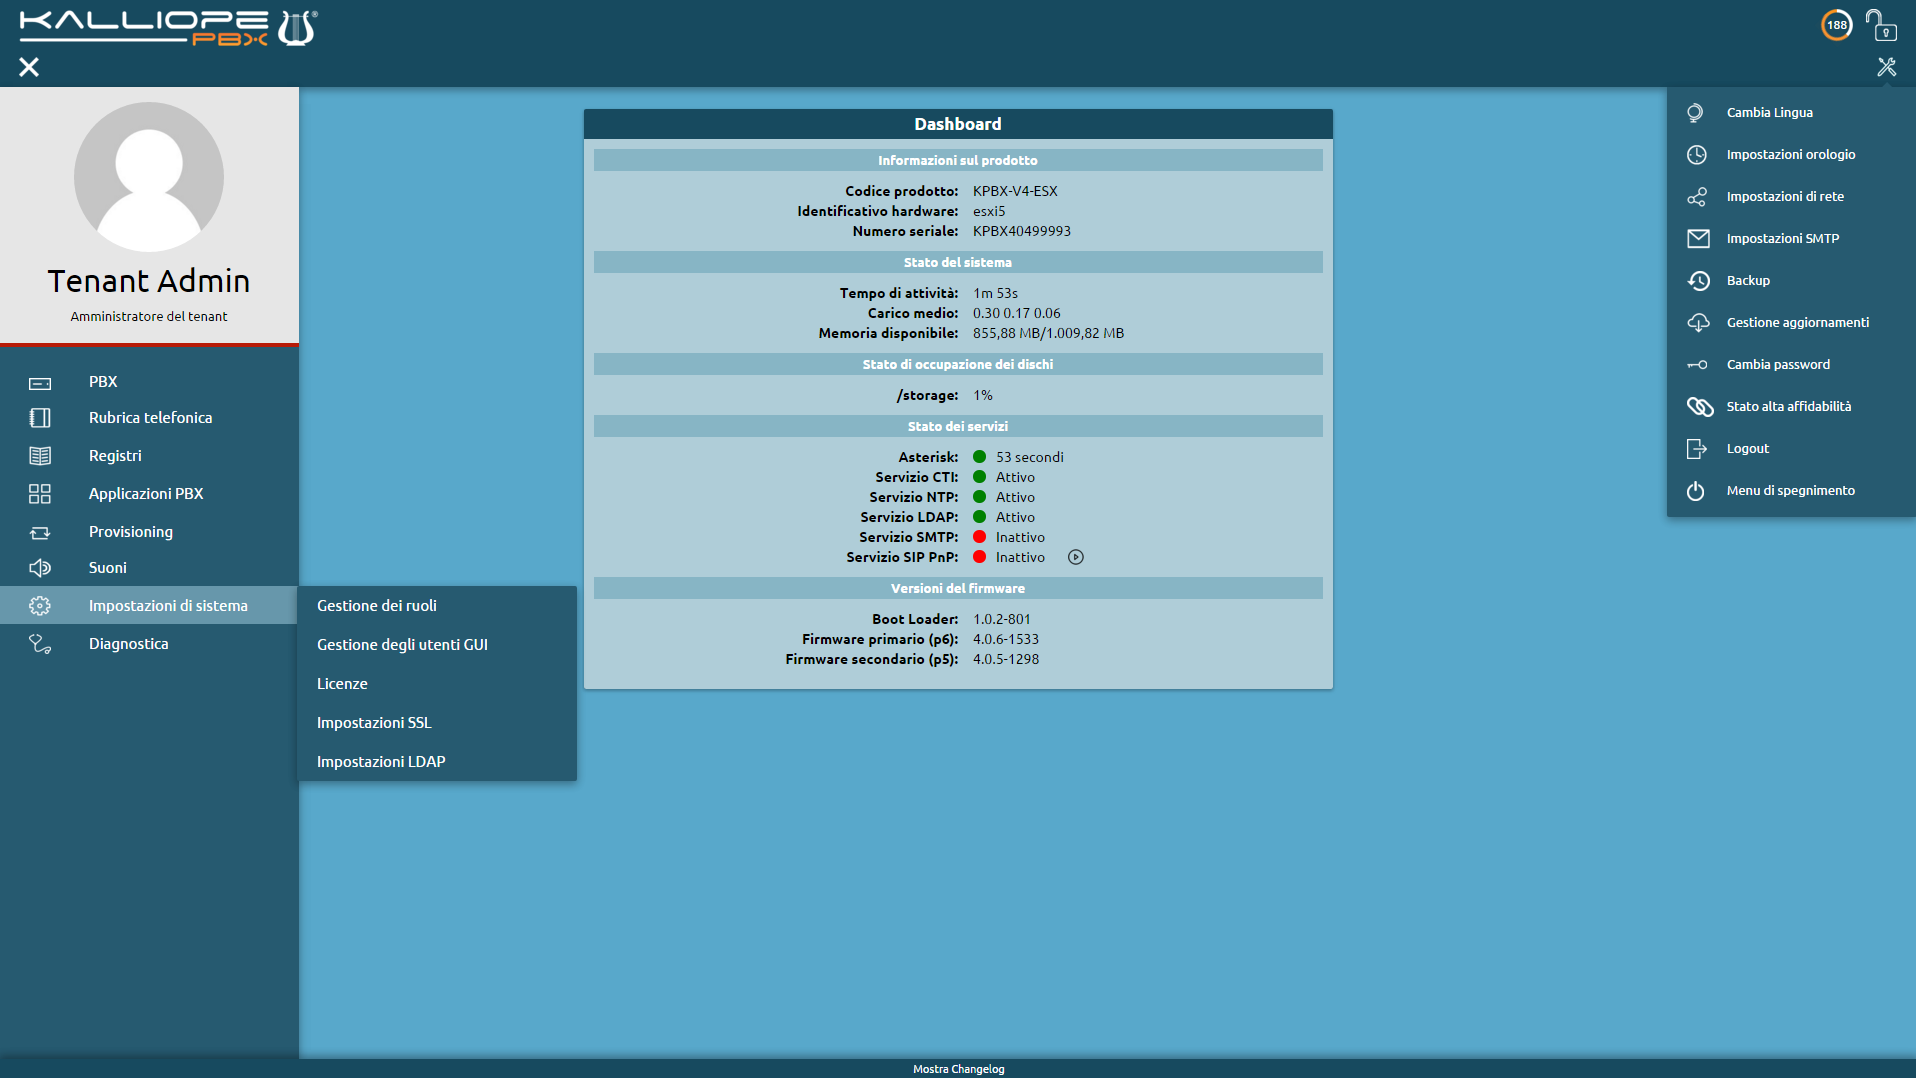
To restore a V3 configuration you must go to the Backup page from the system menu and click on Import Kalliope V3 backup, as shown below.

Before uploading the backup, carefully read all information provided by the system, the click on Choose file and select the V3 configuration backup you wish to convert.
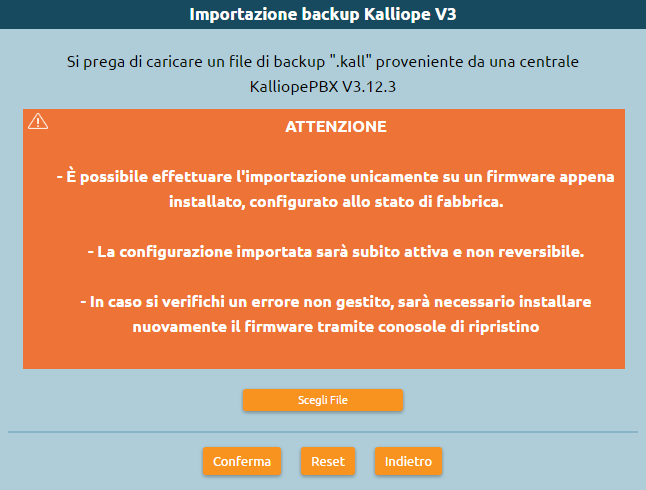
You will now see a summary page showing the details of the selected backup. Once you have made sure it is the correct file, click on Confirm.
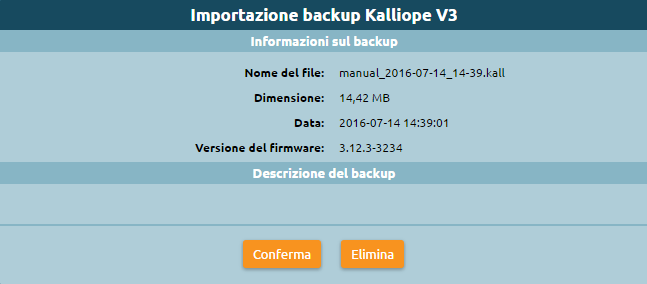
The system will bring the configuration to the new PBX and show which parts of the configuration it was unable to convert and will therefore need to be manually edited.
Warning
Take note of these alerts before exiting the page
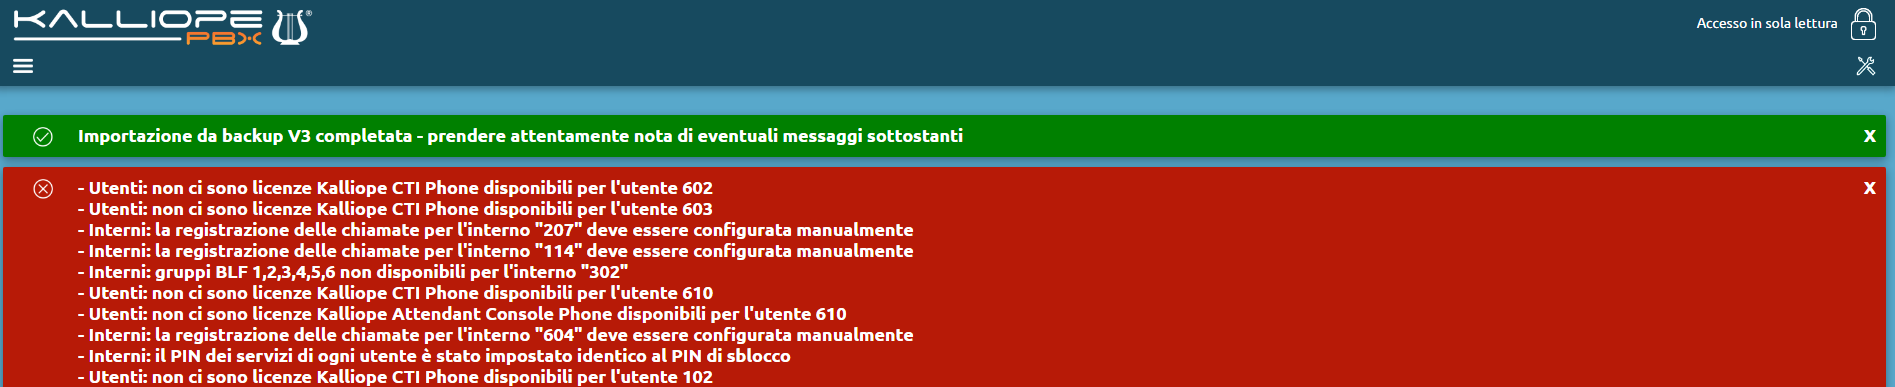
The configuration has now been imported and applied, and it is possible to view it in the KalliopePBX interface.
Interface description
KalliopePBX’s configuration interface consists of the top bar, the operating menu, the system menu, the content area in the center, and the bottom bar.
Top bar
By clicking on the Kalliope logo in the top left you can return to the home page from any configuration page, while clicking on the lock in the top left will lock the configuration.
In KalliopePBX V4, configuration is based on lock (with editing permission), which can only be acquired by a single user at a time. Lock management is strictly based on roles.
Once lock is acquired a 5 minute countdown will begin. The countdown will be reset every time the user interacts with the interface.

When a user is making edits, other users will be notified and they will only be able to acquire a lock if they have a higher priority. If they do not, they will have to wait for the lock to expire.
In the image to the left, the user has higher priority and can therefore access the lock; in the image to the right, on the other hand, the user has a lower priority and therefore the lock is hidden.

User menu
When accessing Kalliope as a user, you can view in the operating menu, on the left side of the the Kalliope interface, information on the logged-in user and access the configuration pages that the user has permissions to access.
As a tenant user, you can always view the phonebook and CDR pages. If the tenant admin assigns you further permissions, you can also view from this menu the other configuration pages.

You can also customize your dashboard with the information relevant to you.
Select the pencil icon on the top left to view all widgets: CDR statistics, user information, account status, ring groups, queues, services, function keys. By clicking and dragging a widget to the space below you can make them visible, as shown in the picture below.

CDR statistics
This widget displays a graph that summarizes the information in the CDR. You can set which information to display in the statistics.
You can:
select the type of filter (outcome or direction);
insert a time span by inserting the number and selecting year, months, weeks, days, hours, or minutes;
insert the span with which the information will be grouped;
insert the number of minutes between updates;
Click on “Save” to save and apply the settings.

User information
This widget displays information on the logged-in user:
displayed name
extension number
extension status: green dot is available, red dot if unavailable, gray dot if suspended
status of the associated CTI: green dot is available, red dot if unavailable

Account status
This widget displays the accounts associated with the extension and their status (green if active, red if not active).

Ring groups
This widget displays the groups the user belongs to. IF the user does not belong to any groups, the widget will remain empty.

Queues
This widget displays the queues the user belong to:
user role (operator or supervisor)
status of the user on the queue (available or paused)
By clicking on the user status, you can change it.

Services
This widget lets you enable or disable certain services:
Unconditional Forward
Forward when not answering
Forward when busy
Forward when not available
Fork to Mobile
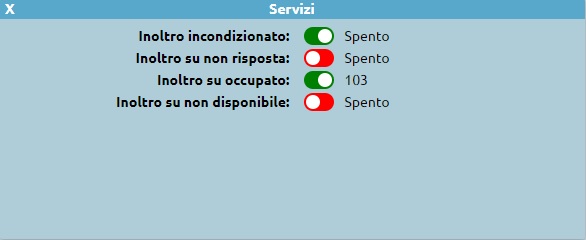
Forwarding services can be enabled by clicking on the red button and inserting the number to which you wish to forward calls and disabled by clicking on the green button.
If you have an associated mobile number, you can view the Fork to Mobile status and enable or disable it by clicking the corresponding button.
Function key configuration
From this widget you can access the function key configuration pages if your extension is associated with a device.

You can set each function key to a service by clicking on the link.
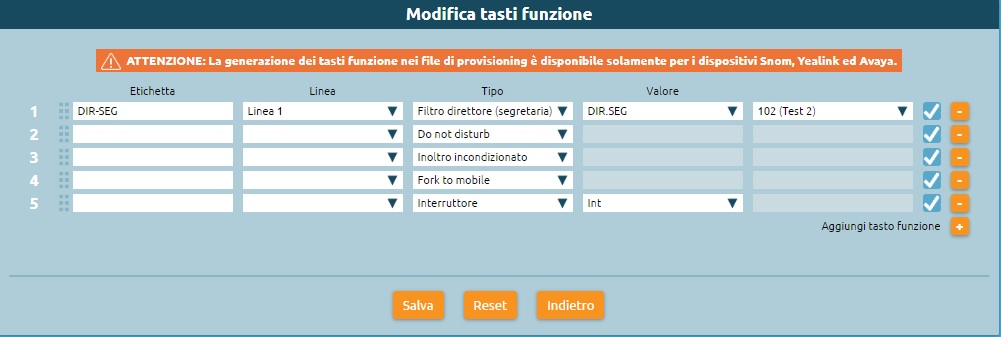
To add a function key, select the “+” button, inset the name of label that will be displayed on you device, select the type of service (BLF, boss/secretary, speed dial, do not disturb, unconditional forward, fork to mobile, switch, or parking slot), insert the corresponding value if required, and save.
After saving the settings, you can enable or disable the service with the phone buttons.
Since unconditional forward requires an extension number to be inserted, you can only disable and not enable it from you device.
Bottom bar
The bottom bar allows access to the changelog containing pending changes (i.e. changes that have been saved but not yet applied).

By clicking on Show changelog you can see a list of pending changes, with each line displaying the following information:
Date and time
Type of action
Object
Object ID
Object description
When changes are applied they will automatically be removed from the changelog.