Getting Started
Mini/Lite

COM1 ( Console 115200 8/n/1)
Gigabit Ethernet (eth0)
Gigabit Ethernet (eth1)
Gigabit Ethernet (eth2)
USB 2.0
Power (12v, 1A)
Installation
Connect KalliopePBX to your network using the eth0 interface.
Optional: connect KalliopePBX’s COM1 serial port to your PC using a serial cable (not included - settings: 115200 8/n/1).
Connect the included power cord to KalliopePBX and plug it into a power socket (100-240V AC, 50-60 Hz). KalliopePBX will boot automatically.
Open http://192.168.0.100:10080 on your browser to register. KalliopePBX will require access to https://license.kalliopepbx.it; the network configuration can be edited from the “settings” menu. In case the error UNSAFE_PORT appears follow this procedure:
After registering, choose and install the desired firmware from those available. KalliopePBX will require access to the address https://updates.kalliopepbx.it. The process may take a few minutes, depending on the size of the firmware and your own network speed.
Follow the firmware installation progress; once it’s over, restart KalliopePBX and access the configuration interface by opening http://<Configured_ip> (default http port 80) on your browser. The default credentials are admin/admin.
V4R/V4R+
KalliopePBX v4 Rackmount (Hw rev. 3)
The KalliopePBX v4 rackmount appliances (in the different -R, -R+, -R-OPT-FO and -R-OPT-FO+ variants) in hw rev. 3 are based on a headless hardware platform that provides:
one Gigabit Ethernet network interface equipped with an 8-port hardware switch, all Gigabit Ethernet autosensing (ETH0)
two single-port Gigabit Ethernet network interfaces (each dual mode RJ45 and SFP 1GbE) (ETH1 and ETH2).
Note
When GBIC is used in the SFP slot of one of these interfaces, if the network cable is left plugged into the RJ45 port, the latter will take precedence.
Note
In the case of using GBIC 100 Mbps, the system does not recognize them automatically and an enabling operation by our technical support is required.
Once the device is connected via the supplied power supply, the system starts up automatically and within a few seconds you will be able to access the KalliopePBX.
The first access to KalliopePBX is via one of the switch ports on the ETH0 interface, pointing the browser to the default address http://192.168.0.100:10080.
Note
Some browsers have started to block access to pages on ports other than the standard ones by default. If an error indicating “ERR_UNSAFE_PORT” is displayed, it is necessary to unblock port 10080, using the procedure given on page Resolution of ERR_UNSAFE_PORT
As with VMs and other physical equipment, the IP address of KalliopePBX can be changed by connecting a PC configured with an IP address on the 192.168.0.0/24 subnet to the ETH0 interface and accessing the “Network Settings” panel from the Tools menu, accessible at the top right of the Kalliope GUI.
Alternatively, it is possible to access the KalliopePBX console (operating only in “recovery” or “recovery console” mode, in which the system is thus booted on bootloader and not firmware) and perform configuration using the built-in CLI (accessed with the default manager/manager credentials). Unlike previous hardware versions, access to the KalliopePBX console is not directly through the serial port on the device, but through the VNC service.
In this hardware revision, in fact, KalliopePBX runs as a virtual machine within a KVM-based virtualization environment. Access to KalliopePBX is therefore mediated by the native operating system running on the physical machine, through which some simple configuration tasks can be performed, as detailed below.
In case the KalliopePBX web interface can be accessed with the default network settings (192.168.0.100/24), the initial activation procedure follows the standard one common to other versions, and consists of the following steps:
Configuring the IP address, default gateway and DNS via web GUI and re-accessing the newly assigned IP address. Verification of correct date/time setting and possible forced synchronization using system NTP servers (or personal ones possibly configured).
KalliopePBX VM license activation. In this case, unlike traditional VMs, it is not necessary to enter an activation key because this will be available on board the device, so activation consists only of pressing the corresponding button from the web interface
Product Registration. Similarly to other Kalliope systems, this operation unlocks the possibility of proceeding with the installation of firmware, and determines the beginning of the expected warranty period on the apparatus and access to updates
Update bootloader, if necessary, and install firmware. After the firmware installation is complete, it will be necessary to reboot from the KalliopePBX GUI, and once the boot is complete, redirection to the login page (on standard port 80) will be automatically performed
In case you cannot access the default IP 192.168.0.100 and you need or want to proceed with its modification using the KalliopePBX CLI, you still need to have access to the device’s native operating system in order to configure VNC access to the KalliopePBX console. Specifically, once you have configured an IP to the native operating system, based on the directions in the next section, simply start a VNC client (e.g., TightVNC Viewer) by configuring the connection to the host <IP_OS_native:5900>, to gain access to the KalliopePBX CLI on which you can login (using the wired user manager/manager)
Access to the apparatus’ native ATOS operating system
Access to the device’s native operating system (ATOS) may be necessary to configure its network settings in order to gain access via VNC to the KalliopePBX console, as well as to be able to perform forced shutdown and reboot of KalliopePBX where necessary.
Access to ATOS can be through the serial (“Console”) port on the front of the device (with 115200/8/N/1 settings), or through ssh access. Similarly to the out-of-band management systems of many servers (iLO for HP, DRAC for Dell, etc.) ATOS has its own network stack, which by default is configured as a DHCP client on the ETH0 interface (with a MAC of the 00:D0:D6:xx:xx:xx family, as listed on the label on the device).
The login credentials are listed on the label on the apparatus. The user is “manager” and the password is uniquely assigned to each apparatus (later changeable after accessing ATOS).
Note
this manager user is unrelated to the manager user you use to access the Kalliope CLI in bootloader mode.
Once the connection has been made via serial console, or via ssh (if the IP acquired by ATOS is known, e.g., thanks to the logs of the DCP server that may be present in the network), proceed with the login using the user “manager” and the password given on the label on the device:
login as: manager
manager@192.168.23.60's password: *******
ATOSNT Remote CLI

CTRL+d to exit

Init Command Line Interface...
ATOS Version: 7.2.7 (mcccfvitbkovsc)
ATOS Date: 06/10/2022 13:34
ATOS License: NFVSBC
Hardware: XV8800 - 4C8R120D - 2518D
Product Code: 708190501
Serial Number: xxxxxx
MAC Address: 00:D0:D6:xx:xx:xx
BARCODE: AE70819050110204xxxxxx

User name :manager
Password :*******
<manager> logged at MANAGER level
KPBXv4_kvm>
By typing “?” followed by the enter key, the system presents the available configuration items and commands:
KPBXv4_kvm>?

Available nodes:
                        system
                        interfaces
                        dns
                        nfv
Available commands:
up                      Move one step up from the current node
top                     Back to the root of the tree
quit                    Exit from CLI session
set                     Set node options
add                     Add a new option
del                     Remove an added option
show                    Show 'KPBXv4_kvm' settings
help                    Help of item
info                    Show the system informations
date                    Show or setting system date and time
save                    Save configuration data
restart                 Restart device
ping                    Send an ICMP ECHO request
tracert                 Display a trace of packet
show-logging-level      Show logged level

password                Set user/others password on node KPBXv4_kvm\system>>
Below are the commands for displaying the current settings, then followed by the device commands, with which to make changes to the ATOS configuration.
Note
all commands have online help, simply complete the current command with the “?” character to have the system inform you of all the possible options available for that command. For example:
KPBXv4_kvm>set interfaces vswitch-0 ip ?

Set command parameters:
ip address          [address]             Current value: 0.0.0.0
default router      [defaultrouter]       Current value: 0.0.0.0
dhcp client         [dhcp-client]         Current value: on
In addition, the “Tab” key performs the completion of the entered command:
KPBXv4_kvm>set interfaces vswitch-0 ip dh<tab>
produces:
KPBXv4_kvm>set interfaces vswitch-0 ip dhcp-client
In the case of multiple autocompletion possibilities, repeated pressing of the “Tab” key causes it to cycle through all possible options.
ATOS status information display commands
Display assigned IP address and interfaces status
KPBXv4_kvm>show interfaces status

Show status of KPBXv4_kvm interfaces
INTERFACES      IPV4-ADDRESS    MAC-ADDRESS        STATUS     PROTOCOL  STATUS-DETAILS                            VRF
eth0            unassigned      00:D0:D6:xx:xx:xx  up         up        operational/running/bundled               global
eth1            unassigned      00:D0:D6:xx:xx:xx  down       down      operational/not running                   global
eth2            unassigned      00:D0:D6:xx:xx:xx  down       down      operational/not running                   global
tap-vdev0       unassigned      02:09:C0:17:8C:24  up         up        operational/running/bundled               global
tap-vdev1       unassigned      02:09:C0:CE:2D:08  up         up        operational/running/bundled               global
tap-vdev2       unassigned      02:09:C0:FA:F0:9E  up         up        operational/running/bundled               global
vswitch-0       192.168.23.60   00:D0:D6:xx:xx:xx  up         up        operational/running/ip4 address assigned  global
In this output, interfaces eth0-1-2 are the physical ports of the equipment (eth1 and eth2 are “not running” since there are no network cables connected), tap-vdev0-1-2 are logical ports used internally to interconnect the network interfaces of the Kalliope VM with the physical ports. The vswitch-0 is the network access interface to ATOS, which in this example received the address 192.168.23.60 via DHCP.
DNS server display set to ATOS
KPBXv4_kvm>show dns work
Show of KPBXv4_kvm dns
Enable                : on
Level of log          : 1
Max retries           : 3
Timeout retries (sec) : 20
Local resolution      : preferred-v4

LIST OF DOMAIN NAME SERVERS
VRF                : global
Domain Name        : anydomain
Interface          : vswitch-0
Primary address    : 8.8.8.8
Secondary address  : 4.4.4.4
Priority           : 1
DNS preset in ATOS are 8.8.8.8 and 4.4.4.4
NTP server display for ATOS time synchronization
KPBXv4_kvm>show system timesync work
Show of KPBXv4_kvm system timesync
Level of log                 : 1
Enable                       : on
Sync frequency (sec)         : 300
GMT offset (min)             : 60
Daylight saving time period  : last Sun Mar 02:00 last Sun Oct 03:00
Local IP Address             : 0.0.0.0
Local IPv6 Address           : ::
VRF                          : global

LIST OF SERVERS
Server                                   Type
it.pool.ntp.org                          sntp
KalliopePBX VM operating status display
KPBXv4_kvm>show nfv kpbxv4 status

Show status of KPBXv4_kvm nfv kpbxv4
Status     : on
UUID       : 614c20db-8219-4804-b27b-ca9afe91398c
Huge pages : 4096
Nic model  : virtio-net-pci
Device and configuration change commands
Warning
To make the following commands persistent upon reboot, it is necessary to execute the “save” command after the changes are complete.
Stopping/starting the KalliopePBX VM.
KPBXv4_kvm> set nfv kpbxv4 off
KPBXv4_kvm> set nfv kpbxv4 on
IP address management interface vswitch-0 of ATOS
Disabling/enabling DHCP client (attention, if you are connected via ssh and not via serial, disabling the DHCP client causes the address to be released and then disconnected!)
KPBXv4_kvm>set interfaces vswitch-0 ip dhcp-client off
KPBXv4_kvm>set interfaces vswitch-0 ip dhcp-client on
Setting static IP address
KPBXv4_kvm>set interfaces vswitch-0 ip address ?

  ip address  [aa.bb.cc.dd[/0-32]]

  Current value:    0.0.0.0
  Default fw value: 0.0.0.0
example:
KPBXv4_kvm>set interfaces vswitch-0 ip address 192.168.55.200/24
Setting default gateway (for possible remote access):
KPBXv4_kvm>set interfaces vswitch-0 ip defaultrouter ?

default router  [aa.bb.cc.dd]

Current value:    0.0.0.0
Default fw value: 0.0.0.0
example:
KPBXv4_kvm>set interfaces vswitch-0 ip defaultrouter 192.168.55.1
Change DNS servers used by ATOS (used for resolution of configured NTP servers)
In this case, the “del” command is used to remove the configured DNS set, and the “add” command is used to add a new set of servers:
KPBXv4_kvm>del dns SERVER anydomain 1
This command removes the priority 1 set (the only one present by default) with which DNS with IPs 8.8.8.8 and 4.4.4.4 are associated. Information about the defined priorities and their associated servers can be obtained with the command “show dns work”
To add a new set of DNS servers, we instead use the command
KPBXv4_kvm>add dns SERVER anydomain 8.8.8.8 4.4.4.4 1
Edit NTP servers used by ATOS
Again, the “add” command is used to add a new server and the “del” command is used to remove the one to be deleted:
KPBXv4_kvm>del system timesync it.pool.ntp.org
KPBXv4_kvm>add system timesync ntp1.inrim.it
If desired, multiple NTP servers can be added, without necessarily deleting the existing one.
KalliopePBX v4 Rackmount (Hw rev. 1 e 2)
Port description

Power (12v, 5A)
VGA (unused)
USB 2.0/USB 3.0
Gigabit Ethernet (eth0)
Gigabit Ethernet (eth1)
HDMI (unused)
Audio jack (unused)
COM1 (Console 115200 8/n/1)
First installation
Connect KalliopePBX to your network using the eth0 interface.
Optional: connect KalliopePBX’s COM1 serial port to your PC using a serial cable (not included - settings: 115200 8/n/1).
Connect the included power cord to KalliopePBX and plug it into a power socket (100-240V AC, 50-60 Hz).
Turn on KalliopePBX by pressing the power button in front; should it be unexpectedly disconnected from the power supply, it will automatically reboot once power is restored.
Open http://192.168.0.100:10080 on your browser to register. KalliopePBX will require access to https://license.kalliopepbx.it; the network configuration can be edited from the “settings” menu. In case the error UNSAFE_PORT appears follow this procedure: Click here
After registering, choose and install the desired firmware from those available. KalliopePBX will require access to the address https://updates.kalliopepbx.it. The process may take a few minutes, depending on the size of the firmware and your network speed.
Follow the firmware installation progress; once it’s over, restart KalliopePBX and access the configuration interface by opening http://<Configured_ip> (default http port 80) on your browser. The default credentials are admin/admin.
Virtual Machine
VMWare
Download the KalliopePBX virtual image file. KalliopePBX VM is available in VMWare ESXi 5.x environment or later. The two images differ for the maximum number of virtual CPUs that are visible from the kernel (up to 8 for the second, and over 8 up to a theoretical maximum of 128 for the first) and for the size of the system disk, which for the first is 120GB while for the second is limited to 40GB (values that can be increased with a simple procedure executable from the VMWare console).
Image |
Download link |
|---|---|
KalliopePBX v4 (supports over 8vCPU) |
https://areaclienti.vianova.it/drive/download/BeWHIH36hbF12cM1/ (KalliopePBXv4_esxi5_128vcpu_120GB.ova) |
KalliopePBX v4 (supports a maximum of 8vCPU) |
https://areaclienti.vianova.it/drive/download/bmOBoFRXDaSlcH2K/ (KalliopePBXv4_esxi5_bl-1.0.5-7156.ova) |
Import the downloaded image file into the virtual environment. Upon booting for the first time, the VM will start in recovery mode, i.e. with only the bootloader and no phone firmware.
Access the predefined address 192.168.0.100:10080 from the GUI. In case UNSAFE_PORT error appears follow this procedure, (click here)
Note
A console access is available (with manager/manager credentials, accessible only in recovery mode) that allows you to make the change of the IP address of the eth0 interface, in case you cannot access the default viq web browser address.
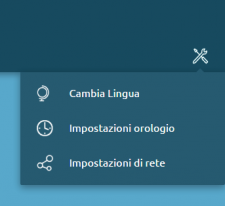
Go to the Tools menu (click on the tools icon) in the top right to change your network configuration so that the PBX can access the internet and reach the license server.
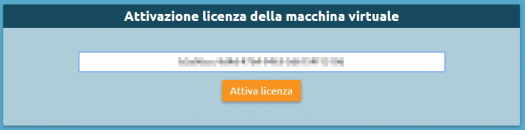
Activate the KalliopePBX VM license with the activation key you were provided.
Once the license has been activated, click on “Register product” to access the Recovery console.
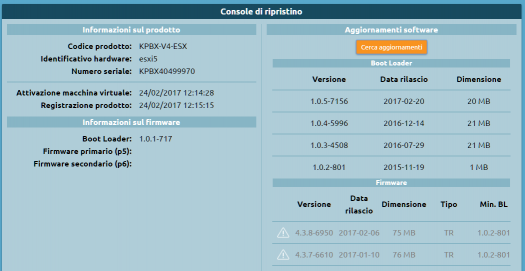
Follow this procedure to update the bootloader to the latest version, (click here)
8. Once the update is finished, click “Restart bootloader” to restart the machine. The machine will always restart in recovery mode.
Click “Find updates” again to download the list of available firmware updates and select the version you want.
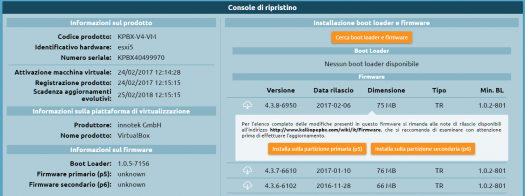
Click on “Install on the primary partition (p5)”. KalliopePBX will warn you that this will reset the partition erasing all data and ask for confirmation.
Since this is the first installation, confirm the request.
Note
Installing firmware from the recovery console will restore the machine to factory conditions. This can be useful when you need to completely reset a machine.
Once the firmware installation is finished, verify the firmware version number from the recovery console.

Open the tools menu and click on the “Shutdown menu -> Restart” item, select “Primary firmware” from the restart menu, and click “Restart”.
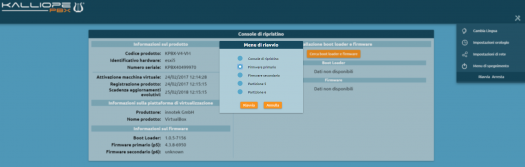
After restart, you will be redirected to the main login (on port 80).
The default login credentials are
Username: admin
Password: admin
You are advised to change the password immediately after restarting.
Promox
Update - 10/05/2020: A new Kalliope image for Proxmox VE environment is now available, which overcomes the limitations of the previous image to use a maximum of 8 vCPUs and to have a default disk size of 22GB. The new image, prepared on Proxmox VE version 6.1 environment and having a 120GB disk, handles up to a maximum of 128 vCPUs
Note
It is not possible to upgrade the VM with 8vCPUs to the one that supports more than 8, so in case of new installations it is recommended to install the new image anyway, even if it will be assigned a number of vCPUs equal or lower than 8
To install KalliopPBX on Proxmox environment you first need to download the two files: .vma.lzo and .log in the folder: /var/lib/vz/dump/
Image |
Download Link |
|---|---|
KalliopePBX v4 (max 128 vCPU) |
https://areaclienti.vianova.it/drive/download/6qmKASR4EfpHbG11/ (vzdump-qemu-100-2020_05_10-23_03_40.vma.lzo - 1,4 GB) https://areaclienti.vianova.it/drive/download/F9zgxpv8UAhcJerD/ (vzdump-qemu-100-2020_05_10-23_03_40.log) |
KalliopePBX v4 (max 8 vCPU) |
https://areaclienti.vianova.it/drive/download/0hh0XCroc9AOsFzt/ (vzdump-qemu-200-2017_06_28-10_06_39.vma.lzo - 1,0 GB) https://areaclienti.vianova.it/drive/download/vcZYocwlyIeqoHHd/ (vzdump-qemu-200-2017_06_28-10_06_39.log) |
Once copied the two files related to the image you want to install inside the /var/lib/vz/dump folder of the host machine (keeping the original names, indicated above), the restore command must be executed in a new VM: .. code-block:: console
# qmrestore vzdump-qemu-<versione>.vma.lzo <nnn> –storage <storage_name>
Where:
<nnn> is the id to be assigned to the VM (must not be already assigned to other VMs in the Proxmox node/cluster).
<storage_name> is the name of the storage in which you restore the VM to (normally it is “local” or “storage”).
The VM is now operational and you can boot it and access the console to configure the network address.
Note
Before starting the virtual machine, it is necessary to change the VM settings by enabling the “KVM hardware virtualization” flag, which is disabled in the exported image, otherwise performance will be extremely slow. The new image already has this flag enabled by default, so it is no longer necessary to change this setting; however, it is recommended to check its actual value.
Note
The VM is deployed with a generic vCPU model, which emulates a Pentium 4 processor, for maximum compatibility. If you use the VM on a single node, or you have homogeneous Proxmox VE nodes in terms of physical CPUs, you can change the processor model to the “host” value, which directly remaps the functions of the physical processor, thus making available to the OS of the VM all the hardware extensions present on the server CPUs. In this regard, refer to the Proxmox documentation page, section “CPU Type”: https://pve.proxmox.com/wiki/Qemu/KVM_Virtual_Machines#_emulated_devices_and_paravirtualized_devices
After this, you can operate as with other VMs, i.e. by accessing with manager/manager credentials, and a wizard will let you configure the network settings.
Once on the network, activation and configuration is done via web interface (initially on port 10080, and after installation of the phone firmware on standard port 80). In case UNSAFE_PORT error appears follow this procedure (click here)
The VM must be able to reach in HTTP our license and update servers (license.kalliopepbx.it and updates.kalliopepbx.it), which currently both resolve the IP address 77.72.27.4.
Multitenant
To activate a Kalliope Multitenant license, follow these steps:
If you wish to activate the license on a new machine, begin by following the instructions for activating a KalliopePBX VM license with the license key you were provided. If you wish to activate a Kalliope Multitenant license on a KalliopePBX VM that was previously set up, skip to step 2.
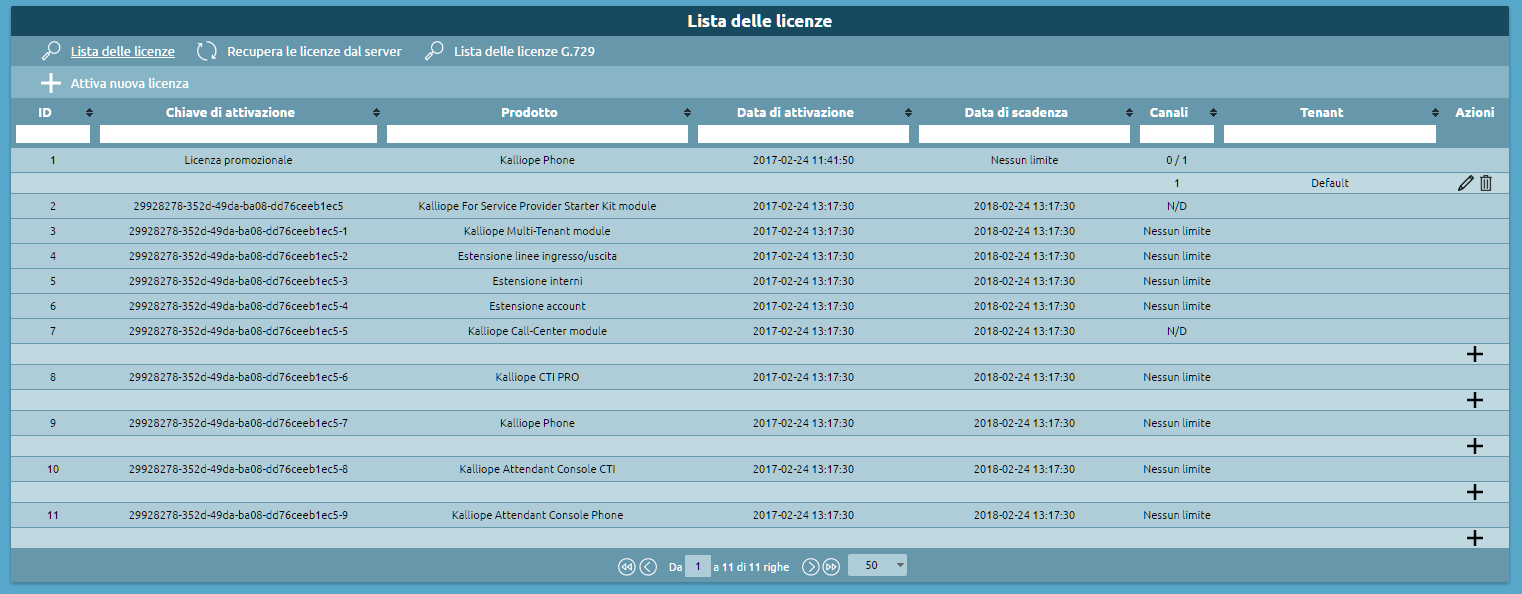
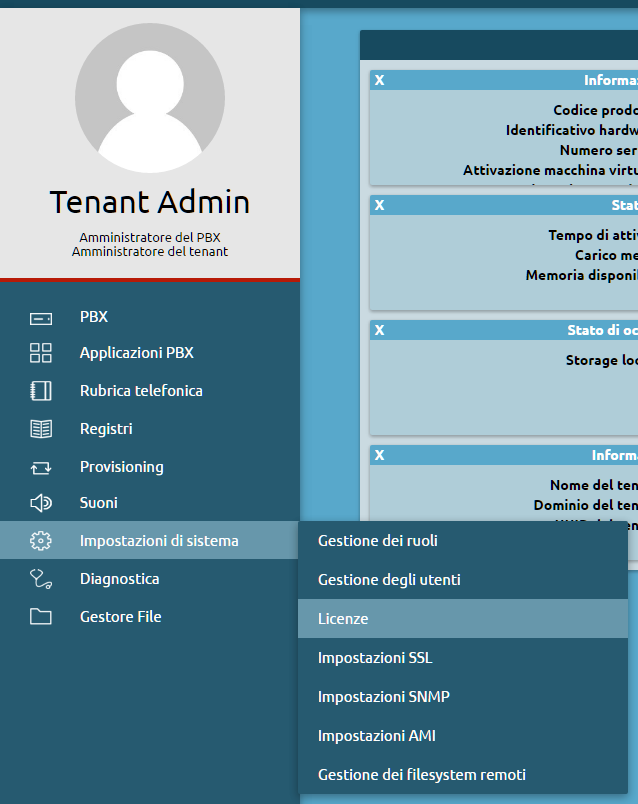
Log into the KalliopePBX administration GUI with “admin” credentials and open the license management page from the main menu.
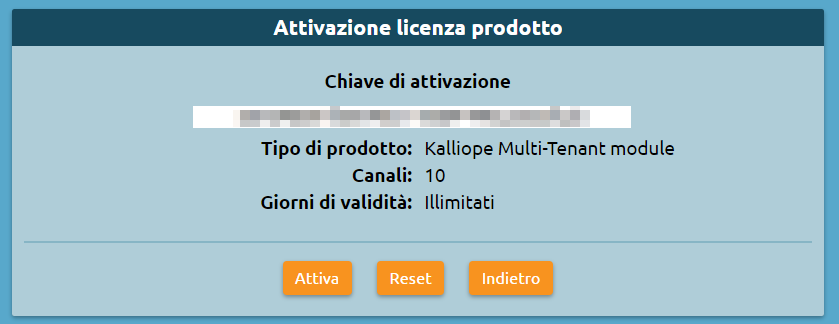
Click on “Activate new license” and insert the “KalliopePBX Multitenant” license key.
Click on “Activate”.
4. After activating the license, you will need to log in again to unlock multitenant functionality. Before restarting you will be asked which limitations, if any, to set for the “default” tenant, i.e. the preexisting one set up during firmware installation (see step 1).
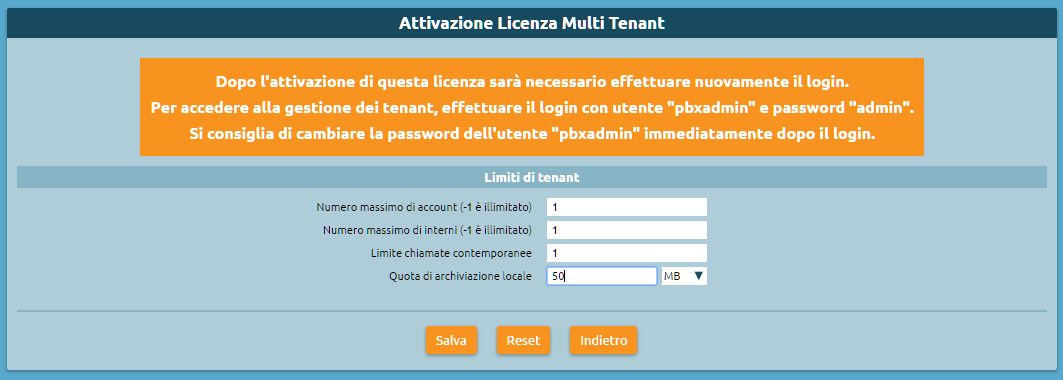
To manage tenants, log in with the following credentials:
Username: pbxadmin
Password: admin
You are advised to change the password for the user “pbxadmin” immediately after login.
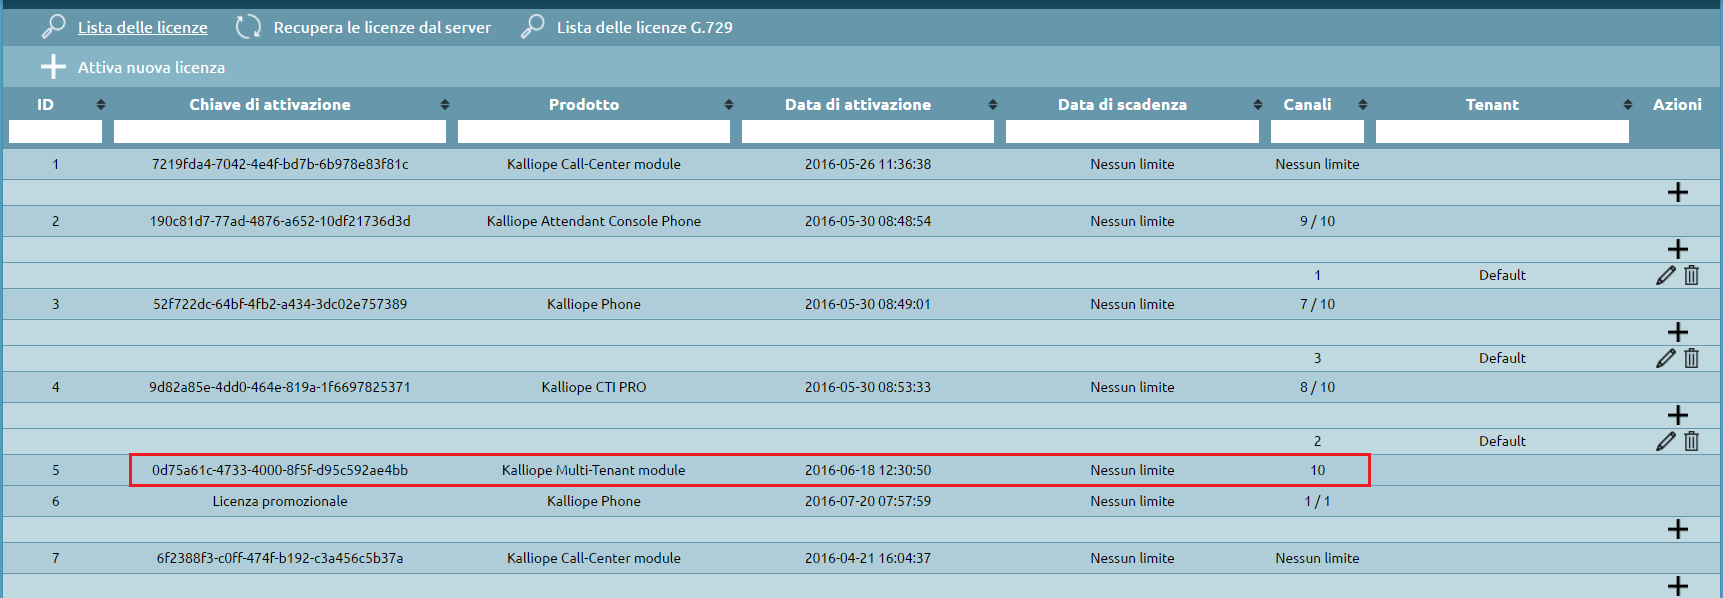
Once you have logged in as pbxadmin, you can view the new license from the Licenses menu.
During the activation of a multitenant license, KalliopePBX executes a series of internal procedures; some are automatic, while others require the admin to input the necessary parameters.
When operating in its default single tenant mode, KalliopePBX is already a multitenant system with a single predefined tenant enabled (associated to the “default” domain); the pbxadmin and the tenant admin (see “Users and roles”) are simply combined into a single user, “admin”.
When a multitenant license is activated, the two users are made distinct, separating the admin’s configuration privileges (the operation of the single tenant) from those of the new user “pbxadmin”. The users of a single tenant are now identified by the domain of the tenant they belong to (in this case, “default”, so the admin becomes admin@default, and so on) so they can have the freedom to pick any username within the tenant.
At the same time, the external SIP lines (gateways, domains, trunks, terminations) and the tenants are decoupled, as the former are controlled by the pbxadmin and their visibility to the tenants needs to be mediated. This introduces the concept of an “assigned line”, a numbering or numbering range attributed to an outbound line, which is assigned to the exclusive use of a single tenant.
Upon the activation of a multitenant license, should there be any inbound/outbound lines already configured on the PBX, assigned lines will be created (one for each outbound line) and attributed to the “default” tenant. In this phase, it is possible to specify which numbering to present to the tenant, in order to reserve others for use by other tenants.
Assigning lines to the tenants works similarly to configuring DID on the inbound lines of a single-tenant system; the difference is that the destination will not be an entity such as an extension, queue, group, or other, but rather an entire tenant. Routing to the final destination will be carried out according to the configuration of the tenant, following the concept of DID associated to a single assigned line.
Warning
During the conversion from single-tenant to multitenant lines, it is important to consider that all inbound manipulation rules (to a gateway or a domain), which in a single-tenant scenario were implemented before applying the DID routing rules, will remain associated to the inbound lines and will not be transferred to the tenant. It follows that the rules for assigning lines to tenants MUST be implemented by configuring the resulting selections AFTER the inbound manipulation rules.
Similarly, any outbound rule will be applied on a PBX level after the call has left the tenant and has been attributed to a specific outbound line.
Within each tenant there are further manipulation tables (both inbound and outbound) associated to the single assigned line attributed to it, allowing both the pbxadmin and the admin to implement the necessary modifications to calling and called numbers during the various phases of call management.
Kalliope4SP
To activate a Kalliope4SP license, follow these steps:
If you wish to activate the license on a new machine, begin by following the instructions for activating a KalliopePBX VM license with the kpbx-v4-vm-null (cod. KPBX-V4-VM-NULL) license key that was provided along with the KalliopePBX Starter Kit for Service Provider (cod.KPBX-V4-4SP-SK) license. If you wish to activate a Kalliope4SP license on a KalliopePBX VM that was previously set up, skip to step 2.
Log into the KalliopePBX administration GUI with “admin” credentials and open the license management page from the main menu.
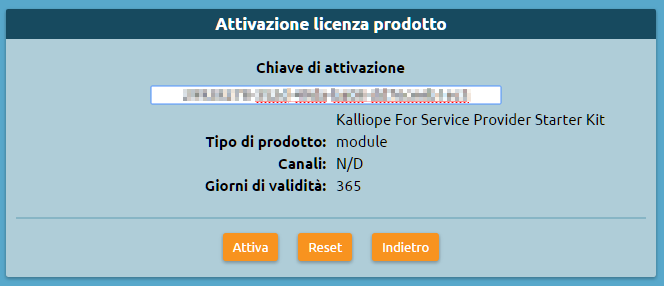
3. Click on “Activate new license” and insert the “KalliopePBX Starter Kit for Service Providers” license key. Click on “Activate”.
4. After activating the license, you will need to log in again to unlock multitenant functionality. Before restarting you will be asked which limitations, if any, to set for the “default” tenant, i.e. the preexisting one set up during firmware installation (see step 1).
To manage tenants, log in with the following credentials:
Username: pbxadmin
Password: admin
You are advised to change the password for the user “pbxadmin” immediately after login.
Once you have logged in as pbxadmin, you can view your license from the Licenses menu, valid for 12 months with no limitations, as per the Kalliope4SP offer.