Kalliope Applications
Kalliope Phone
Enabling Kalliope Phone on KalliopePBX
Guide to enabling Kalliope Phone on KalliopePBX.
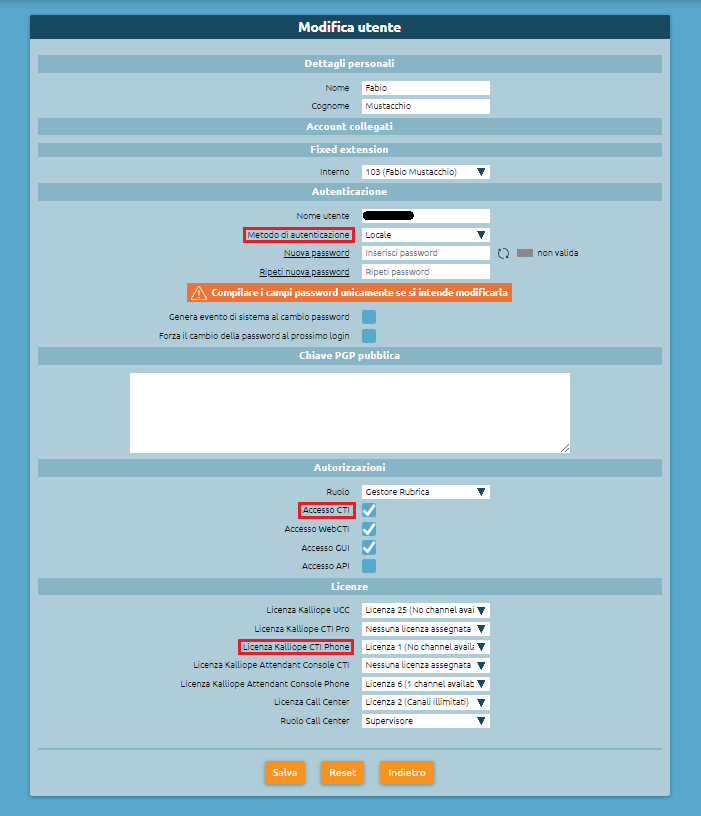
User Setting
Set the “Authentication method” to “Local”
Enable the “CTI Access” option
Enter the KalliopeCTI Phone license in the “Licenses” section.
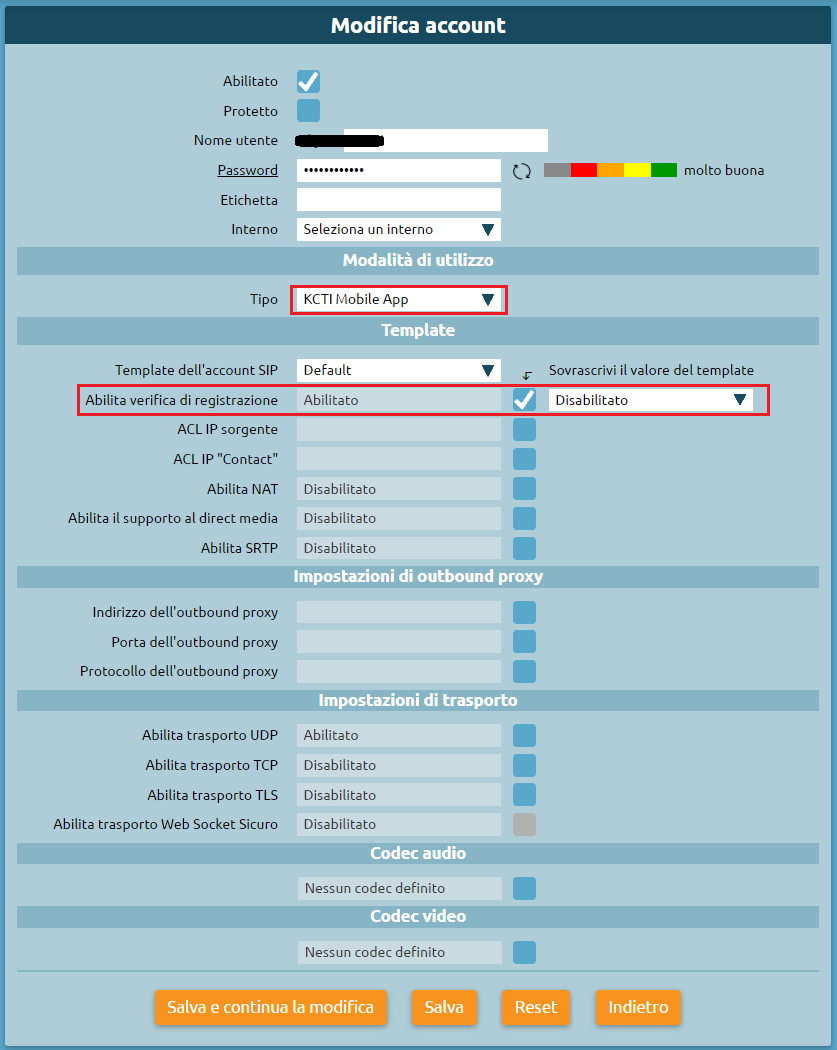
Account settings
As shown in the template below, an account of type KCTI Mobile App must be created and registration verification must be disabled.
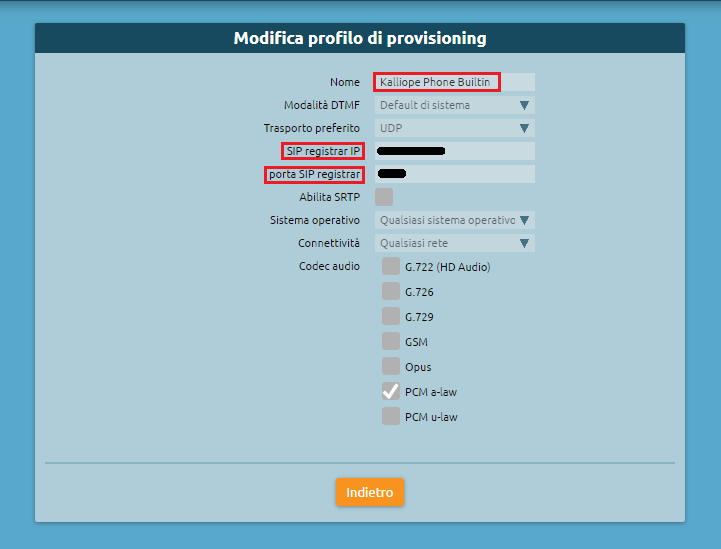
Applications provisioning
To access the provisioning profiles, follow the path “System Settings > Application Provisioning > Provisioning Profiles.” In case there is an SBC or the connection IP of the application is not the same as the one to which the phone component is to register, you need to go and edit the built-in provisioning profile “Kalliope Phone Builtin” by entering the IP and the port of the SIP Registrar.
You can also specify other options in the provisioning profile, such as the codec to be used and the use of TLS and/or SRTP.
User’s Manual
Introduction
The Kalliope Phone application enables business voice calls via Internet connection, allowing you to stay connected to Kalliope from a mobile device and improving the efficiency of business communications.
- … warning::
The product is only available when paired with a KalliopePBX® V4 VoIP PBX. Minimum firmware version: 4.15.6 KalliopePhone license required.
Structure
You can download the application on Android devices directly from Playstore and on iOS from the App Store.
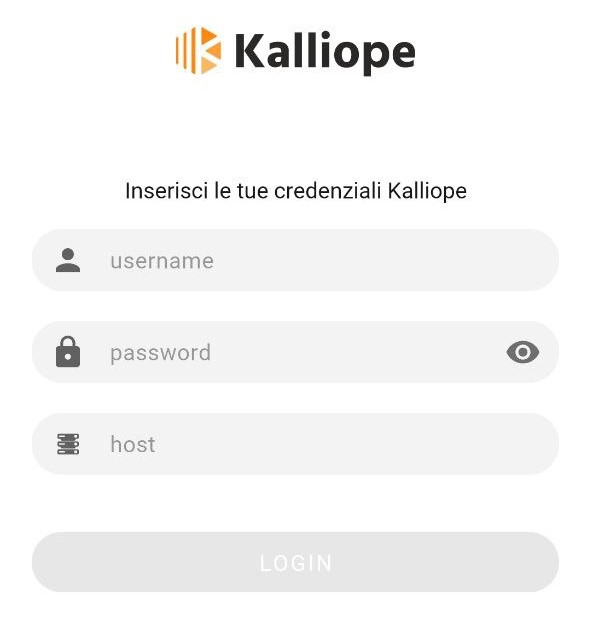
Once downloaded, you must register and enter:
Username
Password
Host: address of the KalliopePBX central unit you have.
The app has a series of icons arranged at the bottom that identify specific sections described below and depicted in the corresponding images:
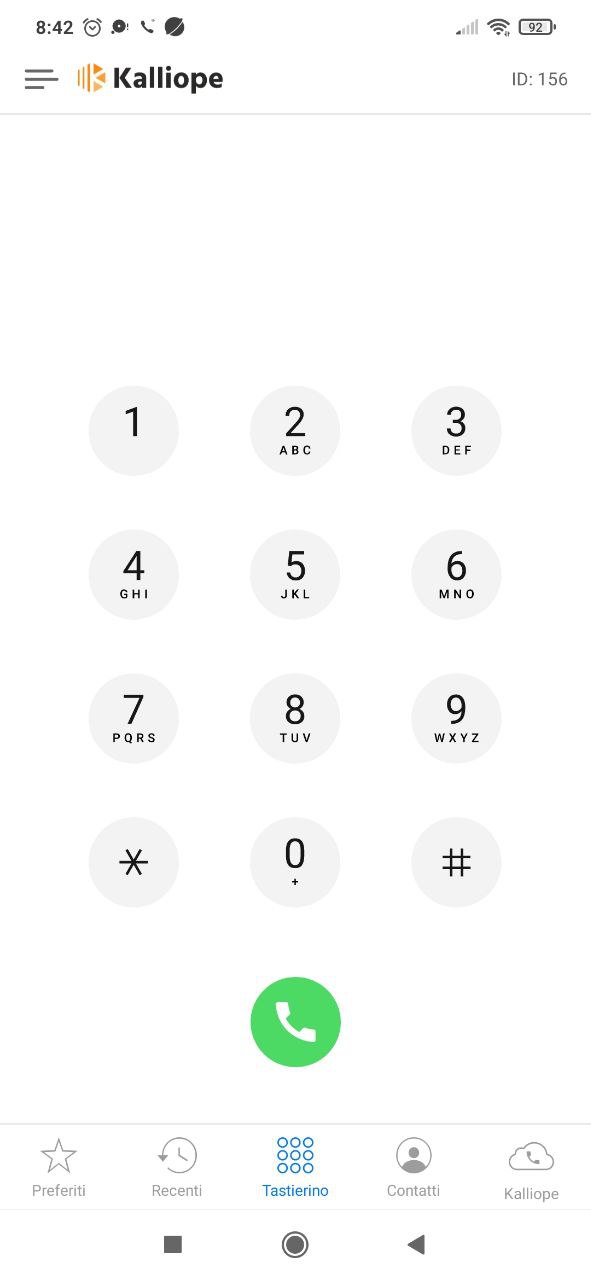
Numeric keypad (1): allows typing in the phone number.
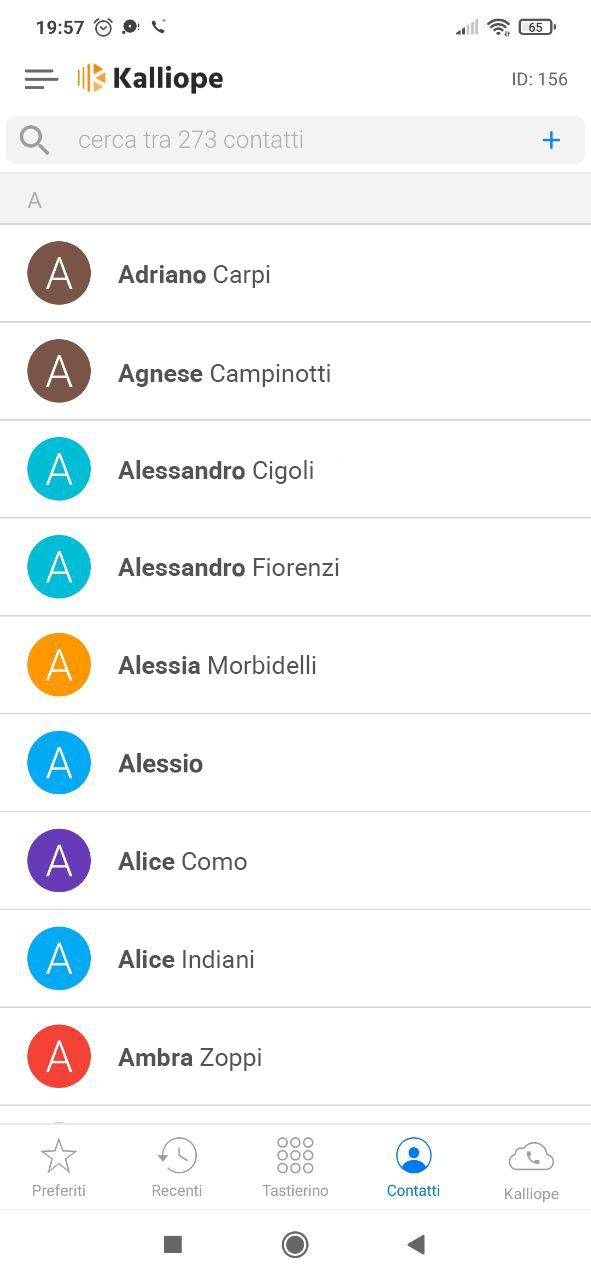
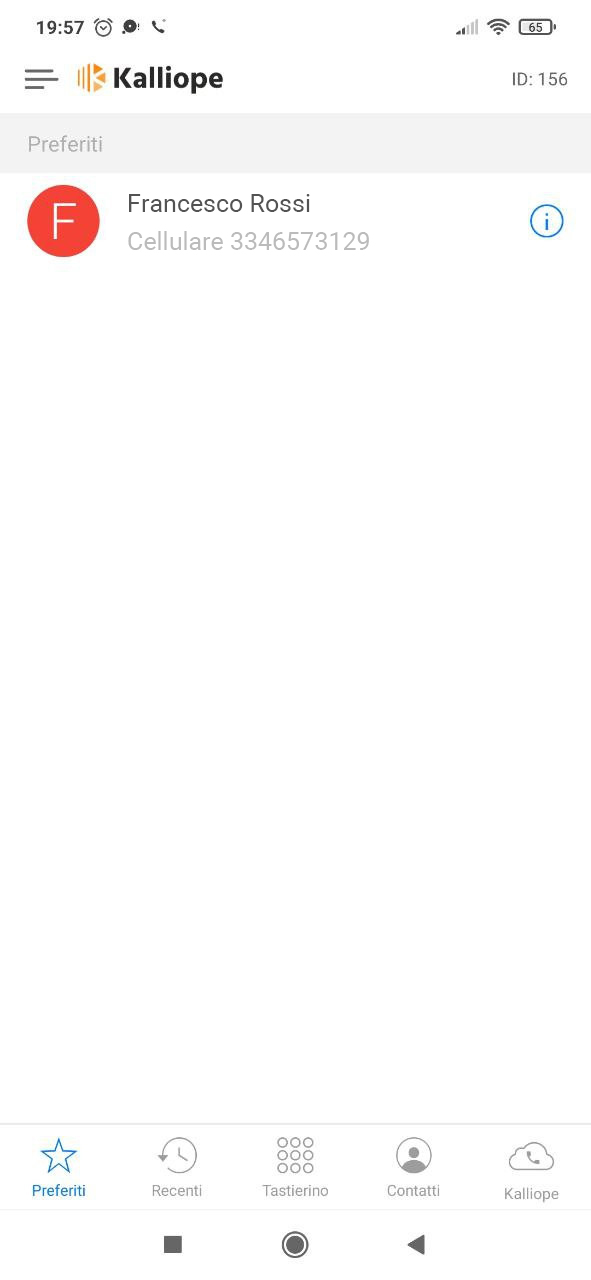
Contacts (2): contains the list of contacts on the smartphone. Pressing on a specific contact displays its details and it is possible to bookmark it via the star icon
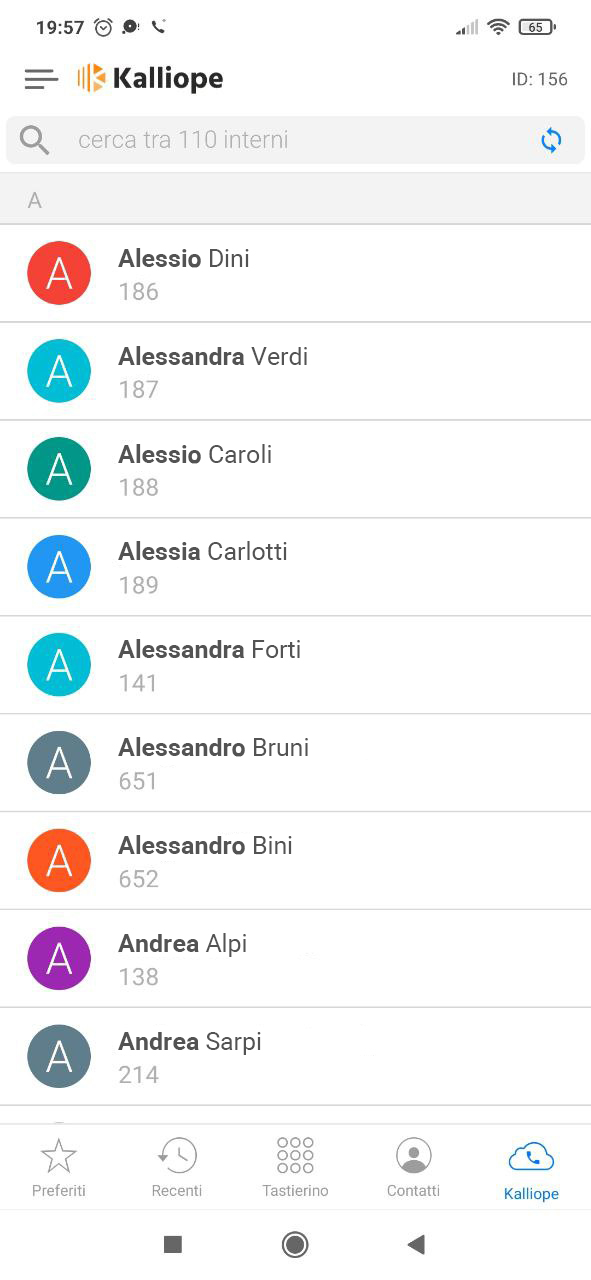
Kalliope (3): list of Kalliope extensions.
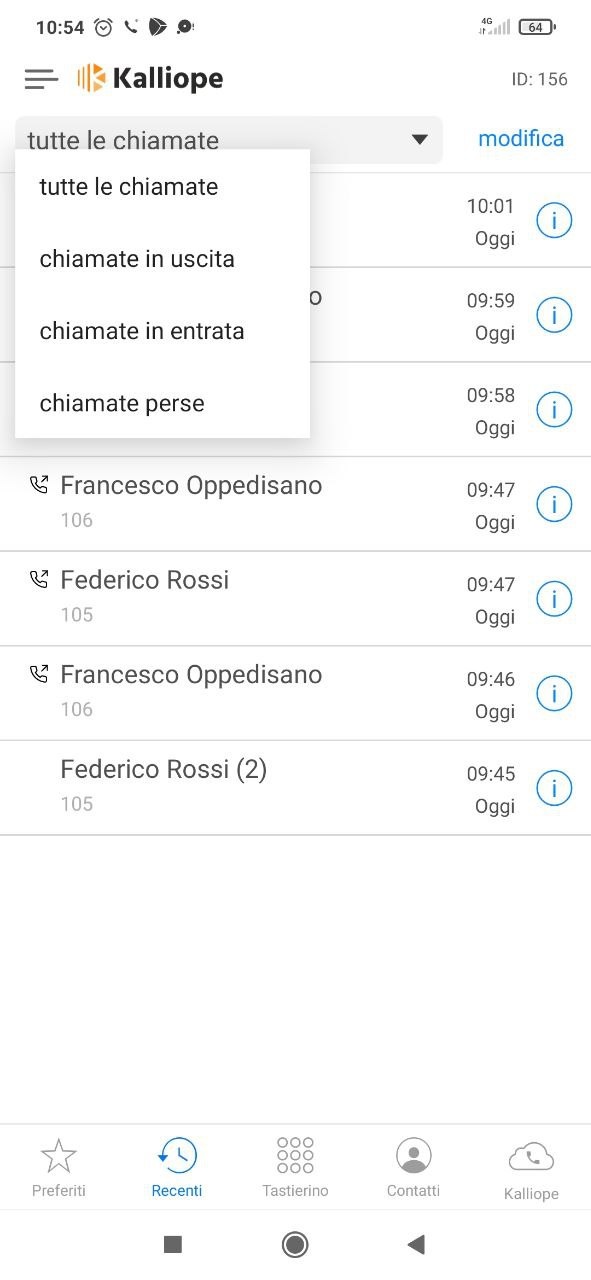
Recent (4): list of recent calls (also called CDR), filterable into “all calls,” “outgoing calls,” “incoming calls,” “missed calls”
Favorites (5): list of contacts entered as favorites
Outgoing call
To make a call, you can enter the phone number via keypad or, by pressing on a specific contact in the “Contacts” list, click on the relevant phone number. During the current call, the following screen will be displayed:

The actions that can be performed are:
Mute call
Put on hold
Change the audio device you are using (phone, speakerphone or bluethooth)
Make, during the active call, a second call using the “other call” button, see the next section.
Open the numeric keypad to send DTMF tones.
Open the contact section
Adding a call
While a call is in progress, you can call another number by pressing on the +”other call “ key and entering the number using the numeric keypad, searching it among contacts or, if present, among recent calls.
Once the desired number is added, the main call is put on hold and you can:
Unite the two calls, so you get a Conference, where the calls are in communication with each other. To view the participants* of the conference just press on the icon in the upper left corner, in this screen you can remove individual participants via the icon
 or disengage them from the conference

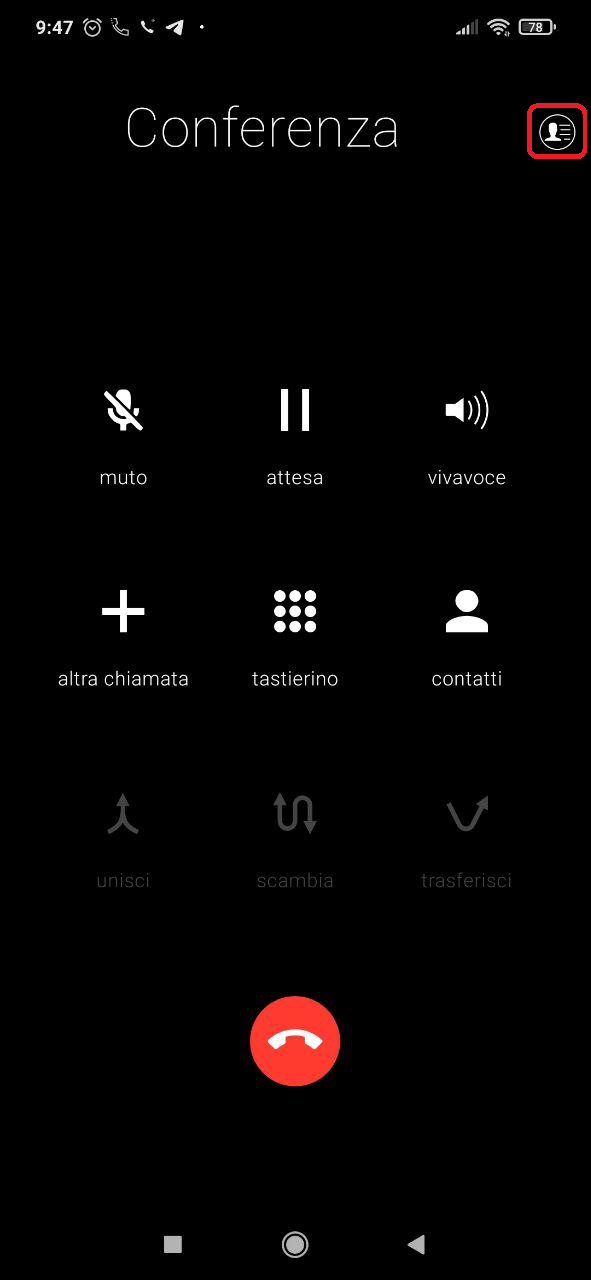

Switch the call: switch between the two calls in progress, automatically pausing one of them (shuttle service)
Transfer the call: the two calls in progress are put into communication, while one’s own line becomes free again
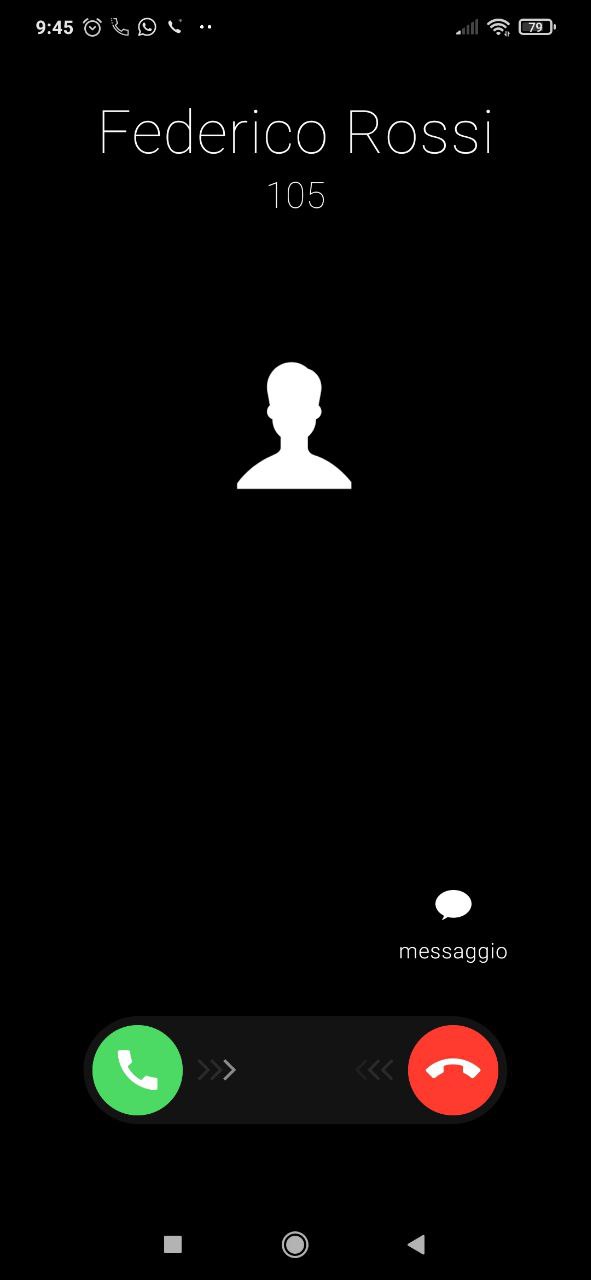
Incoming call
The incoming call is displayed as follows and you can answer or reject it.
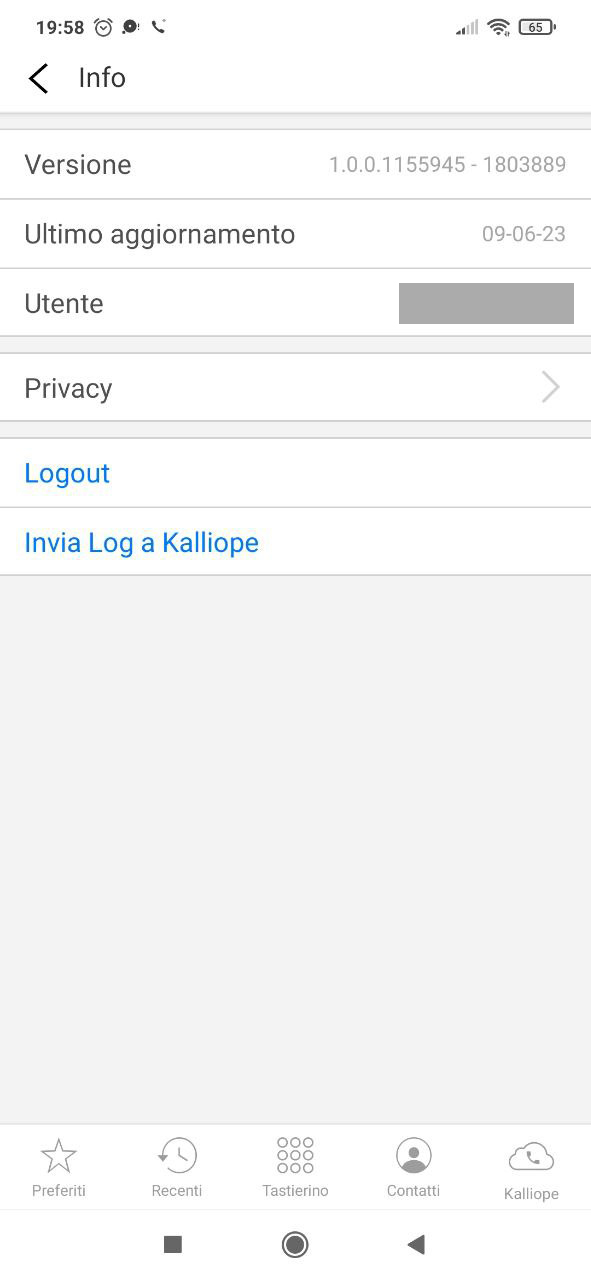
Settings menu
The settings menu can be reached by pressing on the icon in the upper left corner, next to the “Kalliope” logo, as shown in the following figure:

In this section you can set the contact sorting preference, sortable by First Name or Last Name, and the language setting (English, Italian, Spanish).
Also present are the info about the current version of the application, the last update, reference to the user using the application, and the privacy policy.
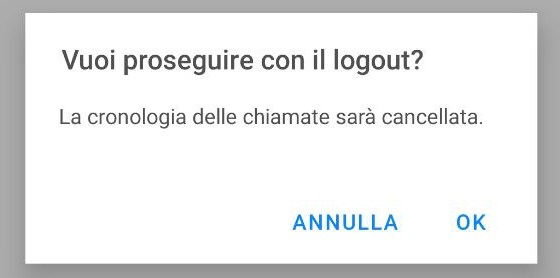
In the info it is also possible to logout and send Log to Kalliope (send call history).
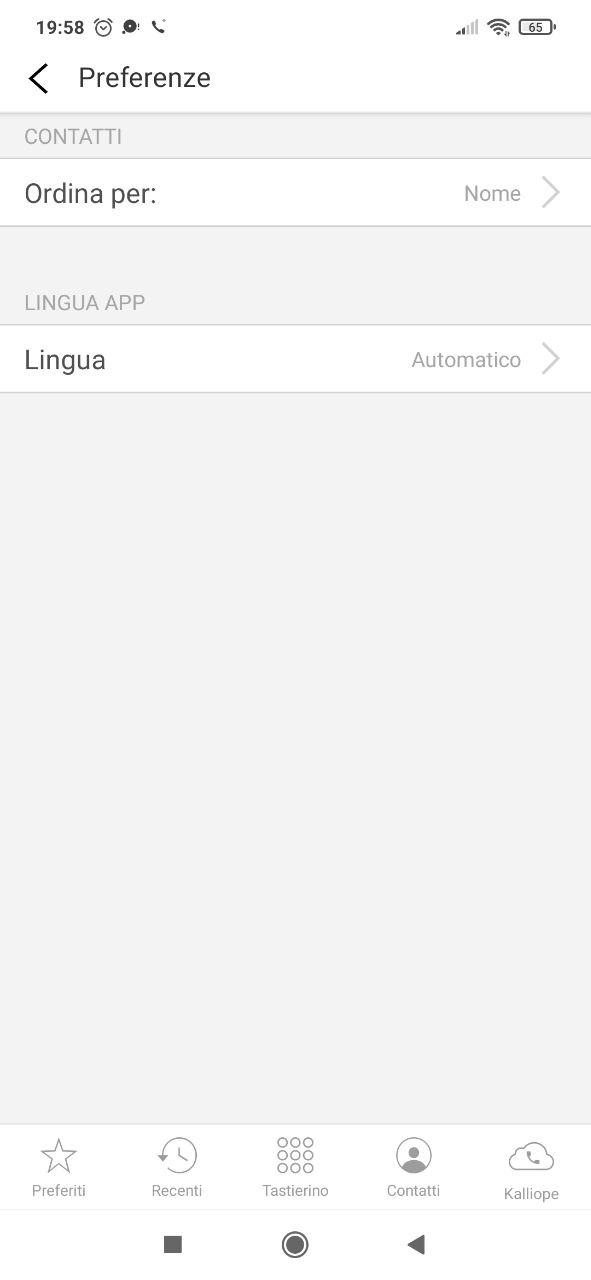
When logging out, the user will no longer receive calls on their smartphone. In addition, when logging out, the application warns that information about calls in the log (the “Recent” section) will be lost.
FAQ
(Android) After starting the Smartphone, I do not receive incoming calls on Kalliope Phone. What can I do?
The behavior is introduced by Android security settings from version 10 onwards. The terminal is really operational only after unlocking by PIN, sign or biometric reading, the times vary from a few seconds to a few minutes depending on the hardware characteristics of the terminal.
(Android) I am not receiving incoming calls when Kalliope Phone is in the background. What can I do?
Go to Settings > App > Manage App > Kalliope Phone and check that no background usage or power saving restrictions are set. Go to the Play Store, search for the Operator Services (Google LLC) app and make sure you have the latest version installed. Also check that the ports needed for Google to deliver push notifications are not blocked by routers, firewalls, or antiviruses. Read here for more information.
(Xiaomi) Kalliope Phone does not appear in the foreground when I receive incoming calls. What can I do?
Kalliope Phone may not have the necessary permissions to appear in the foreground on the lock screen. Go to Settings > App > Manage App > Kalliope Phone > Other Permissions and make sure the permissions are all enabled.
(Android) The ringtone is not played when I receive an incoming call. What can I do?
In case the ringtone is saved on external storage, Kalliope Phone may not have the necessary permissions to read the audio file. Therefore, you need to go to your smartphone settings and authorize Kalliope Phone to access the phone’s memory. For example, on Samsung terminals, go to Settings > Applications > Kalliope Phone > App Permissions > Memory and select Allow.
I cannot make or receive calls and the message “not registered” is displayed. What can I do?
In case of connecting via mobile data network, make sure you:
you have 3G/4G/LTE coverage
you are not in airplane mode
you have not run out of available Internet traffic
In case of connection via WiFi network, make sure that:
the ports on SBC or PBX used for signaling and audio streams are reachable (depends on installations). Es. 5060 UDP and 10000-20000 UDP on Kalliope IP in case the default Kalliope configurations are used and there is no SBC.
port 443 TCP on the IP address used during configuration is reachable
outbound traffic to IPs 78.152.108.54, 78.152.108.55, 80.93.131.132 and 80.93.131.134 (ports 443 TCP, 24998 TCP and 4998 TCP/UDP) is not blocked
If you continue to have problems, please contact your designated Kalliope specialist technician.
(Android) During installation you are prompted to enable permission to display Kalliope Phone in the foreground, but I cannot change this setting. What can I do?
Check Settings > Applications > Kalliope Phone for the Display Featured item and grant permission. The item may have a different name depending on the model (e.g., show above other apps). If your smartphone does not show such an item or the item is not enabled, it is possible that Android Go, a particular version of Android that is not supported by Kalliope Phone, is installed on your smartphone. You can check this in the following ways:
the version of Android currently installed on your device can be found within the Phone Settings. Remember that the section may have different names depending on the model.
the screen shown when restarting your device should say go edition in addition to powered by Android.
standard applications installed on your smartphone should have the suffix Go in addition to their name (e.g., Google Assistant Go, Gmail Go).
standard app icons may have the word GO in them.
I experience poor audio quality under WiFi network. What can I do?
When connecting over WiFi network, the quality of service (QoS) Voice with Kalliope Phone is dependent on the correct LAN configuration. You can best manage the priority of traffic generated by Kalliope Phone by taking into account that RTP packets are classified and marked (within the TOS, Type Of Service, field) with a DSCP value equal to 46. Make sure that the access-points used allow prioritization of voice packets. If you continue to have problems, contact your Kalliope technical specialist of choice.
Kalliope WebCTI
Enabling WebCTI on KalliopePBX
Short guide to enabling WebCTI on KalliopePBX.
Warning
To ensure WebCTI functionality, it is necessary to have updates enabled on the machine.
SIP settings
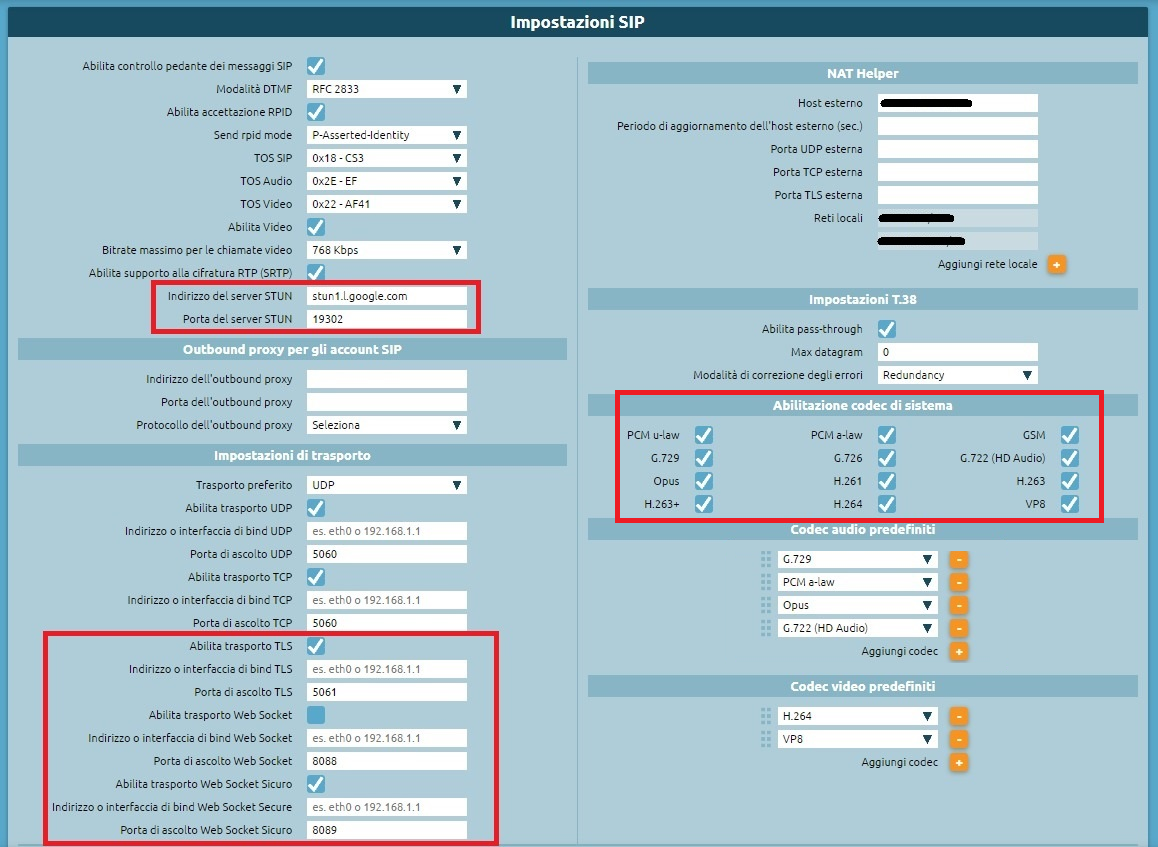
Using the menu on the left of Kalliope, under “PBX > SIP Settings”, you need to configure the following informations:
Enable SRTP encryption support
Set up a STUN server with the corresponding port, for example: STUN server address -> “stun1.l.google.com”, STUN server port -> “19302”
Enable WebSocket transport and/or Secure WebSocket transport (it is strongly recommended to enable Secure WebSocket with port 8089).
Enable PCM a-law and OPUS in the system codec list (Note: using the OPUS codec increases transcoding workloads).
User settings
To configure WebCTI for a user, the following options must be enabled:
Set the “Authentication Method” to “Local”.
Enable the “WebCTI Access” option.
Enter the UCC license in the “Licenses” section.

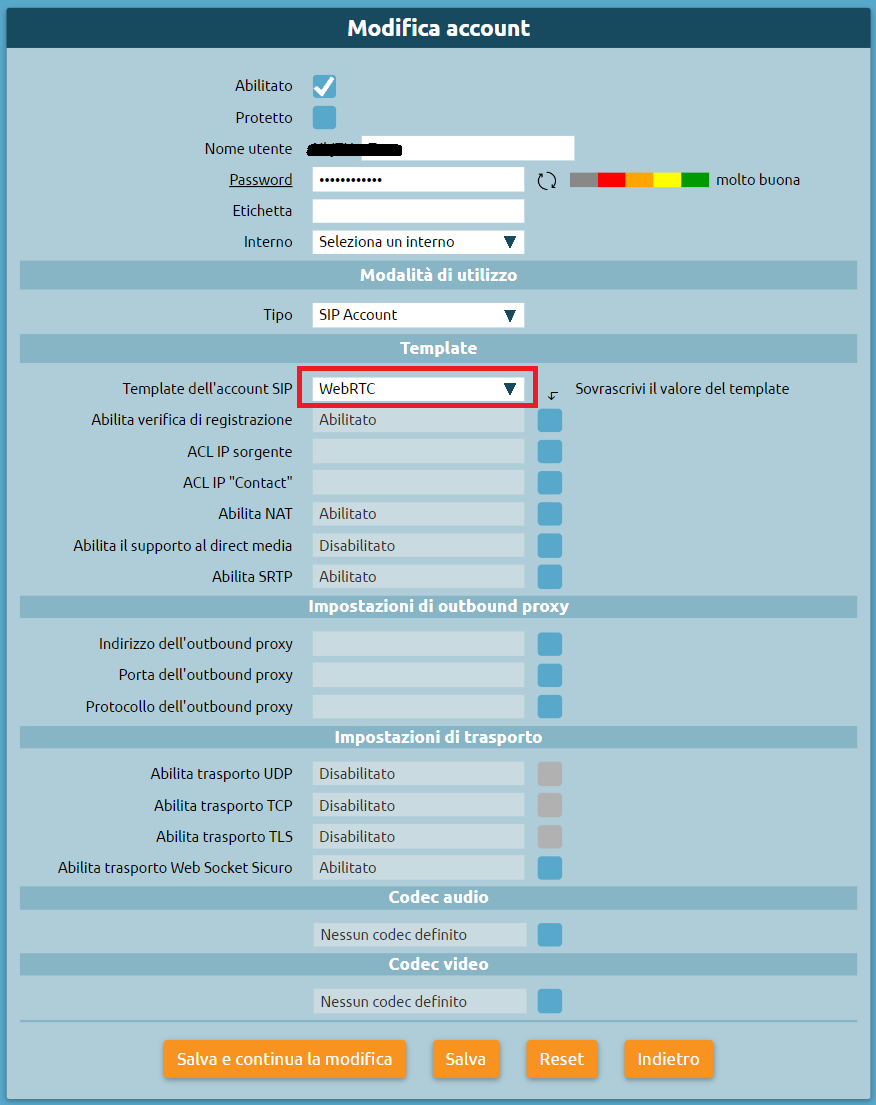
Account Settings
Fot the account configuration:
Use PCM a-law and/or OPUS.
Use WebSocket transport (WebSocket / Secure WebSocket).
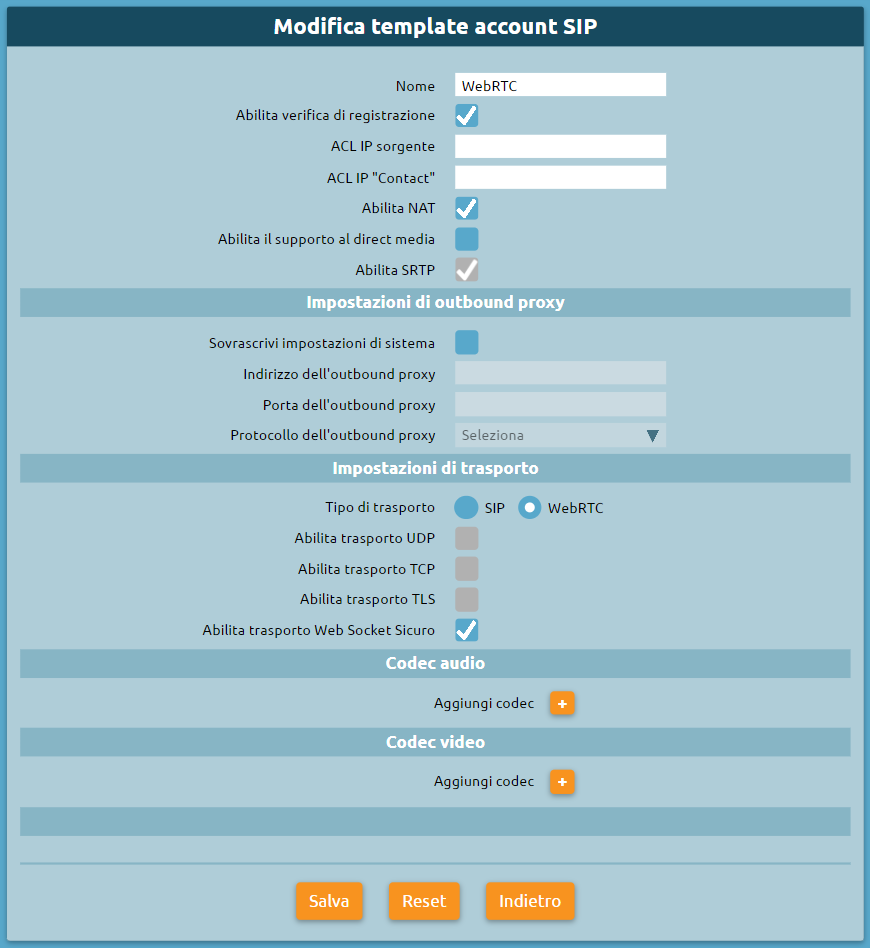
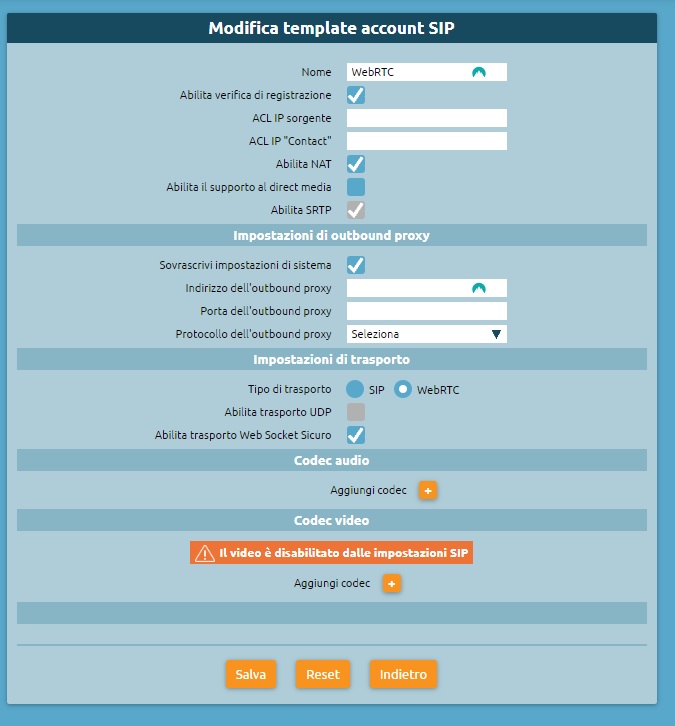
Example of a webRTC Template
Create a template with the following options enabled:
Enable NAT
Enable SRTP
Enable Secure WebSocket transport
Audio Codec: PCM a-law (and/or OPUS)
Only for KalliopeCloud create a template with the following options enabled:
Enable NAT
Enable SRTP
In “Outbound Proxy Settings”, enable the option “Override system settings” while leaving the rest of the settings unchanged.
Enable Secure WebSocket transport
Audio Codec: PCM a-law (and/or OPUS)
User Manual
Introduction
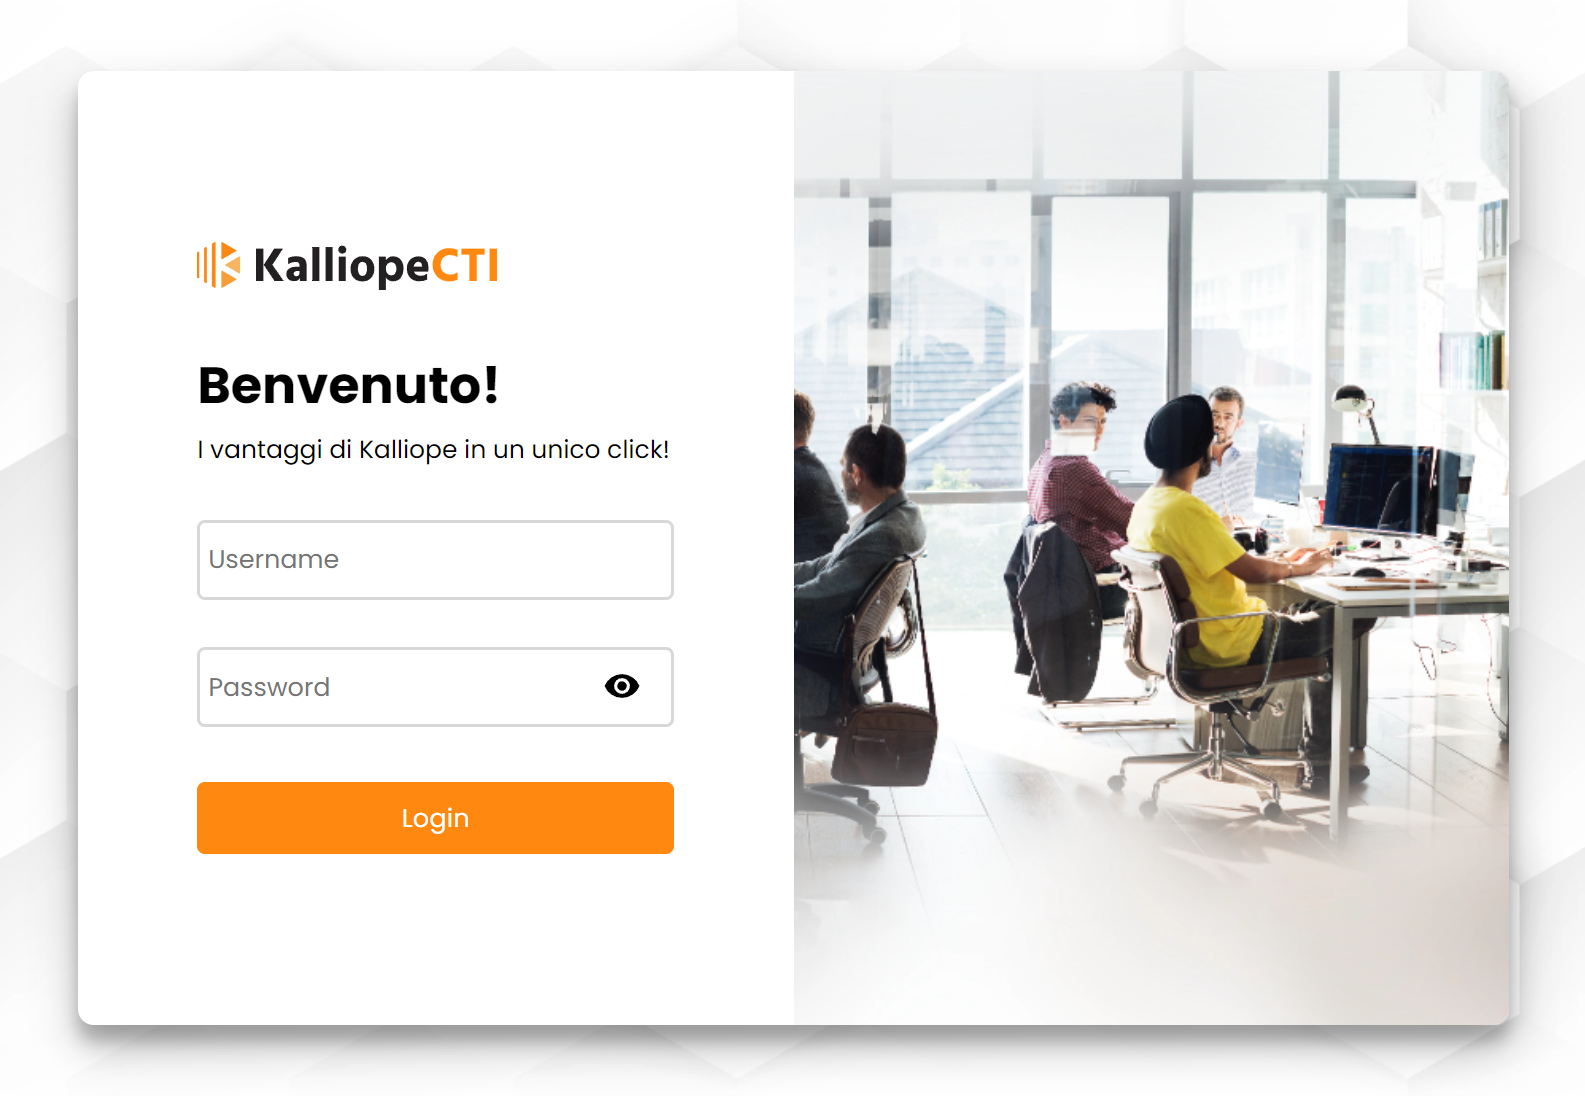
The new WebCTI allows access to telephony services and the information contained in the KalliopePBX switchboard via web browser. To access the service, you need to enter your Username and Password, as shown in the following figure:
Home
Once logged in, to ensure proper functioning of the WebCTI, you must grant permission to use the microphone, which is requested after logging in.
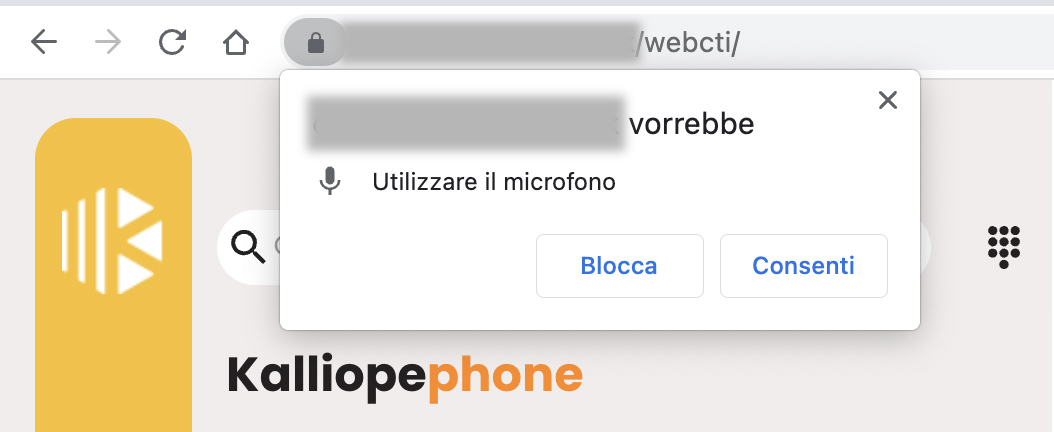
It is also necessary to grant permission to display notifications.

The main screen displays the Kalliopephone section on the left and, on the rest of the page, information about incoming and recent calls.
The main section, highlighted in yellow and represented by the headset icon, displays the list of all contacts, the list of extensions, and the address books.
Contacts may not be extensions (icon without a circle) or may be unregistered extensions (grey circle around the icon). Available contacts have a green circle around the icon, while busy contacts have a red circle.
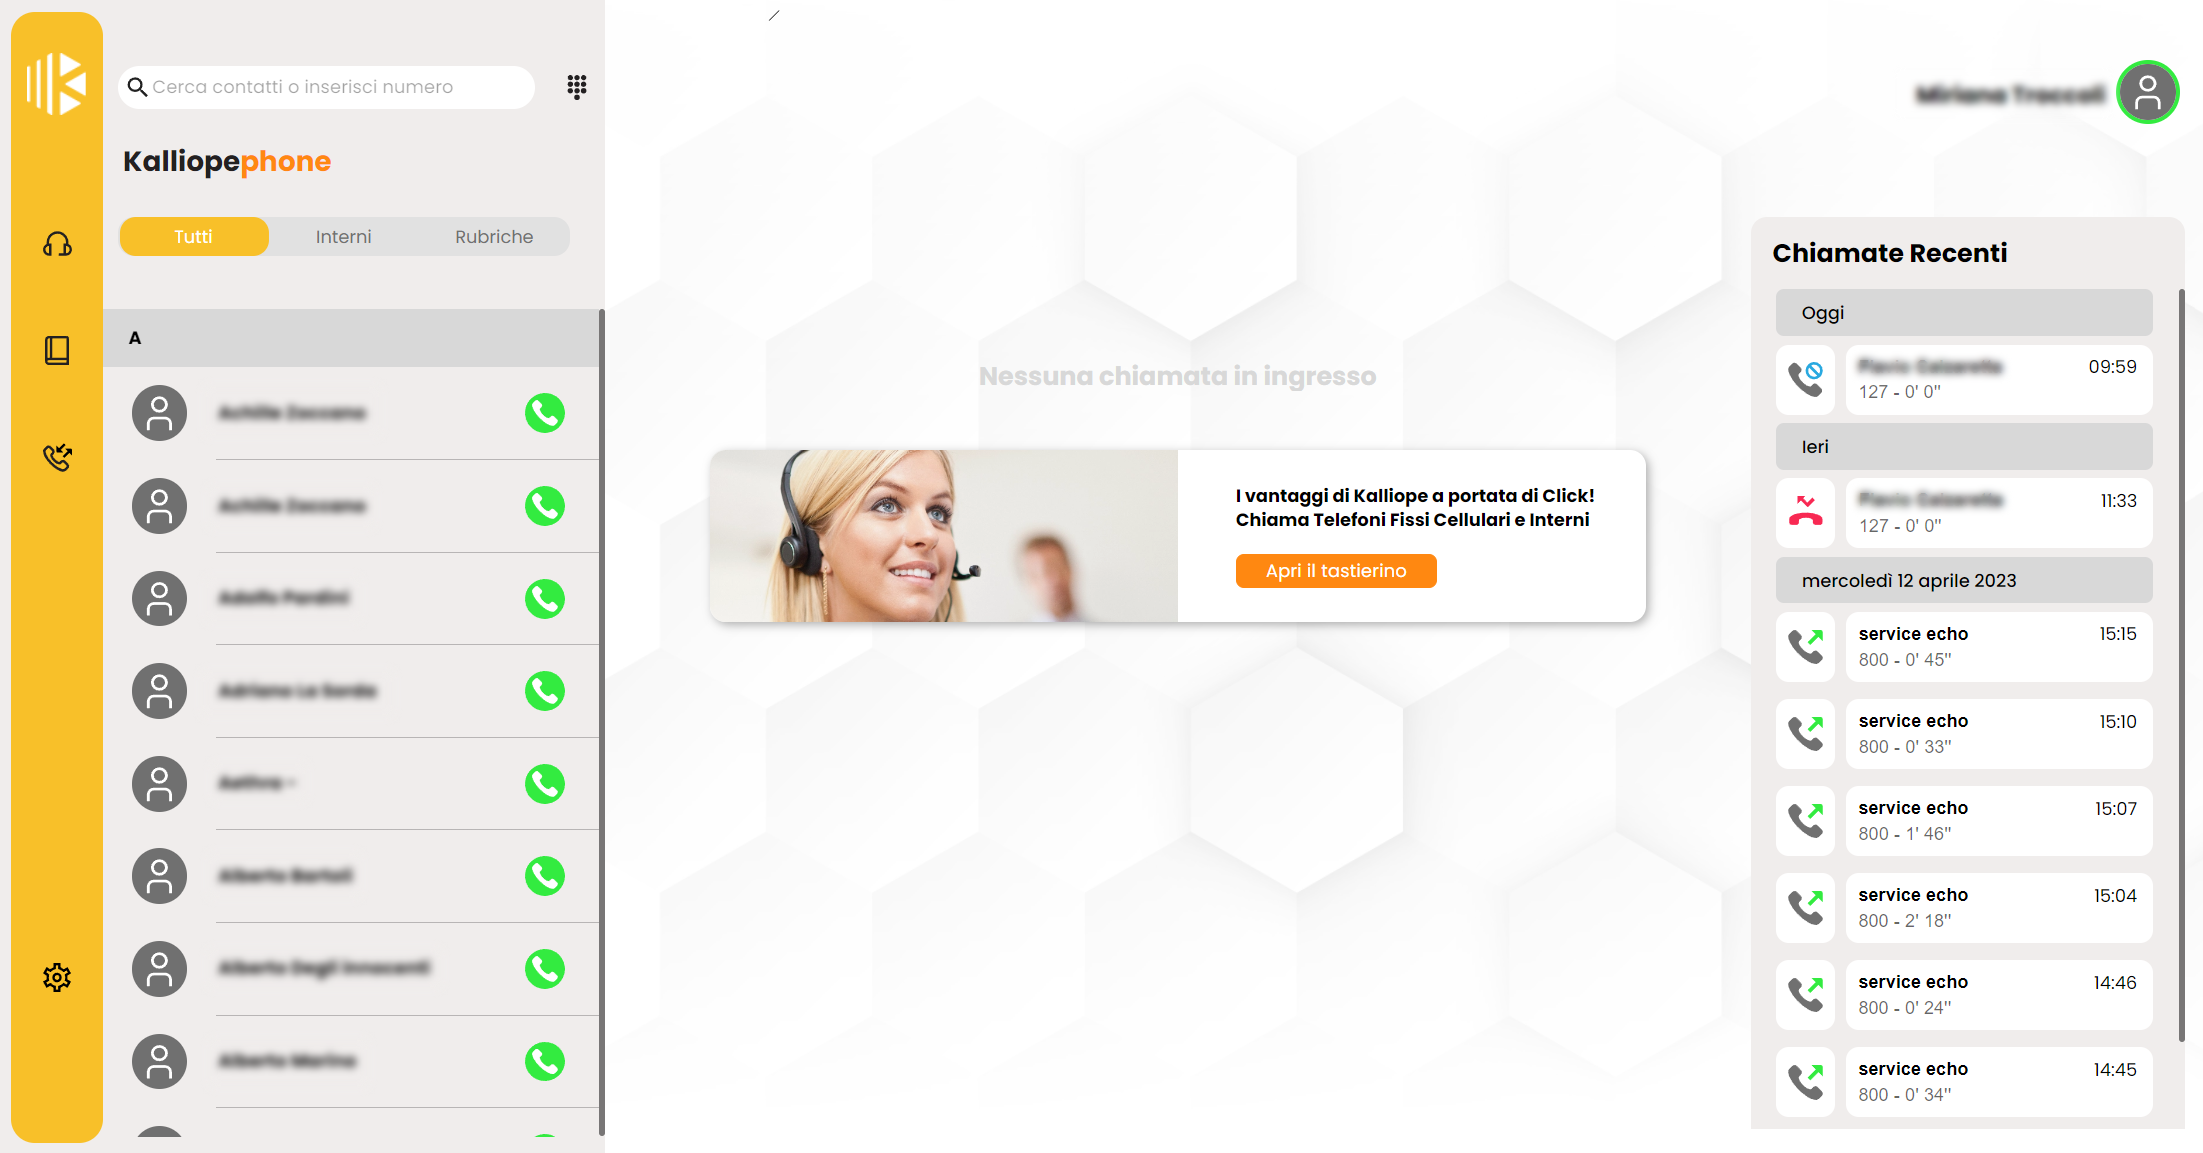
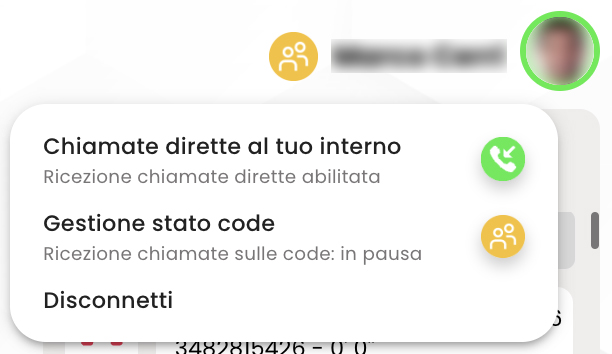
To disable incoming calls to your extension, simply click your profile icon at the top right and press the green handset icon next to “Direct calls to your extension”. The icon will turn red, and direct call reception to your extension will be disabled.

In the same menu, accessible by clicking on your profile icon, you can choose to log out.
Queue Management
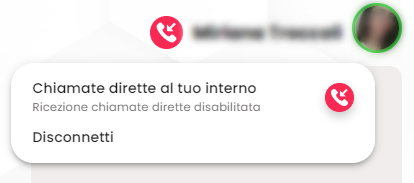
With the update to firmware 4.16.0, the ability to manage call queues has been introduced.
It is now possible to:
View real-time information on queue membership and pause status
Toggle pause status within your queues: in the “Queues” widget, pressing the “Activate” button enables the pause status for a specific queue, and pressing the “Pause” button disables the pause status

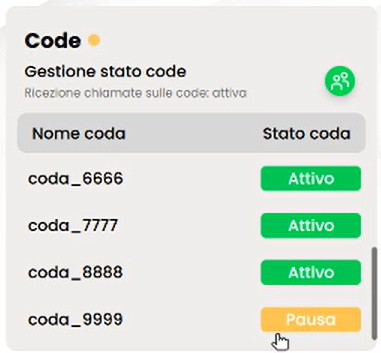
To activate the pause status on all queues, you need to click on the green  “Queue Status Management” icon, which will then turn yellow to indicate the pause status. To deactivate the pause status on all queues, click on the yellow
  icon, which will then turn green.
Note
The pause status is also indicated by a blinking yellow dot next to the “Queues” widget.
Pausing all queues can also be activated or deactivated through the menu accessible by clicking on your profile icon and pressing the “Queue Status Management” icon.
Outgoing Call Example
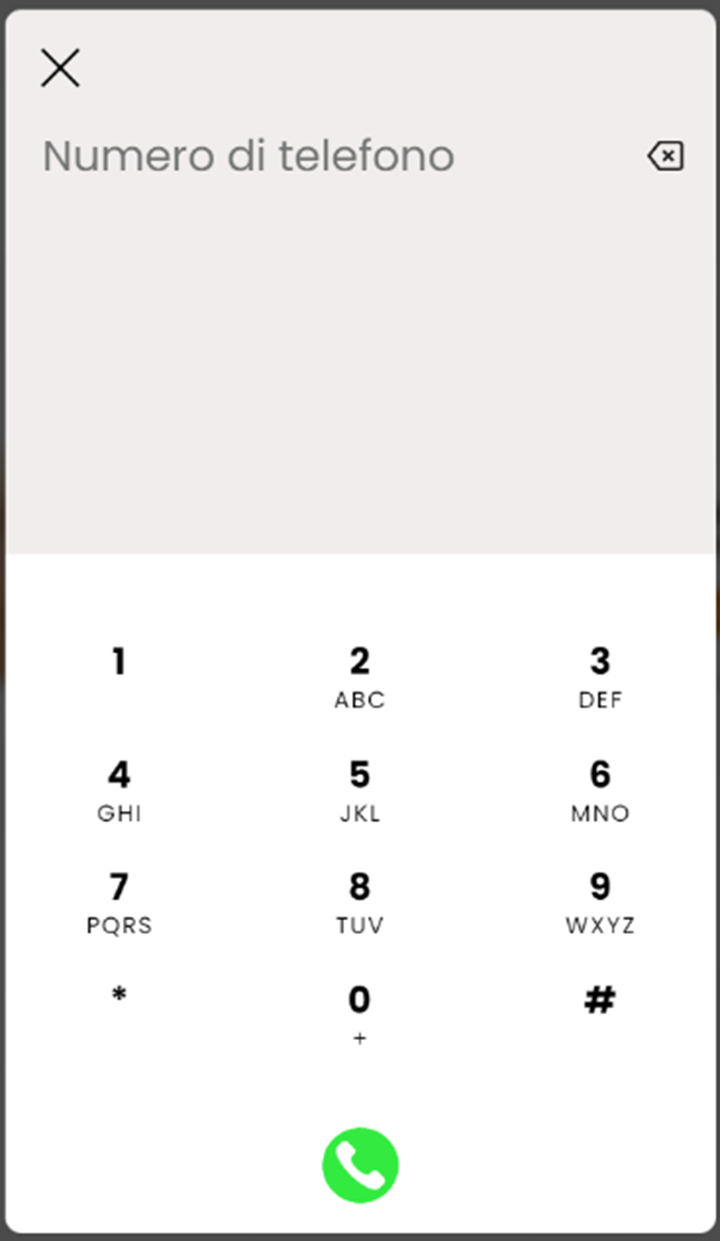
To make a call, you can search for the contact in the search bar using their name, type the number and press Enter, or use the numeric keypad located next to the search bar.

Note
For external calls, it may be necessary to dial the outbound line access prefix (depending on the configuration of the Kalliope pbx).
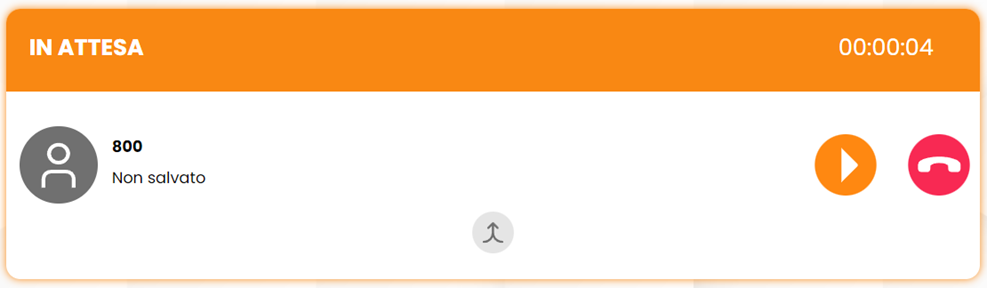
After dialing the number, during the ringing phase, the call card will appear as follows:

During the call, the card will contain several options:
Call hold

Call termination

Additionally, circled in red in the figure below, from left to right, you will find:
Opening the Numeric Keypad for sending DTMF tones.
Blind transfer to redirect the call to a chosen contact (without consultation).
Consulted transfer (with consultation).
The ability to add a participant to the call by entering their number or name.
Activating the Mute mode.

During call hold, it is possible to:
Merge the call with an active one using the icon
 .
.Resume the call
 .
.Terminate the call
.
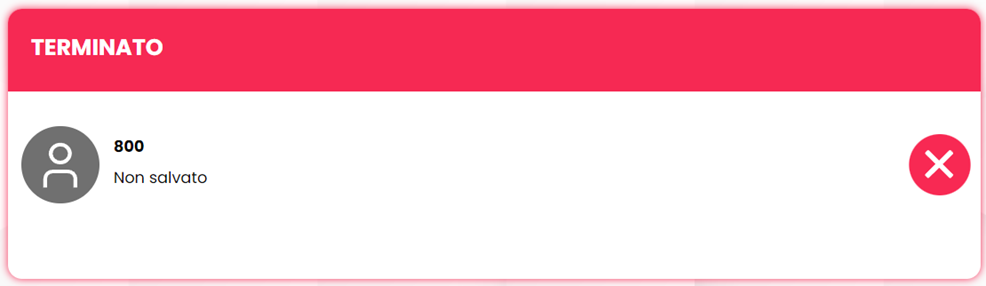
During call termination, the card will appear as follows:
Example of a call with multiple participants
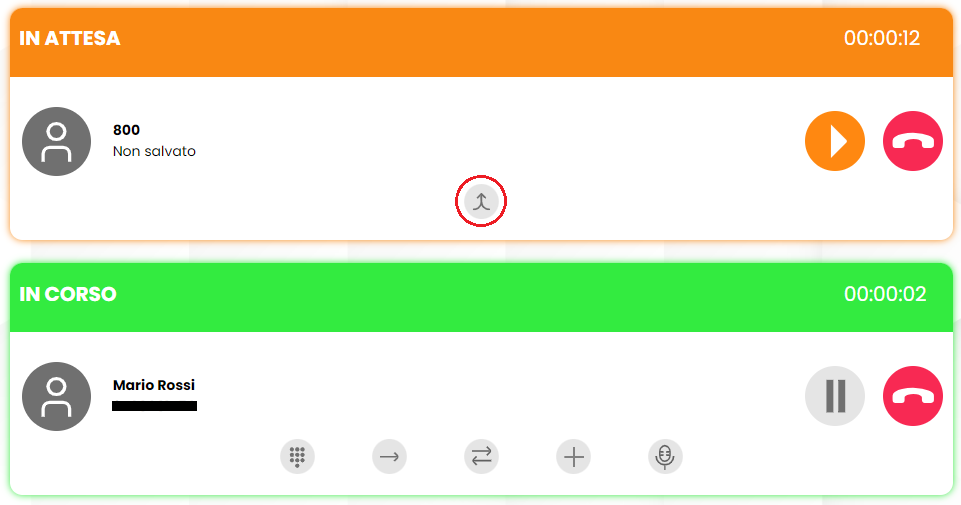
To add a participant to the main call in progress, press the “+” button.
The main call (in the figure, to number 800) will be placed on hold, and using the icon circled in red, it will be possible to add a new participant (in the figure, Mario Rossi).
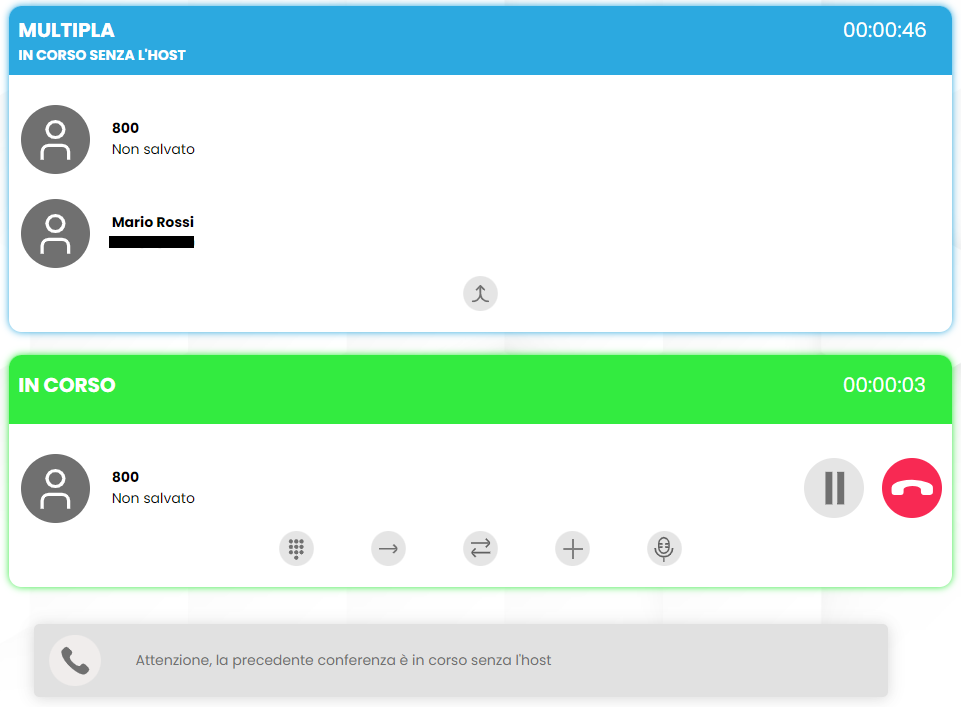
When making a call with 2+ participants, to add a new participant, you need to follow the same steps as previously described. However, unlike the previous scenario, the participants already in the conference (in the figure, within the blue box) remain in conversation and are not placed on hold.
Once in a conference, you can, using the numbered icons in the figure:
Place a participant on hold
Temporarily disconnect a participant from the call to continue the conversation privately (while the other participants continue without the host)
Permanently disconnect a participant from the call
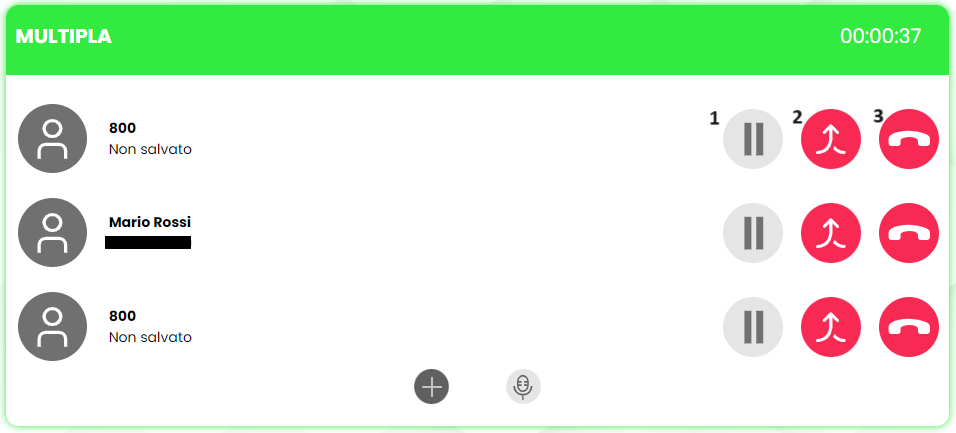
In the second case, for the host to rejoin the conference, they must place on hold or end the call with the participant they are speaking with privately (or re-add them to the conference if they are to remain part of it).
Incoming Call Example
The incoming call will be displayed by the WebCTI as shown in the figure and will be accompanied by an audible notification.
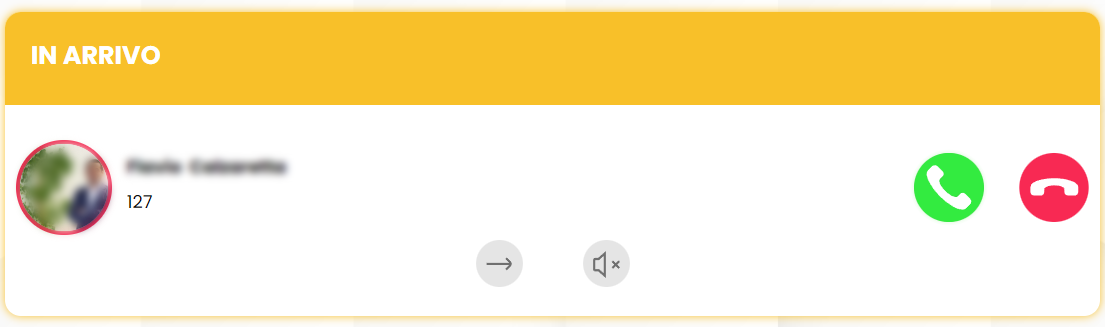
While the call is incoming, you can choose to:
Perform a blind transfer

Mute the ringtone

Answer using the green handset icon
Reject using the red handset icon
Personal Address Book
The address book section is highlighted in green and can be accessed by clicking on the book icon. Here, you can add contacts, search using the search bar, and view recent activities.
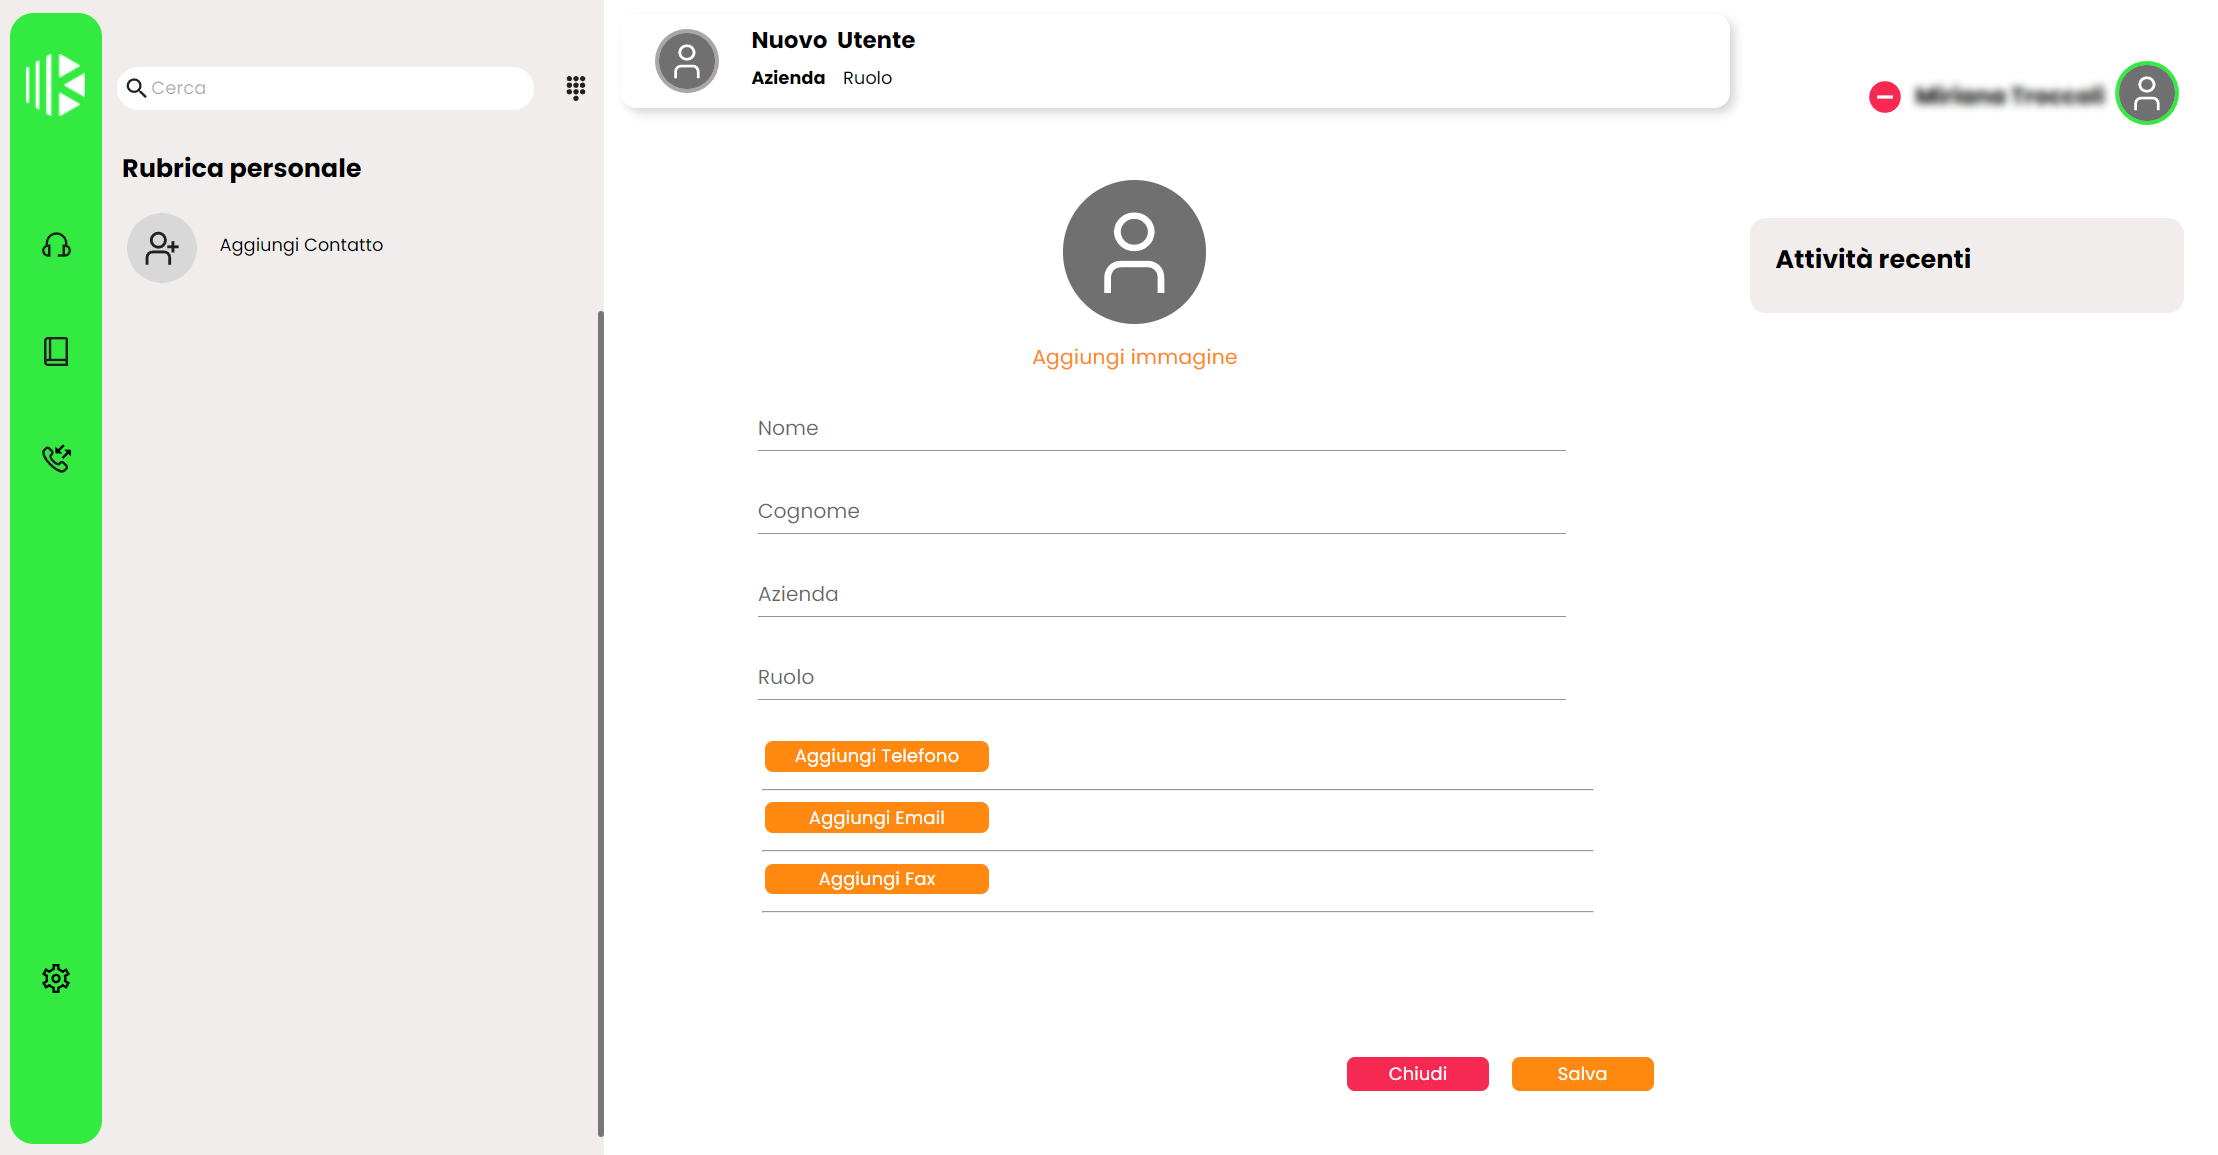
To add a new contact, simply click on “Add Contact”, which will display the creation form. The first fields allow you to enter the basic information about the contact, such as name, surname, company name, role within the company, and an optional profile picture.
Note
In this initial version, contacts are added to your personal address book and not to the shared address book (even if you have management permissions for it)..
The last fields contain information related to phone numbers, email addresses, and fax numbers. By clicking on “Add Phone”, you can select the desired type from the dropdown menu: Extension, Home, Work, Mobile, or Work Mobile, depending on your needs.
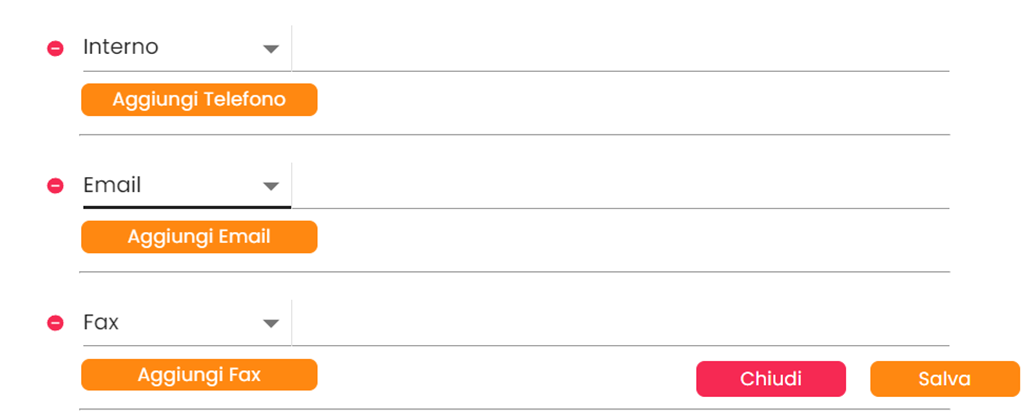
You can add multiple phone numbers, emails, and fax numbers by simply clicking again on “Add…”.
Created contacts will be displayed in the address book, and their information can always be edited using the “Edit” button. By clicking it, in addition to editing the information, you can choose to delete the contact using the “Remove” button.

Note
When logging out, if changes have been made, the entire address book is downloaded (currently, there is no option for updating only the modified contacts).
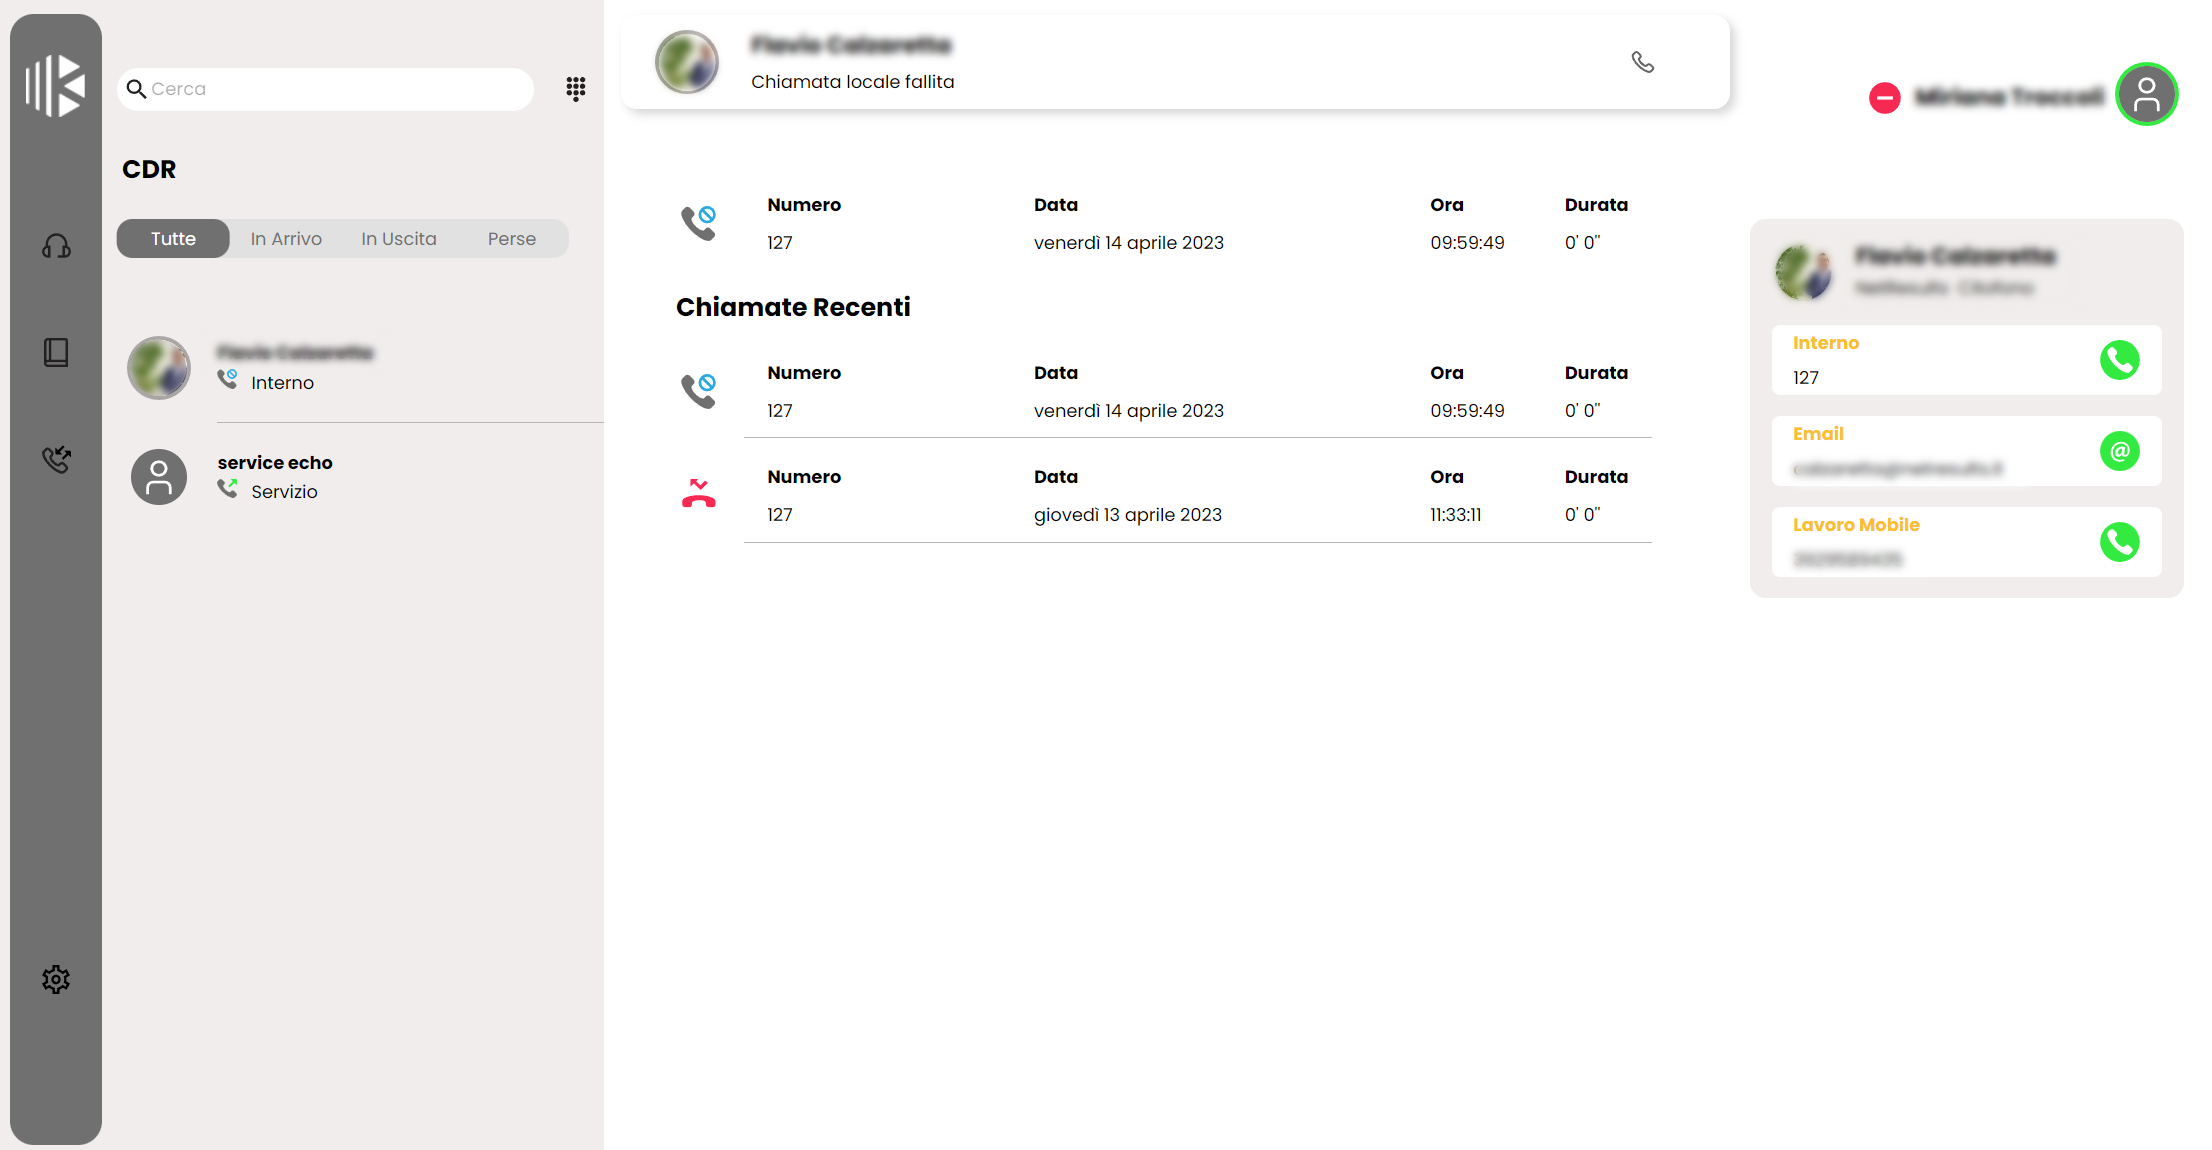
CDR
The section identified by the phone icon is dedicated to the call log. The menu is highlighted in gray and, on the left, distinguishes between all calls, incoming calls, outgoing calls, and missed calls.
The rest of the page displays the calls with their respective details:
Number: the number or extension of the interlocutor
Date: the date the call was made/received
Time: the start/receipt time of the call
Duration: the actual duration expressed in seconds
Note
In this initial version, CDR calls are updated only if they are made/received through the WebCTI, just as they are on phone terminals. Therefore, if calls are made/received outside the WebCTI, the WebCTI call list will not be updated.
Settings
The settings panel can be accessed by clicking on the gear icon at the bottom left and allows you to configure and customize WebCTI features.
Audio Settings
In this section, you can find the available audio devices and select options for microphone (audio input), speaker (audio output), and ringtone. The following options are available:
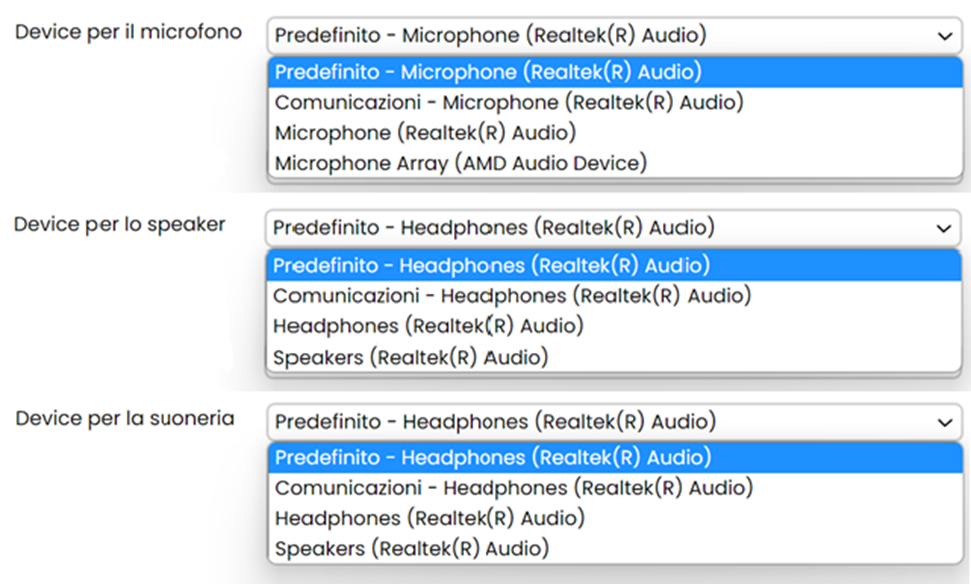
With the update to firmware 4.15.7, it is also possible to check the microphone input level and play an audio test for the speaker and ringtone:

Services
The “Services” section contains the following settings:
Auto Answer: You can enable auto-answer for all calls or only for click-to-call calls. Note: Auto-answer will occur only if no other calls are active.
Call Forwarding: You can add a destination for each forwarding setting.
Call Waiting: You can select the busy level.
To save the settings, click on “Save”.

Automatic Actions
With the update to firmware 4.16.1, it is now possible to configure automatic actions, allowing the invocation of a URL while passing call parameters as attributes.
The section allows users to View the list of automatic actions and for actions created locally (via WebCTI by the user), modify or delete them using the respective icons  .
.
Note
Automatic actions defined at the switchboard level are provisioned to WebCTI users and appear in the initial list. However, they cannot be modified or deleted by the WebCTI user. When clicking on the edit icon, the only configurable option is opening the action in a new tab/window .
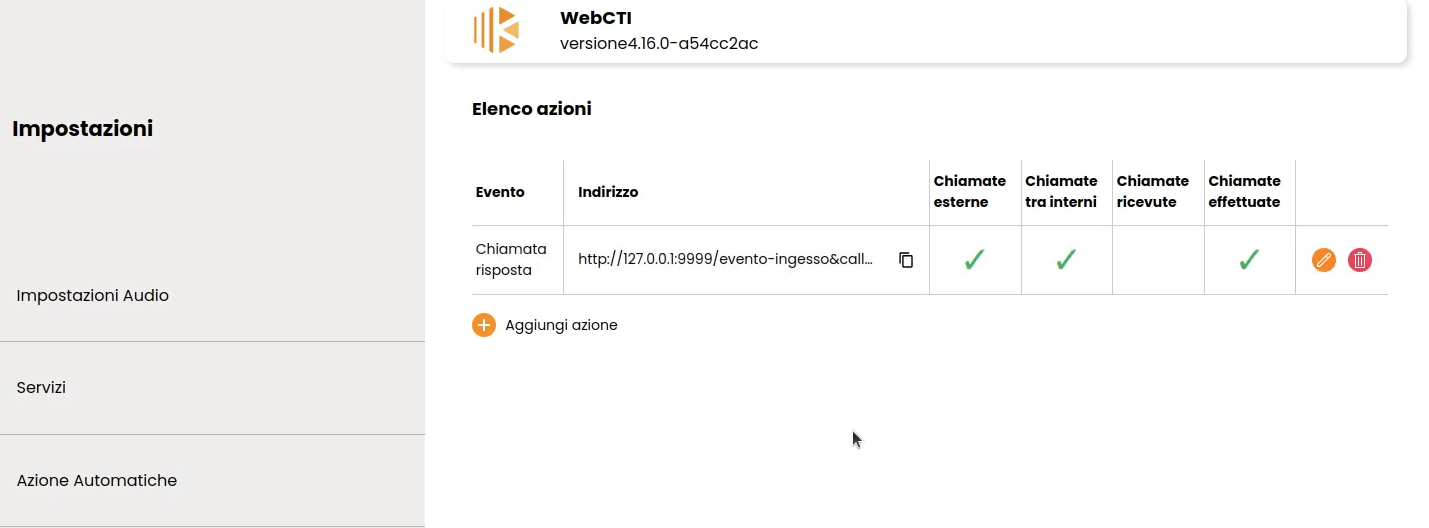
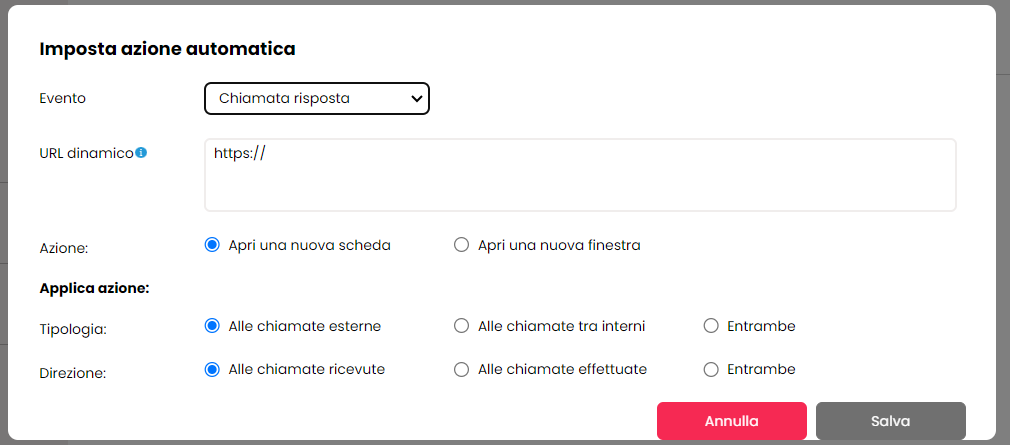
By clicking on the “Add Action” button, you can create a new automatic action.
In the “Set Automatic Action” panel, you can specify:
- Event type, which can be:
Incoming call: equivalent to the ring event
Answered call: the event triggers when an incoming call is answered
Ended call: the event triggers when the call is concluded (by either the local or remote user).
- Dynamic URL: to assist in filling in call parameters, type the character “<”. The available parameters are:
<callername>: automatically replaced with the name associated with the calling number, if present in the address book
<callernum>: automatically replaced with the number associated with the calling party
<callerCompany>: automatically replaced with the company name of the caller
<extenNum>: automatically replaced with the extension number associated with the local user
<queueName>: automatically replaced with the queue name associated with the calling number. It may be set to “N/A” if the called/calling number does not represent a queue
<callUid>: automatically replaced with a unique call ID
<calledNum>: automatically replaced with the called number
<callerUnit>: automatically replaced with the calling department
- Action:
Open a new tab.
Open a new window.
Depending on the event type, the following options are available:
- For incoming calls, you can select only the action type:
For external calls
For internal calls
For both
- For answered and ended calls, you can select both the direction and the action type
For received calls
For made calls
For both
Kalliope Call Center
Introduction
Kalliope Call Center is an optional KalliopePBX module that adds advanced features specially designed for call centers.
The main features included in Kalliope Call Center are:
Kalliope Supervisor Panel
Call Center CDR
Call Tagging
Spy/Whisper/Barge services
Queue position reservation and automatic callback
This page describes the Kalliope Supervisor Panel. For further information on the other features included in Kalliope Call Center, see the user manual.
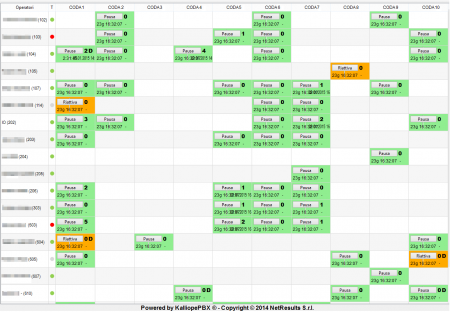
Kalliope Supervisor Panel
The Kalliope Supervisor Panel software lets a user access queue statistics based on their role, monitor and change the state of the operators, and manage dynamic operators.
When first opening the application, you will need to go to the Settings page and insert the credentials of the extension. The system will automatically check for the required Call Center license and the role of the user (supervisor or operator).
Note
Installation does not prompt for any activation keys. Instead, the application will automatically check for the correct license on KalliopePBX every time it is opened.
Menu bar
The menu bar lets you select the Settings sub-menu.
The Settings menu contains the following items:
Connect to KalliopePBX: start the connection with KalliopePBX
Disconnect from KalliopePBX: interrupt the connection with KalliopePBX
Fullscreen: view the application in fullscreen mode (shortcut: F11)
Settings: opens the Settings page
Quit: close the application (shortcut: CTRL+Q)
Settings page
From the menu bar you can open the configuration page, which consists of two parts: Credentials and Customize logo.
Credentials
This section lets you configure the following parameters:
KalliopePBX IP address: the IP address of the KalliopePBX the application should connect to
Username: the name assigned to the user
Password: the password assigned to the user
Note
The username and password are the same as the credentials on the System -> KCTI/Web users page on KalliopePBX V4.
Customize logo
This section lets you upload an image file containing the custom logo that will be displayed in the main screen of the application instead of the KalliopeCC logo.

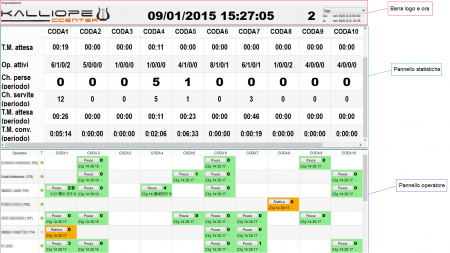
Main screen
The main Kalliope Supervisor Panel screen is divided in thee sections:
Logo bar
Statistics panel
Operator panel
The first has a set size and cannot be hidden, while the other two can be expanded or reduced and can be set to completely fill the main screen. This can be useful if, for example, you wish to only view aggregated data without seeing the names of every operator.
The main screen changes depending on whether the logged-in user is a supervisor or an operator. A supervisor will see information on all active queues on the PBX and will have permissions to pause and assign queues to every operator. An operator will only see the queues and statistics that concern them.
The three sections are detailed below.
Vediamo, di seguito, le singole le sezioni in dettaglio.
Time and logo bar
As explained above, this section can be partly customized by changing the logo from the Settings page.
The time and logo bar displays the following information:
The KalliopeCCenter logo or the custom logo uploaded by the user
Date and time
The total number of calls in every queue
Time range selection: from the drop-down menu you can choose the time range for which to display aggregated data in the section below
Statistics panel
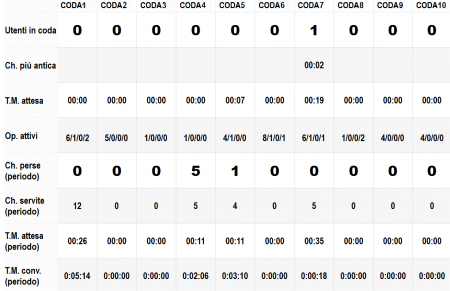
This columns of this table display information on each active queue on the PBX.
The rows display data on:
Users in the queue: dynamically updates when a user enters or exits the queue
Oldest call in the queue: the time, in seconds, that the oldest call has been in the queue;
Average waiting time: always refers to the last hour regardless of the selected time range and updates every 5 minutes by automatically downloading and analyzing the month’s CDR;
Active operators: reports the state of the operators in real-time; the first number is the number of active registered operators (green BLF), the second the number of busy registered operators (red BLF), the third the number of paused registered operators (orange BLF), and the fourth the number of operators whose state is unavailable (gray BLF);
Missed calls (in the selected range): varies depending on the time range selected in the drop-down menu;
Answered calls (in the selected range): varies depending on the range of time selected in the drop-down menu;
Average waiting time (in the selected range): varies depending on the range of time selected in the drop-down menu;
Average conversation time (in the selected range): varies depending on the range of time selected in the drop-down menu;
Operator panel
The first column shows the registered operators on the PBX, the second the corresponding BLF state, and the remaining ones correspond to each queue, as with the statistics panel.
Each row corresponds to a single operator and their data for each queue they are statically or dynamically assigned to. This table gives an overview of the situation across all queues.
Each cell corresponding to a specific operator and a specific queue gives the supervisor important information.

The color of the cell indicates the state of the operator. If the operator is active, the cell is green; if the operator is paused, the cell is orange. Similarly, the button will change between Pause and Reactivate.
Note
Operators are only able to change their own status, while supervisors can act on all operators.
Each cell also displays the following information:
The number of answered calls in the selected time range, on the top right;
Whether the operator is static or dynamic on that queue (in the latter case, a “D” will be displayed next to the number of answered calls);
Time operating on the queue: the amount of time since the status was last changed from active to pause or vice versa;
Time of the last served call.
Adding dynamic operators
A dynamic operator is a user that has been temporarily assigned to one or more queues by a supervisor. Unlike static operators, dynamic operators are assigned to the queues on an application level rather than a PBX level.
Any extension on the PBX can be set as a dynamic operator, not just those already assigned to a queue.
To add an extension that is already an operator on at least one queue, the supervisor can simply right-click on the empty cell that corresponds to the desired queue and selecting Add from the context menu. Similarly, they can remove the operator by right-clicking on the relevant c

If the extension is not an operator on any queue, the supervisor must use the drop-down menu at the end of the column that corresponds to the desired queue. From there they can select the desired extension then click on Add to assign it to the queue as a dynamic operator. A new row will appear displaying information on the new operator.
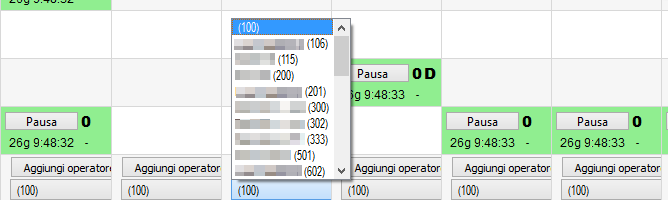
As with other dynamic operators, the supervisor can simply right-click on the relevant cell to remove the extension from the queue.
Kalliope Attendant Console
Introduction
KalliopeATC (or KATC) is an accessory application of the KalliopePBX VoIP that incorporates features specially designed for phone operators into KalliopePhone’s usual features.
KATC is available for Windows.
The following table lists the main features of KATC.
Kalliope Attendant Console features |
|---|
Extension phonebook |
Shared phonebook |
CDR |
Inbound call notification |
Chat |
Presence |
Opening a custom URL for inbound calls |
Voicemail access |
Drop-to-Call |
BLF |
Blind transfer |
Attended transfer |
Queue statistics |
Inbound call classification |
Do Not Disturb |
Call recording |
Unconditional forward |
Call parking |
Call pickup |
Pickup with invite |
Forking to Mobile |
Touchscreen support |
Drag & Drop call transfer |
Installation
KalliopeATC can be bought separately from KalliopePBX and can be activated by purchasing a license.
On the configuration page you can insert the credentials of an extension and the system will automatically check for the required license.
Note
Installation does not prompt for any activation keys. Instead, the application will automatically check for the correct license on KalliopePBX every time it is opened.
For instructions on activating the KATC license on KalliopePBX V4, see the licenses page.
System requirements:
Windows 7 or later
Sound card (for KATC Phone)
2 GB of RAM
40 MB of free disk space
To install the application on Windows, simply open the executable file and follow the instructions.
Configuration
When you first open the application, you will see a message prompting you to insert the configuration parameters.
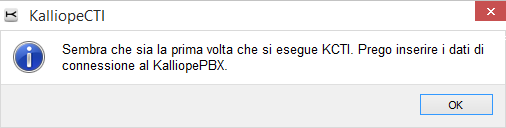
You will then be taken to the configuration page. The settings are grouped by category.
Application mode
In this tab you can select which mode to use: Kalliope Attendant Console CTI or Kalliope Attendant Console Phone. You can also choose the language (English, Italian, Spanish).
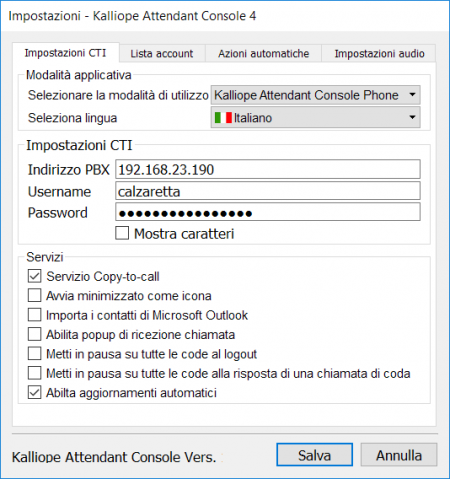
KATC settings
In this tab you can configure the following settings:
KalliopePBX IP address: the IP address of the KalliopePBX the application should connect to
KCTI username: the name assigned to the user
KCTI password: the password assigned to the user
Note
The username and password are the same as the credentials on the System Settings -> Users management page on KalliopePBX V4.
Services
In this tab you can configure the following settings:
Open minimized as system icon: if selected, the application will open in minimized mode.
Import Microsoft Outlook contacts: if selected, KCTI will automatically sync with Microsoft Outlook contacts when opened. The imported contacts will appear in the phonebook marked by an icon.
Enable call reception popup: enables or disabled the call reception popup.
Pause on all queues upon logout
Pause on all queues upon answering a call from the queue
Enable automatic updates: automatically download available Kalliope Attendant Console updates
Phone integration
In KCTI 4 Pro mode, you can remotely control a linked phone through native APIs. This feature is currently only available on Snom or Yealink phones.
Account list
This tab shows all accounts linked to the user, listing the brands, models, firmware, and MAC addresses of each one. It is up to the user to select which accounts to link to KATC.
Automatic actions
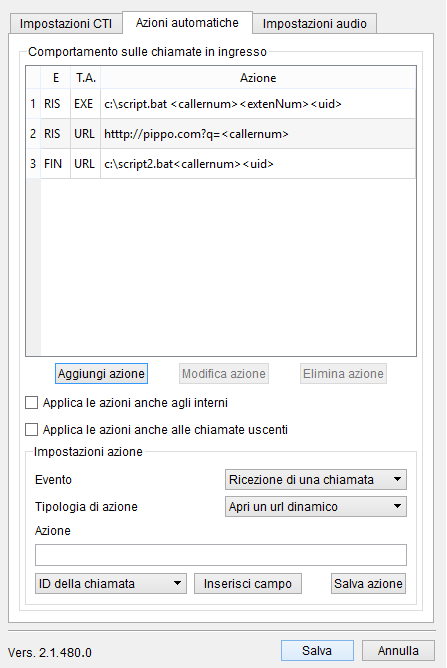
In this tab you can manage the behavior of the application during inbound calls by configuring actions triggered by the following events:
Arrival of call: the action will be executed when the phone begins to ring
Answering call: the action will be executed when the user answers a call
End of call: the action will be executed when the call is terminated, either by the local user or by the remote one
For each of these events, you can choose one or more actions of two types:
Open a custom URL
Execute an external process
In both cases you can use the following dynamic parameters:
<callername>: this parameter will be replaced by the name assigned to the caller if present in the phonebook
<callernum>: this parameter will be replaced by the number of the caller
<extenNum>: this parameter will be replaced by the extension number of the local user
<uid>: this parameter will be replaced by a unique call ID.
The figure to the side shows the automatic event configuration tab. The table on the top part of the tab contains the list of configured actions, showing the type of event (“IN” = arrival of call, “RIS” = answering call, “FIN” = end of call), the action type (“EXE” = execute an external process, “URL” = open a dynamic URL), and the action details.
Once the action has been saved, you can always edit or delete it by selecting it and clicking on Edit action/Delete action. For each action you can indicate whether it must be executed only on calls from external users or on calls between extensions as well, and whether or not it must also be executed on outbound calls.
Audio settings
This tab is only available in KATC Phone mode and lets you select the audio devices to use for audio input (microphone), audio output (to listen to the call), and for notifications (audio output for the ringtone and other notifications).
Manuale Utente
The KATC v4 user manual is available in pdf format at this link.
KalliopeCTI 4
Warning
The KalliopeCTI 4 version 4.5.23 manual for the client installation and configuration is available here. To download the client for your operating system, visit kalliope.com, menu Support –> Downloads and then Applications
Introduction
KalliopeCTI 4 (or KCTI 4) is an accessory application of the KalliopePBX V4 VoIP that helps you use its services and access information.
KCTI 4 (available in Free, Pro, and Phone modes) is a cross-platform application on Windows, Mac OS X, and Ubuntu. A KCTI 4 Pro or Phone license includes a license for the KCTI Mobile app for Android and iOS.
The KalliopeCTI Mobile user manual can be found here.
The following table lists the features available with each mode:
KCTI 4 Free |
KCTI 4 Pro |
KCTI 4 Phone |
KCTI 4 Mobile |
|
|---|---|---|---|---|
Extension phonebook |
✓ |
✓ |
✓ |
✓ |
Shared phonebook |
✓ |
✓ |
✓ |
✓ |
CDR |
✓ |
✓ |
✓ |
✓ |
Click-to-call |
✓ |
✓ |
✓ |
✓ |
Inbound call notification |
✓ |
✓ |
✓ |
✓ |
Instant Messaging |
✓ |
✓ |
✓ |
✓ |
Presence |
✓ |
✓ |
✓ |
✓ |
Opening custom URLs |
✓ |
✓ |
✓ |
✘ |
Voicemail access |
✓ |
✓ |
✓ |
✓ |
Synchronization with Outlook contact |
✘ |
✓ |
✓ |
✘ |
BLF |
✘ |
✓ |
✓ |
✓ |
Number dialing |
✘ |
✓ |
✓ |
✓ |
Blind transfer |
✘ |
✓(2) |
✓ |
✓ |
Attended transfer |
✘ |
✓(2) |
✓ |
✓ |
Do not Disturb |
✘ |
✓(2) |
✓ |
✘ |
Call recording |
✘ |
✓(2) |
✓ |
✘ |
Unconditional forward |
✘ |
✓(2) |
✓ |
✘ |
Call parking |
✘ |
✓(2) |
✓ |
✘ |
Call pickup |
✘ |
✓(2) |
✓ |
✘ |
Forking to Mobile |
✘ |
✓(2) |
✓ |
✓ |
Queue statistics |
✓(2) |
✓(2) |
✓(2) |
✘ |
Supervisor mode |
✓(2) |
✓(2) |
✓(2) |
✘ |
Selective pause |
✓(2) |
✓(2) |
✓(2) |
✘ |
Touchscreen support |
✘ |
✘ |
✘ |
✓ |
Mobile phonebook integration |
✘ |
✘ |
✘ |
✓ |
1 Available only when paired with a Snom or Yealink phone
2 Available only when paired with Kalliope Call Center
Download and installation
KCTI 4 can be downloaded for free from the Download page of the official KalliopePBX website.
The user can then go to the configuration page to select which version to open each time (as long as the corresponding license has been activated on KalliopePBX V4). KCTI Free, Pro, or Phone are different modes of the same software.
Note
Installation does not prompt for any activation keys. Instead, the application will automatically check for the correct license on KalliopePBX every time it is opened.
Unlike KCTI 4 Free, KCTI 4 Pro and Phone require a specific license to be activated on KalliopePBX V4 for each workstation. The KCTI 4 Phone license also includes KCTI 4 Pro. The user can choose their desired mode from the configuration page.
For instructions on how to activate the KCTI 4 Pro or KCTI 4 Phone licenses, see the licenses page.
System requirements:
Windows:
Windows 10 or later
Sound card (for KCTI Phone)
2 GB RAM
100 MB of free disk space
MAC:
macOS: Ventura, Monteray and BigSur
recommended: Apple hardware from 2013 or later
Linux:
Ubuntu 22.04 and 20.04
To install the application on Windows, simply open the executable file and follow the instructions.
Note
In case the SIP service of the central unit is exposed on a different IP from the CTI connection one, or on a different port from the standard one (5060) it is necessary to set on the KalliopePBX one or both of the following custom placeholders inside the Provisioning panel: %%_KPHONE_SIP_REGISTRAR_IP%% and %%_KPHONE_SIP_REGISTRAR_PORT%%% . This configuration is normally necessary when the SIP service is exposed to the public through a Session Border Controller that uses a different IP from the one on which the PBX is reachable, while it is not necessary if the PBX and the SBC are NATed on the same public IP, each one for the ports of its competence (TCP/5039 and TCP/5222 for the CTI and Chat components, towards Kalliope, and SIP + RTP for voice, towards the SBC).
User Manual
The KalliopeCTI 4 manual for version 4.5.23 and the installation and configuration of the cient is available here.
Special parameters of the KalliopeCTI INI file
Starting from 4.5.18 of KalliopeCTI the following parameters can be added or modified in kcti.ini. The following table shows the editable parameters with the version of KalliopeCTI from which the parameter is present and editable.
Parameter |
Example Value |
Description |
Starting from (version KCTI Desktop) |
|---|---|---|---|
echoCanceller |
on |
To enable (on) or disable (off) the echo cancel. Default: on |
4.5.23 |
echoCancellerLmsFilter |
off |
To enable (on) or disable(off) the echo caneller LMS filter. Default: off |
4.5.23 |
echoSuppressor |
on |
To enable (on) or disable (off) the echo suppression. Default: on |
4.5.23 |
suppressorLowerThreshold |
10 |
To set the lower threshold (percentage) of echo suppression. Allowed value range: [0, 100]. Default: 10 |
4.5.23 |
suppressorUpperThreshold |
40 |
To set the highest threshold (percentage) of echo suppression. Allowed value range: [0, 100]. Default: 40 |
4.5.23 |
suppressorDivider |
15 |
To set the echo suppressor divider. Allowed value range: [2, 50]. Default: 15 |
4.5.23 |
suppressorConvergenceMillis |
4000 |
To set the echo suppressor convergence (millis). dell’echo suppression. Allowed value range: [1000, 120000]. Default: 4000 |
4.5.23 |
chatKeepAliveSendIntervalSecs |
120 |
To XMPP ping messages, default 2 minutes |
4.5.19 |
contactsRefreshTimeoutSecs |
600 |
To the contacts refresh, default 10 minutes |
4.5.18 |
cdrRefreshTimeoutSecs |
90 |
To cdr/voicemail refresh, default 1 minutes and 30 seconds |
4.5.18 |
identitiesRefreshTimeoutSecs |
300 |
To identities refresh, default 5 minutes |
4.5.18 |
queueStatsRefreshTimeoutSecs |
300 |
To queue stats refresh, default 5 minutes |
4.5.18 |
codecOrderRefreshTimeoutSecs |
30 |
To codec order refresh, default 30 seconds |
4.5.18 |
excludedOutlookFolders |
Public folders;Cache;Lync;Skype |
list of strings contained in the Outlook folders to be excluded. Including the relative subfolders from contacts imports. As a separetor you can use ; |
4.5.18 |
queueNames |
Queue1;Queue2 |
list of the queue names to be displayed in the Supervisor panel. As a sepaetor you can use ; |
4.5.15 |
kcti.ini is located in the same directory of the traces (AppDataRoamingKCTI4 under the user path).
Note
kcti.ini must be edited manually when Kcti is not running.
API
The client provides the user with APIs to perform actions without the use of the graphic interface. The available actions are:
To call a number
To close the current call
To transfer with/without an offert the call in progress
To pause/unpause on all queues
To enable/disable DND
Retrieve the data of the active call
For versions 4.5.0 and up a Postman collection is available to test the API of the KalliopeCTI client. You can download it from this link: KalliopeCTI Client (vers.4.5.x) postman collection. You can also download a Kalliope CTI client API operation manual in pdf format from here link
KalliopeCTI Mobile
Attention
KalliopeCTI Mobile app is no longer supported as of December 31, 2023
Introduction
For those who need to always be on call, Kalliope has designed the KalliopeCTI mobile app for Android and iOS.
The KalliopeCTI mobile app is an optional product that lets you access telephone and UC services even outside your office through your extension number, using the company lines.
To guarantee stability and improve conversation quality, KalliopeCTI mobile lets you choose how to handle your calls: based on data traffic availability, you can choose whether to use the GSM network or use the app in softphone mode.
KalliopeCTI mobile lets you call using three different modes:
Click-to-call: the call will be handled through the desk phone associated with your extension;
Call-back: call from your smartphone using Kalliope lines;
Softphone: using an integrated SIP telephone engine, your smartphone will register to KalliopePBX like any other IP client.
KalliopeCTI mobile is available on Playstore and App Store.
View the policy on Processing of users’ personal data
Note
Each extension can only be linked to one KCTI account.
Initial configuration
In order to use the KalliopeCTI mobile app you must first:
Enable “KCTI Mobile App” in the account settings
Note
Only one account per extension may be enabled to use the mobile app
Assign one of the following KalliopeCTI licenses to the user:
KalliopeCTI Pro license -> enables the use of the KalliopeCTI mobile app only in callback mode (GSM™)
KalliopeCTI Phone license -> enables the use of the KalliopeCTI mobile app in both softphone and callback mode
If you wish to externally access the company network with the mobile app, you will need to publish the following KalliopePBX ports
Note
It is recommended to not expose the central unit’s SIP service on the public in a direct way that can be reached from arbitrary IPs, but to use a Session Border Controller that can properly protect the central unit from intrusion attempts from outside)
TCP 5039 port for CTI services
TCP 5222 port for XMPP chat services
UDP for SIP service port as configured in the “SIP settings” page (only for softphone mode, default value is ‘5060’)
UDP 10000-20000 ports interval for RTP streams (only for softphone mode)
Also, it is necessary that the KalliopePBX can send messages to the push notification servers of Apple and Google, so the reachability by the KalliopePBX of the following addresses must be guaranteed:
iOS: api.push.apple.com (HTTPS, port TCP/443)
Android: fcm.googleapis.com (HTTPS, port TCP/443)
Since these hosts may resolve different IPs over time, it is recommended that no filters be applied to HTTPS traffic exiting KalliopePBX.
In addition, in order for mobile devices running the KalliopeCTI Mobile APP to receive notifications, they must be connected and reachable by the sending services. For more information about the flows that must be ensured, please refer to the official documentation of:
Google: https://firebase.google.com/docs/cloud-messaging/concept-options#messaging-ports-and-your-firewall
Note
In order to avoid abnormal behavior in sending incoming/ending call notifications to clients, it is necessary that each user is logged in on a single device, because each SIP account (and therefore associated user) can be associated with a unique Firebase token (used to identify the recipient of the notifications).
Note
In case the central unit SIP service is exposed on a different IP than the CTI connection IP, or on a different port than the standard one (5060), it is necessary to set on the KalliopePBX one or both of the following custom placeholders within the Provisioning panel: %%_KPHONE_SIP_REGISTRAR_IP%% and %%_KPHONE_SIP_REGISTRAR_PORT%%%. This configuration is normally necessary when the SIP service is exposed to the public through a Session Border Controller that uses a different IP from the one on which the PBX is reachable, while it is not necessary if the PBX and the SBC are natted on the same public IP, each one for the ports of its competence (TCP/5039 and TCP/5222 for the CTI and Chat components, towards Kalliope, and SIP + RTP for voice, towards the SBC).
More and specific informations regarding the configuration and use of the KalliopeCTI Mobile app in the two operating systems Android and IOS can be found on the following dedicated pages:
Manuale KalliopeCTI Mobile app Android
Manuale KalliopeCTI Mobile app IOS
- Kalliope CTI Mobile Android
- Changelog vers. Android
- KalliopeCTI Mobile App Version 4.8.12
- KalliopeCTI Mobile App Version 4.8.11
- KalliopeCTI Mobile App Version 4.8.10
- KalliopeCTI Mobile App Version 4.8.9
- KalliopeCTI Mobile App Version 4.8.8
- KalliopeCTI Mobile App Version 4.8.7
- KalliopeCTI Mobile App Version 4.8.6
- KalliopeCTI Mobile App Version 4.8.5
- KalliopeCTI Mobile App Version 4.8.4
- KalliopeCTI Mobile App Version 4.8.3
- KalliopeCTI Mobile App Version 4.8.2
- KalliopeCTI Mobile App Version 4.8.1
- KalliopeCTI Mobile App Version 4.8.0
- KalliopeCTI App Mobile Version 4.7.3
- KalliopeCTI Mobile App Version 4.7.2
- KalliopeCTI Mobile App Version 4.7.1
- KalliopeCTI Mobile App Version 4.7.0
- KalliopeCTI Mobile App Version 4.6.0
- KalliopeCTI Mobile App Version 4.4.6
- Android Specification:
- Organization of the GUI
- Settings Panel
- Contacts
- Call history
- Voicemail
- Instant Messaging
- Call management
- Keypad
- Services
- Privacy Policy
- Changelog vers. Android
- Kalliope CTI Mobile IOS