Advanced phone services
Audio conference
Note
The audio conference service has greatly changed starting from firmware version 4.7.12, which introduces “dial-out” mode and a web panel for supervising and monitoring an audio conference room in real time, displaying the status of the participants and execute management actions such as expelling or inviting participants, disabling audio input for one or more participants, etc.
The audio conference service provided by KalliopePBX lets you configure multiple rooms with different settings. These rooms can be independently managed and monitored by individual PBX users (including those without admin privileges).
For each conference room, you can enable “dial-in” and/or “dial-out” access.
With “dial-in” access, participants access the service by calling a give number and join the conference room after inserting an access PIN (sent through DTMF tones).
Conference rooms can be accessed in different modes:
access with interactive room selection: the audioconferencing service has associated a selection within the numbering plan, the default value of which is 802; calling this selection from an extension a guide voice prompts to enter the number of the room to connect to. Depending on the room configuration, the guide voice may be prompted to enter an access PIN.
direct access to a specific room: a call is made to the selection associated with the service concatenated with the room number (e.g., 8021234, in case the service code is 802 and you want to access room 1234). Again, the guide voice will prompt you to enter the access PIN, if provided for the room.
In both these cases, you can allow rooms to be accessed by external callers as well by directing DID on inbound lines or forwards (in the numbering plan, through IVR menus, or from other telephone entities) towards the “Audio Conference Service” and selecting “Ask for room number” or one of the existing rooms.
With “dial-out” access, the PBX will call the configured participants when the room is opened from the GUI.
A room can be configured to have both “dial-in” and “dial-out” participants; a web panel allows the room manager to monitor the status of the room and its participants, with the option to execute management actions such as muting and unmuting one or more participants, expelling a participants from the room, or closing the room (consequently expelling all participants).
Room configuration
Conference rooms are configured in two phases. In the first phase the room is defined by assigning it an identity (i.e. a room number) and settings certain accessory parameters. The second phase concerns the operational settings. In this phase you can set the access mode of the room (dial-in and/or dial-out), set the behavior when a new participant joins the room (e.g. whether of not to require an access PIN) or configure a list of internal or external contacts that the PBX should call when a room with dial-out access is opened.
Creating and configuring an audio conference room
his service can be configured in the “PBX applications” -> “Audio conference service” page. the panel shows the list of existing rooms with their main attributes. To add a new room or edit and existing one you will need to acquire a lock.
To edit an existing room, click on the pencil icon; to add a new one click on “Add new room” above the list of rooms. In both cases a new page will open, in which you will need to set the following parameters:
General settings
Enabled: click the checkbox to enable or disable to room. If a room is disabled it cannot bu used, but its configuration will remain.
Number: the primary ID of the room. Must be numeric. It is used by the system to identify the room, for rooms with dial-in access this is the number that participants must dial when prompted by the automated message or immediately following the service code.
Name: the name assigned to the room. It does not have an operational use; it is used in selection menus when configuring forwards to the room.
Dial-out settings
These settings are needed if you wish the room to have dial-out access. If the room only has dial-in access, these parameters do not need to be set.
The two parameters are identity and outbound routing class and are used by the PBX when calling external numbers. The outbound routing class is used to determine the routing of the call, while the identity is used to set the calling number.
Users enabled to edit the operational settings
This is a list of users who, independently of the permissions given by their role, can edit the operational settings of the room. These settings include the access PIN, the wait music played when only one participant is present, dial-in and dial-out settings. These privileges to not include monitoring and piloting in real time, which can be assigned to different users.
Operational configuration
Once a room has been created you can edit its operational settings by selecting the “Room operational configuration” tab, which lists the existing rooms with a summary of their main operational parameters.
Each room can be “closed” or “open”. The operational settings of a room can only be edited (by clicking on the pencil icon at the end of the row) when the room is closed. A room can be opened in two modes, manual and automatic.
In manual mode, a room is opened by an enabled user (see below) by clicking on the corresponding button beside the edit button. Automatic mode is only available for rooms with dial-in access, and happens when any extension joins the room.
The operational configuration page is divided into various sections; the first contains the general settings, which are:
Language: the language of the various audio prompts (e.g. the PIN request or the message played when a new user joins the room).
Admin PIN: the PIN required to enter the room as an admin; note that there may be multiple admins in a single room. if the corresponding flag is enabled, when all admins have left the room all participants will be automatically expelled.
PIN: the access PIN required to enter the room as a standard participant.
Announcements enabled: if this flag is enabled, users who enter the room will be required to say their name so that their arrival and departure can be announced to the other participants.
Expel users when the last admin leaves the room: if this flag is enabled, all participants will be automatically expelled once every admin has left the room.
Enable mixing optimization: optimize performance and audio quality by not transmitting audio from silent participants (Silence Suppression, or Talker Optimization) through the use of VAD (Voice Activity Detection). If enabled, background noise will be reduced, but some brief clipping may occur when a user begins talking, as typical with VAD, since the PBX will need to determine that the audio has exceeded a certain intensity threshold before the user is considered active. Mixing optimization does not significantly impact system performance since any gains from having to decode and mix fewer audio streams are balanced out by the load required by VAD, while the greater part of the performance is due to codifying the resulting audio stream for all participants, which is independent of the number of active participants.
Wait music file: you can set the room to play wait music when only one participant is present; click on “Choose file” to select the audio file you wish to use.
The Dial-in section only contains the checkbox to enable the service. If the service is disabled, users will not be able to access the room by calling the audio conference service; they will only be able to access the room if called by the system in dial-out mode.
The Dial-out section contains the following parameters:
Enable Dial-out: the flag that enables dial-out mode. In order to enable dial-out access for external participants, you will need to set the identity and routing class in the room configuration page.
Maximum number of attempted calls per participant: the max number of times the system will attempt to call each participants; the calls may fail for various reasons (the user may be busy or unreachable, or reject the call). If the invite policy for the user is set to “automatic with repetition” the system will attempt to call again until the max number is reached.
Enable audio file playback for complete/incomplete room and corresponding file selection buttons: with dial-out access, you can set an audio file to play different audio files depending on whether the room is “complete” or “incomplete” based on the presence of all participants marked as “required”. This feature is useful for rooms without supervision to let participants know if someone is missing.
Next is the list of dial-out users who will be called by the PBX following the set policy.
Click on the + icon to add a new participant; a new row will appear in which you can specify the participant, choosing between “Extension” or “External”. In the former case, the “Contact” field will be a list of the extensions in the PBX; in the latter, you will have to insert the number of the participant, preceded by the external line commitment prefix. In this case, you can also set the name of the participant, which will be displayed in the in the room management/supervision page. For each participant, you can set one of three invite policies: automatic with or without repetition, or manual. See the section on the management/supervision page below for details.
With the automatic invite policy, the room will automatically call the participants the moment the room manager, after opening the room, activates the invite mechanism. The calls are made in parallel; for external participants, it is necessary to ascertain that the call was answered by a person and not an automated system (courtesy messages or voicemail) so the recipient of the call will need to accept the invite by dialing “1”. If the tone is received, the PBX will include the participant in the conference, otherwise it will act as if the call had not been answered and end it after a timeout.
If a call fails, the status of the participant will be set to “out of the room” if the invite policy is set to “automatic without repetition”, and if they are marked as “required” the incomplete room audio file will play if enabled. If the invite policy is set to “automatic with repetition, the system will attempt further calls until reaching the set maximum. Participants with a manual invite policy will only be called if the action is selected for each individual participant. If the call fails, further attempts will only be made manually.
The final section of the panel lets you add users authorized to operate and manage the room in addition to those authorized to configure the room (because of their role - for which write permissions are necessary - or because specified in the room configuration page).
Note
If dial-in access is enabled, extensions associated to users enabled to manage the room can enter the room in can enter the room as administrators without enterin the PIN.
Users authorized to manage the room will see, if the room is closed, the “Open room” button (play icon) to manually open the room and, if the room is open, the “View room” button (magnifying glass icon) to access the supervision and management panel.
Room supervision and management
Each conference room can be, at a given instant, in one of these three states: “closed,” “open,” or “open and active.” The transition between these 3 states can occur automatically or manually, according to a specific state machine.
As mentioned above, opening a conference room can be done in manual or automatic mode. In manual mode, one of the users enabled to manage it explicitly commands its opening by clicking on the “Open Room” button (play icon) In the case of a dial-in enabled room, the room is automatically opened the moment an extension enters it. In both cases, the status icon in the room operational configuration panel turns into a lens, and the ability to make changes to the operational configuration is inhibited; in order to make changes to the operational configuration of the room, it must first be closed (by entering the room management panel). The “open and active” (or more briefly “active”) status indicates that the dial-out invitation service for participants is active for that room (for those characterized by an automatic invitation policy)
The user, by clicking on the “View status and manage room” icon, accesses the room supervision and management panel, which is divided into 3 sections.
The first section (“Room Information”) shows the name and number of the room, and its status, which can be “Open” or “Active”; in the first case the room is operational but automatic invitations are stopped, while in the second case the control panel takes care of making automatic calls to participants with an automatic invitation policy, and repeating the invitation in case one of those participants leaves for any reason. Next to the status is an X-shaped button that allows you to eject all participants and return to the “closed” room status.
The second section (“Dial-out”) shows the status information related to this room mode, and the buttons that can be used to command its operations. The first flag “Automatic Dial-out” indicates whether the automatic participant invitation function is active or inactive; if the invitation service is inactive, you can start it by clicking on the adjacent “Play” icon; if the service is active, the “Stop” button allows you to eject all participants and stop the automatic invitation mechanism.
The following status indicator shows whether the room is complete or incomplete, based on the presence of the participants who are marked as mandatory. If even one of the mandatory participants is outside the room (unless it has been placed in the “Suspended” state-see below for possible states of room participants) then the room is considered incomplete, otherwise it is in the complete state. In each of the two states a background audio file can be played in the conference room to inform the participants of the condition.
At the bottom of the panel is a list of conference room participants in table form; for each participant there is the following information and a set of actions that can be performed (depending on the nature and state of the participant):
Name: the identity of the extension of the name assigned when adding the participant to the room.
Selection: extension of external number.
Call policy: the policy used when inserting the participant to the room. With dial-out access, this can be manual or automatic with of without repetition. Dial-in participants are also included under manual mode.
Required: participants with this flag are considered necessary when evaluating the completeness status of the room. Disabled for dial-in participants.
Dynamic: determines whether a participant is static (dial-out participant defined in the room operational configuration) of only present in a temporary capacity (either as a dial-in participant or dynamically added through the “Add dial-out participant” button in the dial-out section). When the room is closed, all temporary participants will be deleted and when the room is next opened automatically only static participants will be called; if the room is opened due to a dial-in participant joining, that user will be present in dynamic mode.
Direction: determines whether the participant is dial-out or dial-in. Dial-in participants will remain included in the list if they end the conversation, are removed from the GUI, or the room is stopped without being closed. You can click on the phone icon uner the “Actions” column to have the room call the user, effectively turning them into a dynamic dial-out participant with manual invite.
Status: each participant can be:
Out of the room: the user is not participating in the conference; this is the default status when the room is open but not active.
In the room: the user is participating in the conference.
Invited: KallipePBX is calling the participant to invite them. If the call fails the room will keep calling them if the policy is set to repetition or set the user as “out of the room”. If the user answers and accepts the invitation, the user will be set to “in the room”.
Suspended: the user is temporarily excluded from the room. They will not receive invites and they will not be considered required.
The available actions for each user depend on their status.
If the user is “out of the room” and has a manual call policy, the room invite service is not active, or the maximum number of call attempts has been reached, the “Invite” (phone icon) and “Suspend” (stop icon) will be available. The former will call the user to the room (with repetitions if configured) and the latter will suspend them.
If the user is “suspended”, the “invite” action will be available.
If the user is “in the room”, the “Hang up” action will be available, which will end the call for the user and suspend the automatic invite policy if set.
A “Mute” action is also available for single or all participants in the room. To mute a single participant, click on the microphone icon under the “Actions” column. To mute everyone in the room use the “Disable all microphones” and “Enable all microphones” buttons present above the list of users.
Blacklist on inbound lines
Note
Introduced in version 4.5.17
Description
This service lets you define specific routings for inbound calls based on the calling and called numbers.
For each pair of numbers, you can choose whether or not to play an audio file (even “in progress”) and define the failover action to carry out (among the routing actions available on KPBX).
The pairs of numbers to which the same routing policy should apply can be grouped in blacklists to use on different inbound lines.
The blacklists are applied to inbound calls, so in a single-tenant system they can be linked to the gateways and VoIP domains. In multi-tenant systems, the blacklists are managed by the tenant admins and are linked to the assigned lines.
You can also link a list of blacklists to each inbound line. These blacklists will be applied in a cascade after the manipulation rules and before the DID rules associated to the line.
Configuration
To configure the service, you must first define the blacklist and then associate it to an inbound line.
The blacklist configuration can be set in the PBX -> Gateways and VoIP domains -> List of blacklists page.

Note
In multi-tenant systems, the service can be configured in the PBX -> Assigned line management -> List of blacklists page.
In this page you can create new blacklists by clicking on “Add blacklist” or edit and existing one.

The main fields of the form for defining the blacklist are the following:
Enablement
Name
Failover
Rules
Rules can be ordered, but, as with the notes, this is purely for organizational purposes. Since they all have the same failover action, the first match will trigger the action.
L’associazione della blacklist alla linea di ingresso viene effettuata su gateway e domini VoIP nel pannello PBX -> Gateway e domini VoIP -> Linee in ingresso / uscita.
The association of the blacklist to the incoming line can be configurated on gateway and VoIP domains in PBX panel -> Gateway and VoIP domains -> Incoming/Outgoing lines .
In multi-tenant systems, this can be configured in the PBX -> Assigned line management -> Assigned lines page.
In either type of system, you can assign blacklists by clikcing on “Add blacklist” and adding all necessary blacklists.
You can also disable all association of the blacklist with the inbound line so that its rules will not be applied.
You can also reorder the blacklists within the inbound lines, so as to implement both blacklist and whitelist mechanisms.
Call Campaign
Note
This service is available for firmware version 4.9.4 or later.
Description
KalliopePBX’s “Call Campaign” service lets you execute a session of automated calls towards a group of recipients, playing an audio message and gathers confirmation that each recipient has listened to the call.
On a general level, this service lets you configure call campaigns through a web panel, each with the following settings:
**list of participants (internal and external)
**audio message
**maximum number of simultaneous external calls
**whether or not to collect confirmations
**number of call attempts for each recipient
A user with the required permissions can start (instantaneously or with a delay), suspend, or stop a call campaign, or view its status.
A campaign will end the moment, for each configured recipient:
the recipient answers the call and, if required, provides confirmation that they have answered and/or listened to the message (this is the “success” condition);
the number of call attempts for the recipient has been reached without satisfying the previous condition.
In the case that all recipients have been successfully reached (or the minimum number set for that specific campaign), the status of the campaign will be set to “completed”; otherwise, once the maximum number of call attempts have been reached for all recipients, it will be set to “incomplete”. In the latter case, the user may assign further call attempts for one or more of the recipients that have not been successfully reached, or mark the campaign as permanently closed, setting its status to “terminated”.
The web panel allows the user to manage individual campaigns in real time (with the ability to view the status for each recipient) as well as access a log with the details of concluded campaigns: this log displays the events and parameters relative to the execution of the campaign and all, so that they can be consulted even if the settings have been changed or the campaign has been deleted.
Configuration
The call campaign services can be configured on the “PBX Applications” -> “Call Campaign” panel. Users may view the panel and its tabs if their role has the required permissions.
The call campaign panel has three tabs:
Models list and Campaigns list (associated to the “Call Campaign Management” permission);
General settings (associated to the “Call Campaign general settings management” permissions)
In the “General settings”’ users you can configure the global limits of the service, i.e. the maximum number of simultaneous active campaigns and the maximum number of simultaneous calls (internal, external, or overall) between all active campaigns. the parameters that can be set are:
Maximum number of simultaneous active campaigns: the maximum number of campaigns that can set as “active” at the same time. This parallelism concerns the effective execution of the calls, so for instance so with a parallelism of 1 a campaign can be started even if another one is already being executed. The campaigns will be ordered according to their “priority” attribute, and if two campaigns are started at the same moment, the system will make the calls for the campaign with the highest priority (within the simultaneity constraints set both generally and for that campaign). The empty value means unlimited.
Maximum number of simultaneous calls (total/internal/external): these three values determine the maximum number of calls that the system can make among all active campaigns. The empty value means unlimited.
Note
The sum of the values set for internal and external calls may exceed the total limit, but in this case the effective number of overall calls cannot exceed it (e.g. with the values 10/8/6, there can be at most 8 internal calls, 6 external calls, but no more than 10 calls in total; if at one moment 7 internal calls are active, only 3 external one can be made)
Every time a call is terminated, whether successfully or not, or when a new campaign is started, the call scheduler (which determines whether or not a new call may be made and towards which recipient among all those for all campaigns) operates according to the current limits.

To start a campaign, you must first set a Campaign model with the parameters that determine the behavior of the active campaigns and then start a campaign from that model (or set it to start at a later time). Multiple campaign may be started from the same model at different times, changing a subset of settings such as the audio file to be played or the list of recipients.
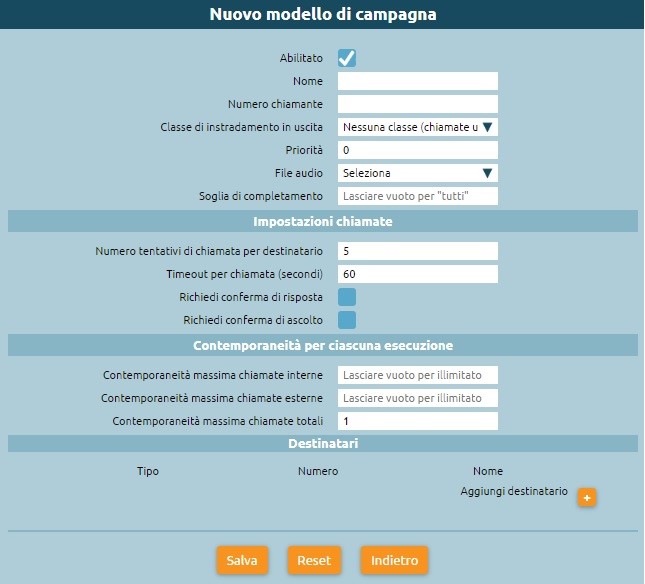
Models can be created from the “Models list” panel by clicking on “Add a new campaign model”.
The panel for creating a new model or editing an existing one contains the following parameters:
Enabled: this checkbox determines whether the model is enabled or disabled. If a model is disabled new campaigns may not be started or scheduled from it.
Name: the name of the campaign. Can contain alphanumeric characters, spaces, dashes, and underscores. This attribute is used as the Display-Name for calls made by the campaign.
Caller number: the number used by the system to make the calls (both internal and external). For external calls, the effective caller number will be derived from this attribute based on the manipulation rules of the outbound line used.
Outbound Call Routing class: determines the routing of external calls. If the class does not allow one or more of the configured recipients, those calls will fail; no preemptive checks will be made.
Priority: the value used by the scheduler to make the calls if more than one campaign is active at the same time.
Sound file: the audio file played to each recipient.
Completion threshold: the number of recipients that must be successfully reached in order to to consider the campaign complete.
Number of call attempts per recipient: the maximum number of unsuccessful call attempts that will be made towards each recipient. Once this number has been reached for a recipient, the system will not make any new attempts and the recipient will be definitively considered “not reached”. The user that manages the campaign may add new call attempts. This value cannot be unlimited (default 5).
Call timeout (seconds): the ring timeout (in seconds) for each call
Request answer confirmation: this checkbox determines whether or not the system must require the recipient to dial 1 to confirm that they have actually answered before playing the message. This applies to both internal and external calls and ensures that the call was not sent to an answering machine or a voicemail box.
Request listening confirmation: this checkbox determines whether or not the system must require the recipient to dial 9 after the message has been played to confirm that they have actually listened and understood it. If 9 is not dialed, or if another button is dialed, the message will be repeated. If the call ends before confirmation is given, the system will consider the recipient to be “not reached”, and if call attempts are still available a new one may be made depending on the policies of the scheduler.
Maximum number of simultaneous total/internal/external calls: these three values determine the maximum number of calls that the campaign cam make. The empty value means unlimited. The sum of the values set for internal and external calls may exceed the total limit, but in this case the effective number of overall calls cannot exceed it.
Recipients: the list of internal or external recipients. For contacts inserted manually, the user can specify a name and an email address along with the number. The list can be ordered; the scheduler will make calls according to the order if other parameters are equal.
Once the model has been created, it will appear in the “models list”, from which an enabled user can:
Create any number of models.
Delete one or more existing models by clicking on the thrash icon. Models from which one or more campaigns have been started or scheduled can be deleted, as the necessary parameters have already been copied to the campaign configuration. The user will still be alerted of the presence of such campaigns through a confirmation popup.
Clone an existing model to create a new one with inherited settings.
Edit the configuration of an existing model; models from which one or more campaigns have been started or scheduled can be edited after clicking a confirmation popup.
View the list of recipients of the campaign.

Starting and managing a call campaign
After configuring a call campaign model, you can start a new campaign, immediately or with a delay.
You can create a campaign by clicking on the “Start” icon in the “Actions” column of the Models List. A new panel will open in which you can set the name of the campaign and change the audio file or the list of recipients if necessary.
Finally, you can configure the start of the campaign in three modes:
Immediate: the campaign will start immediately after you press “start”;
Delayed: select the delay (in minutes) after which the campaign will start;
Set schedule: specify the time and date on which the campaign will start.

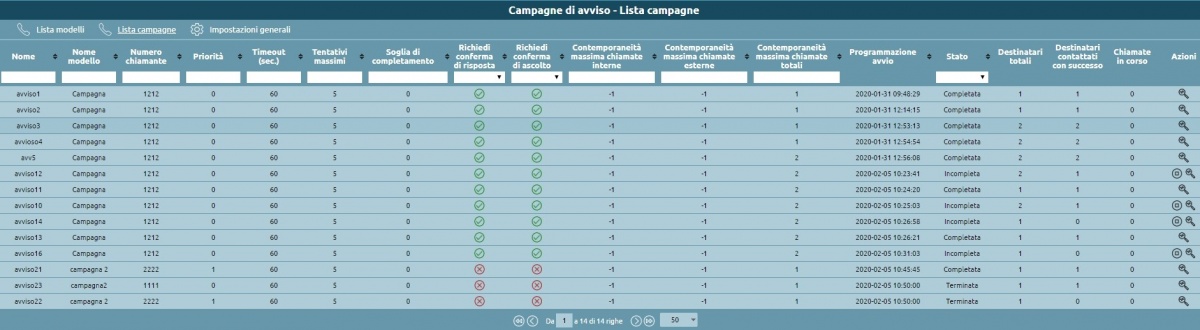
Upon confirmation, selecting by pressing the “Start” button, the new campaign (started or scheduled) appears in the “Campaign List” panel. This panel is a record of past and also current campaigns, through which you can view the instant status of the campaign, the progress of calls, as well as some configuration parameters. The campaigns view shows the following information:
The following configuration parameters: Name, Model, caller number, priority, ring timeout, maximum call attempts per recipient, completion threshold, answer and listing confirmation, simultaneity.
Start time.
Total number of recipients.
Successfully reached recipients: the recipients that have been reached by the campaign according to its settings.
Current calls: the number of calls that are currently active.
- Status: the status of the campaign, which can be one of the following
Scheduled: at the time of activation. The status will change to “Active” if the starting mode is immediate, or at the moment set in the configuration if the starting mode is immediate is delayed.
Active: calls towards the recipients are currently being made.
Paused: can be activated by the user by clicking the “Pause” button. New calls will not be made; current calls will not be interrupted.
Blocked: the number of simultaneous calls has been reached.
Incomplete: all possible calls towards the recipients have been made but at least one has not been successfully reached.
If the status of a recipient changes to “Failed” to “Idle” (because the user added new call attempts)the the campaign will switch to “Active” mode again. Alternatively, the user can permanently close the campaign by clicking the “STOP” icon.
Terminated: the campaign has ended even if some recipients have not been successfully reached. If a campaign is “Incomplete”, the user can switch it to this status.
Completed: this status is automatically reached the moment all recipients have been successfully reached.
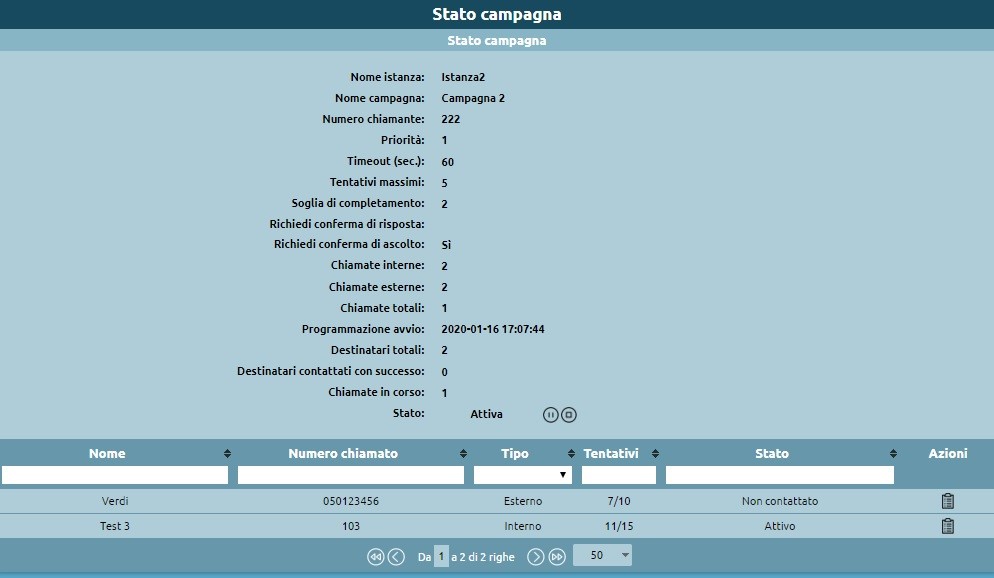
There is also a “Campaign status” panel that displays all the data regarding the status and history of a campaign.
This panel, which can be accessed by clicking the magnifying glass icon, displays the list of recipients and the current status for each: time of last call, outcome, number of call attempts, timestamp of last answer or listening confirmation, list of call attempts and corresponding events and timestamps. Within this panel you can execute actions regarding the campaign (pause and terminate) and the recipients (stop call attempts, add more call attempts, etc.).
The panel shows the state changes of a recipient, which are driven by the initiation and termination of calls directed to it, and can cause the state of the campaign to which they belong to change:
Idle: inactive, available to be called (if the campaign is in Active state).
Active: a call is in progress
Contacted: has been successfully contacted, and required acknowledgments have been given (answered and listened to, if provided)
Failed: several call attempts equal to the maximum expected number have been made, without being successfully contacted. From this state, the user can assign further call attempts to that recipient, which then returns to the “Idle” state again
Call scheduling logic
The logic by which the system decides on the execution of a new call to a recipient belonging to a certain campaign depends on several parameters:
Maximum simultaneity of campaigns
Maximum simultaneity of total calls (total/internal/external)
Maximum simultaneity of calls per campaign (total/internal/external)
Priority of campaigns
Start timestamp of each campaign
Timestamp of last call attempt to each recipient (unsuccessful)
Campaigns active at a given time are sorted by priority, and in case of a tie, precedence is given to the campaign with an earlier start timestamp. Starting with the highest priority campaign, the system generates as many calls until the maximum simultaneities (of the campaign and overall) are reached. Recipients who have not been called previously are called first, according to the order in which they are listed in the campaign configuration. If a concurrent limit has been reached, such as for internal, the system will continue to select recipients from that campaign, choosing only from external ones. When you run out of recipients, who have never been called, if there is still room for more calls for that same campaign, the system will switch to calling back previously called recipients, starting with those who have been called furthest back in time. When a new recipient cannot be selected from this campaign, the scheduler repeats the evaluation on the second campaign (by priority/start time), until the overall call limits are reached, or the available recipients are exhausted. Each time a call ends, a new campaign is started, or when global service limits are changed, the scheduling algorithm is run again to determine whether one or more new calls can be made.
Fast Transfer
Description
The Fast Transfer service allows an extension to transfer an in progress call to a mobile number linked to the extension. This service is useful for users who wish to continue a call on their mobile if they need to leave their workstation.
When this service is enabled, KalliopePBX calls the previously configured mobile number and once communication has been established it bridges the original call with the new one to the mobile phone.
The user can then restore communication on their extension (as with the first transfer, KalliopePBX will first call the extension then interconnect the call channels).
A user who wishes to transfer a call to their mobile or vice versa must simply dial the fast transfer code (by default **). After the user answers, the call will end on the original device and continue on the new one.
Configuration
For global enablement of the Fast Transfer service, it is necessary to enable the Fast Transfer Code (from/to mobile) in the On-Call Services panel and, if necessary, change the code to be used.
Instead, to enable the service for the specific extension, it is sufficient to enter the mobile number in the extension definition panel.
Fork to Mobile
Description
The Fork2Mobile service forwards calls to an extension to a mobile number linked to the extension. This service is useful for users who wish to receive calls even when they are away from their workstation. This service is available for direct calls and calls to groups, but not for calls to queues.
When this service is enabled, KalliopePBX presents the inbound call not only to the accounts linked to the extension but also to a predefined mobile number. Once communication with the mobile phone has been established, KalliopePBX first verifies whether the call has actually been answered (and not, for example, sent to voicemail) and then bridges the original inbound call with the new one to the mobile phone. The other devices will stop ringing once the call is answered. The call to the mobile number follows the outbound routing rules associated to the extension and the caller ID will be the one shown whenever the extension makes calls to the public network. The call to the mobile phone will not therefore include any information on the original calling party.
However, if the KalliopeCTI Mobile app is active and connected, KalliopePBX will send the original calling number to the app, which then displays it to the user. This way, the user can see who is calling them before choosing whether or not to answer.
The difference between this service and unconditional forward to a mobile device are two:
with Fork2Mobile the mobile number is preconfigured and cannot be changed when activating the service;
with Fork2Mobile all accounts linked to the user will ring at the same time as the mobile phone until one terminal answers, while with unconditional forward the call will be diverted exclusively to the mobile phone.
The Fork2Mobile service can be enabled and disabled in three ways:
From the phone: the service can be enabled by dialing the activation code (by default 501). KalliopePBX will confirm the activation by playing the “Saved” audio file. Similarly, the user can deactivate the service by dialing the deactivation code (by default *500). KalliopePBX will confirm the deactivation by playing the “Thank you” audio file. There are also codes to invert (by default *50) and to verify the state of the service (by default *509). These codes can only be used from a phone linked to the extension on which the service is being enabled/disabled.
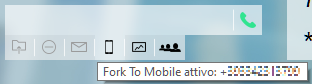
From KalliopeCTI Desktop (all versions): if Fork2Mobile is enabled for the extension, you can find the mobile icon under the number dialing box. Clicking the icon will enable the service, shown by the icon changing to black. Clicking on the icon again will disable the service. Hovering the cursor on the icon will display the mobile number used by the service.
**From KalliopeCTI Mobile: tap the Mobile tools icon on the lower right, then the shaking mobile icon. When the service is active the icon will change to white shaking mobile. Clicking on the icon again will disable the service. If the service has been disabled for the extension, tapping the icon will not change its state.
When the service is enabled and the user answers from their mobile phone, they will hear the following audio message: “Press 1 to accept the call.”
If the user presses 1 they will answer and other calls will be canceled.
If the user presses any other number the call to the mobile phone will be concluded and the other terminals will keep ringing.
If the user does not press anything after 15 seconds (e.g. if the call was transferred to voicemail on the mobile device), the call will be hung up.
Configuration
Fork2Mobile is always globally enabled. Specific extensions can be enabled by inserting the mobile number in the configuration page for that extension.
The service codes can be enabled/disabled/changed in the numbering plan.
Interoperability
When enabling/disabling the service from the phone, it can be useful to have a key (with Busy Lamp Field) that lets you verify and invert the state of the service.
For monitoring, KalliopePBX sends SIP NOTIFY messages to communicate changes of state. The phone must send a SIP SUBSCRIBE message to request this information.
This operation is normally executed by configuring a BLF-type function key. The object that needs to be monitored is forkm<extension>. The same key will also be set up to call the code to enable/disable the service (by default 50).
Examples
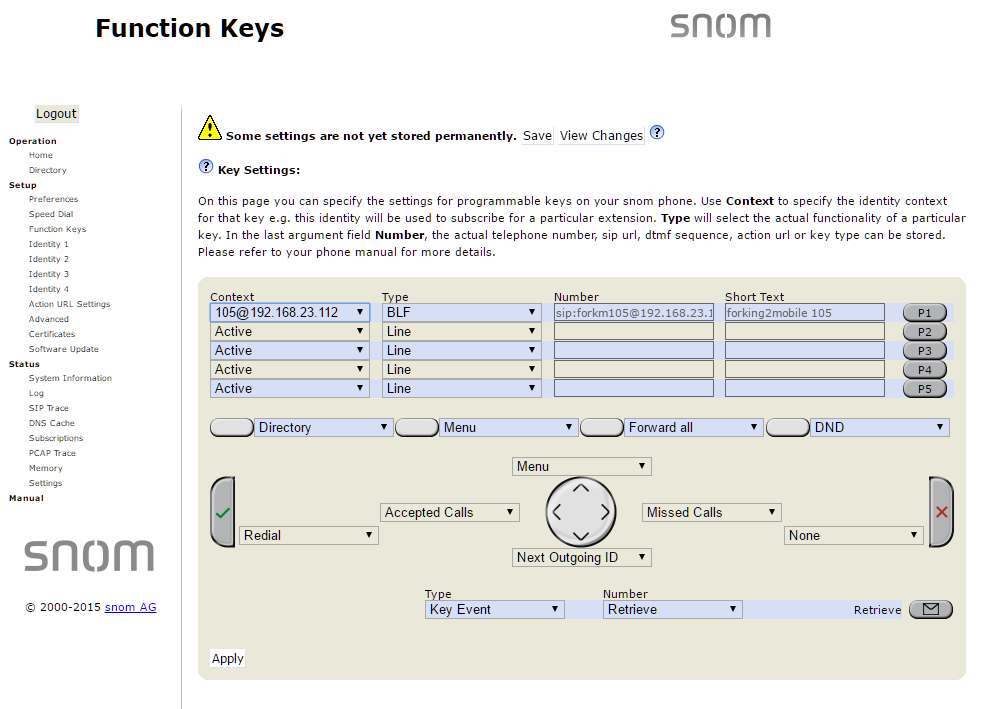
On SNOM
Through the web GUI, you can configure function keys with:
Account: select the account from the drop-down (if only one account is configured on the phone, it will be the first in the list)
Type: BLF
value: forkm<extension>
Or you can directly edit the configuration file or the template:
<fkey idx="%%id%%" context="%%line_id%%" label="" perm="">blf sip:forkm<interno>@%%KPBX_IP_ADDRESS%%;user=phone</fkey>
where %%id%% is the ID of the key to configure and %%line_id%% is the ID of the corresponding account (1 if the account is the only one on the phone).
Example:
<fkey idx="0" context="1" label="forking2mobile 105" perm="">blf sip:forkm105@192.168.23.112</fkey>
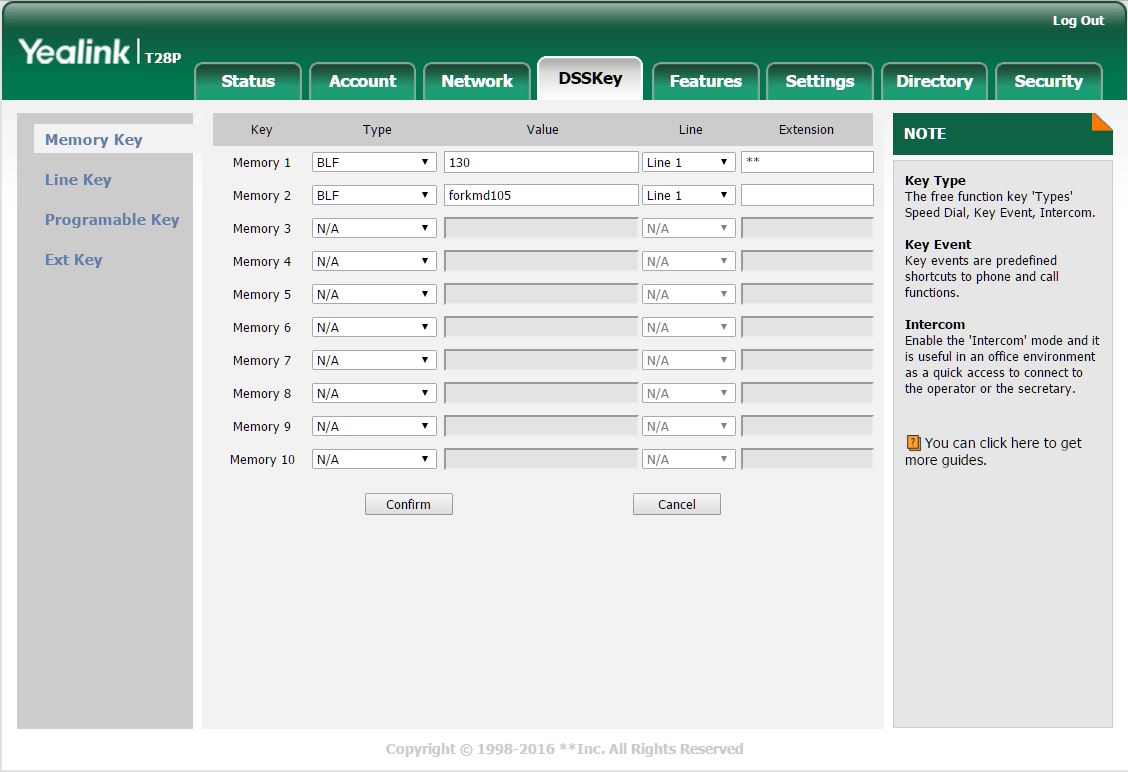
On YEALINK
Through the web GUI, you can configure DSS keys with:
Type BLF
Value: forkm<extension>
Line: The line associated with the account (Line 1 if the account is the only one on the phone)
Or you can directly edit the configuration file or the template:
memorykey.%%id%%.line=%%line_id%%>
memorykey.%%id%%.value=forkm<interno>
memorykey.%%id%%.type=16
where %%id%% is the ID of the key to configure
and %%line_id%% is the ID of the corresponding account (1 if the account is the only one on the phone).
Example:
memorykey.2.line = 1
memorykey.2.value = forkm105
memorykey.2.type = 16
memorykey.2.pickup_value = %NULL%
memorykey.2.xml_phonebook = %NULL%
Closed extension groups
Note
Introduced in firmware version 4.5.5
Description
This service lets the admin of the PBX restrict the ability to make calls to one or more extensions to a list of enabled extensions.
If an extension belongs to a closed group, it can be contacted only by the users authorized to make calls to the group.
Configuration
The service can be configured in the Extension configuration panel under the Closed Extension Groups section. In this section you can set which groups the extension belongs to and which groups it is authorized to make calls to.

Example
You can set that extension 101 belongs to group 1 and is authorized to call groups 1 and 2. Or that extension 102 belongs to group 2 and is authorized to call only group 2.
If extension 101 calls extension 102, the call will be correctly established.
If extension 102 calls extension 101, the call will not be established, since 102 is not authorized to make calls to the group that 101 belongs to.
Hot desking
Description
The Hot Desking service allows the telephone identity of a KalliopePBX user to be linked to any enabled phone. This way the user can receive calls to their extension and keep their phone properties (such as calling number, routing rules, failover policies) and a single call record regardless of the terminal they use.
The service is accessed by logging in with the service PIN of the user.
If a user is already logged into the Hot Desking service on another terminal, the other terminal will be immediately disconnected, while all terminals that are statically linked to the user will remain registered to them.
Inbound calls will therefore be simultaneously presented to all static terminals as well as the single Hot Desking terminal.
The Busy Level and number of concurrent calls for each user is specified in the Extensions page.
A user can log into the Hot Desking service by calling their extension from a terminal that is not linked to any extension. KalliopePBX will then ask for their password and the user must input their service PIN followed by # (if # is not pressed the system will still accept the PIN 5 seconds after the last number has been dialed). The system will confirm the login by playing the “Logged in” audio file. The phone will be dynamically reconfigured and the display will show the user information.
The user can log out by dialing the Hot Desking service logout code (by default *400).
Requirements
To enable the Hot Desking service on a terminal, the configuration must be internally handled through auto provisioning, and the terminal must support configuration updates through SIP NOTIFY.
Many phone manufacturers (such as Snom, Yealink, Gigaset, Polycom, etc.) allow this.
For a full list of certified phones and the relative firmware versions, please see the Interoperability section.
Configuration
The Hot Desking configuration involves several different parts of the KalliopePBX web GUI; the main configuration is done through the Hot Desking page reachable from the PBX applications page, but certain settings will need to be edited in the Extensions page and the numbering plan.

Before configuring the service you must first insert the device (including model, MAC address, and IP address) in the provisioning page without linking it to a SIP account. You can omit the template, as it will be configured in the Hot Desking page.
From the Hot Desking page you can set the desired devices (among those defined in the provisioning page but not linked to a SIP account) to Hot Desking mode. The system will automatically generate a SIP account (hotdesk-<mac>) used in the configuration of the terminal in order to allow the call required to log in.
For each Hot Desking enabled extension, the corresponding flag must be enabled (this can be done via template). A dedicated SIP account will be automatically generated (hotdesk-<extension>); this will be used to generate the configuration of the terminal used after login. This account must also be linked to a SIP account template.
Note
The Hot Desking flag and the SIP account template are configuration parameters present in the extension template, and they can be overwritten.
Hot Desking page description
The configurable parameters needed to enable a device to use the Hot Desking service are:
provisioning device: the terminal that needs to be enabled from those defined in the provisioning page;
provisioning template: the template to be used to generate the provisioning file for the terminal;
SIP account template: the template used for the automatically generated SIP account and for the configuration of the terminal.
Enabling extensions
Devices can be enabled to use the Hot Desking service through the extension template, enabling all extensions that use the template, or by overriding the values from the assigned template.
The configurable parameters needed to enable a device to use the Hot Desking service from the template page are:
The flag that enables the use of hot desking
**The SIP template to assign to the hot desk accoun**t: the SIP template for the automatically generated SIP account, used after a user logs into the Hot Desking terminal.
These parameters are also present in the Extensions page with their template override flags.
Enabling the service
In order to use the service, Hot Desking must be enabled in the numbering plan.
Interoperability
The service has been tested with SNOM and Yealink terminals.
Brand |
Series/Model |
Firmware |
|---|---|---|
Snom |
D3x5 |
8.9.3.40 |
Snom |
D745 |
8.9.3.40 |
Snom |
D765 / D725 / D715 / D710 |
8.7.5.35 |
Snom |
3xx |
8.7.5.35 |
Snom |
7xx |
8.7.5.35 |
Snom |
8xx |
8.7.5.35 |
Yealink |
T19P / T20P / T21P / T22P / T26P / T28P / T32G / T38G / VP530 |
v70 |
Yealink |
T19P E2 / T21P E2 / T23P / T23G / T27P / T29G / T40P / T41P / T42G / T46G / T48G / VP-T49G |
v80 |
Other models are being tested. Should they prove to be compatible, they will be added to the above table.
In order to prevent Yealink phones from rebooting after reprogramming, you will need to add the following line to the configuration template:
sip.notify_reboot_enable = 0
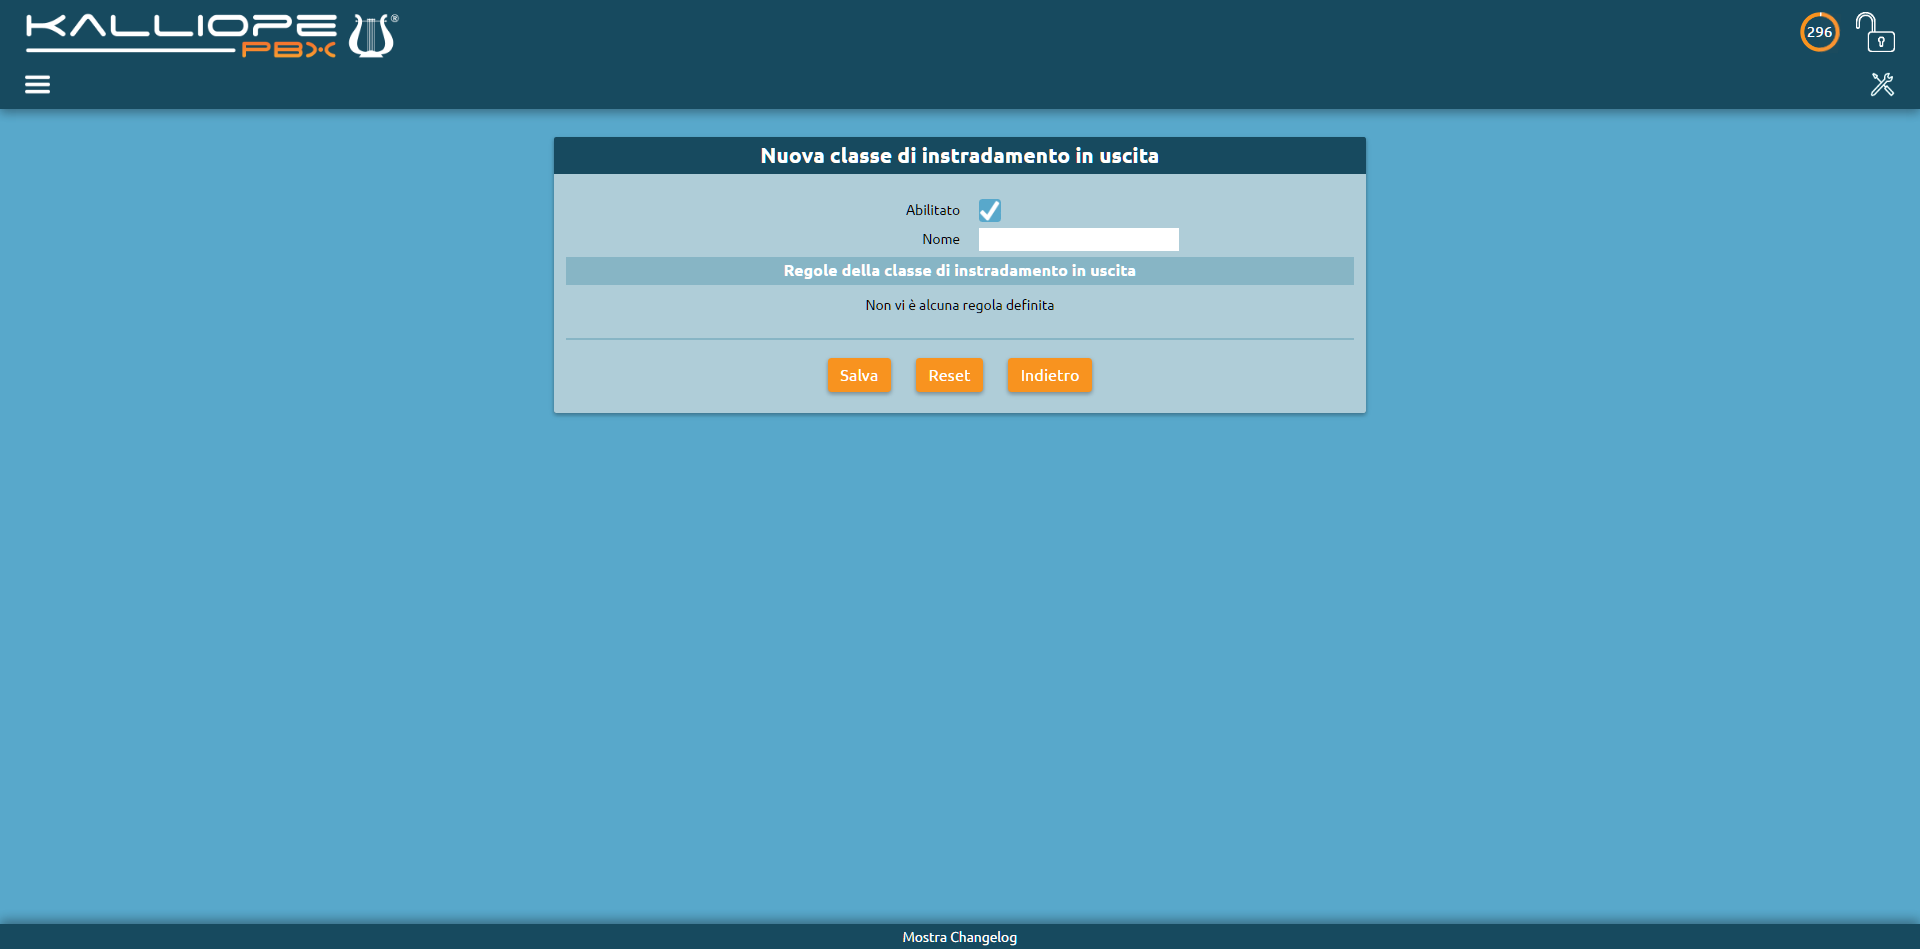
Outbound routing (ACR)
This section details all the settings needed to set up a way to make calls to external numbers.
Outbound routing classes
An outbound routing class is a set of outbound routing rules to be verified in order to establish a routing policy applied to a call from an extension to an external number. The rules are matched in the same order as they are shown in the GUI, from top to bottom.
If the match is valid, the corresponding action will be executed and no further rule will be examined. For this reason it is essential that the rules are arranged from the most particular to the most general. Therefore, it would be wrong to dispose first a general rule that, for example, allows to call all numbers without distinction, since this would lead to the cancellation of all the others that potentially contain particular differentiating features.
You can reorder the rules by clicking and dragging the corresponding icon to the desired place.
The following table lists the configurable parameters for each outbound routing class.
Parameter |
Description |
Value |
|---|---|---|
Enabled |
Lets you disable an outbound routing class without losing its configuration. |
Yes / No |
Name |
Outbound routing class identifier |
Alphanumeric |
Outbound routing class rules
Parameter |
Description |
Value |
|---|---|---|
Add rule |
Lets you select the configured outbound routing rules and insert them in the order in which they will be checked by the PBX |
Outbound routing rule |
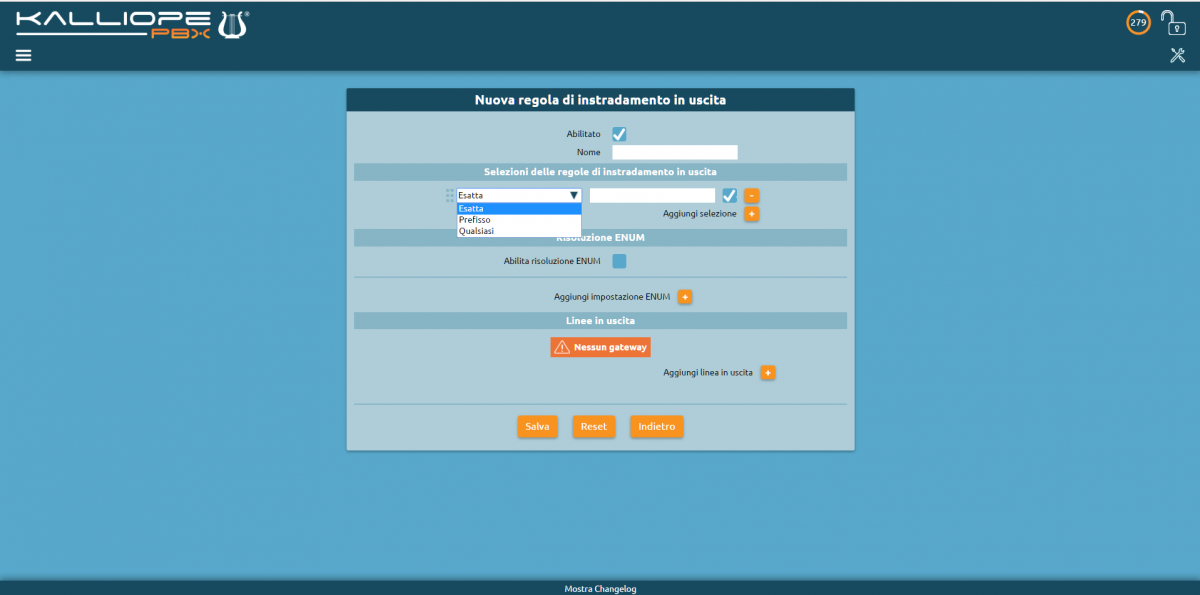
Outbound routing rules
And outbound routing rule has two components.
A set of conditions on the called number. The verification may be carried out on a specific phone number (“exact selection”) or on a prefix (“prefix”), or else the rule may be validated on any called number (“Any”).
An ordered list of outbound lines on which the PBX will attempt to route the call. Should an error occur on the first outbound line, the PBX will attempt to route the call on the next. The error conditions correspond to a 5xx or 6xx SIP message or a SIP timeout (32 seconds by default). For example, if the PBX receives a 486 Busy Here SIP message, it will make no further attempts to route the call to the next lines.
The following table lists the configurable parameters for each outbound routing rule.
Parameter |
Description |
Value |
|---|---|---|
Enabled |
Lets you disable an outbound routing rule without losing its configuration. |
Yes / No |
Name |
Outbound routing rule identifier |
Alphanumeric |
Outbound routing rule selection
Parameter |
Description |
Value |
|---|---|---|
Enable ENUM resolution |
Lets you enable ENUM resolution for a specific rule |
Yes / No |
Add ENUM setting |
Lets you specify which search domains (defined in the ENUM settings) must be verified |
ENUM settings |
Outbound lines
Parameter |
Description |
Value |
|---|---|---|
Add outbound line |
Lets you create a list of outbound lines to use for matched selections |
Outbound lines |
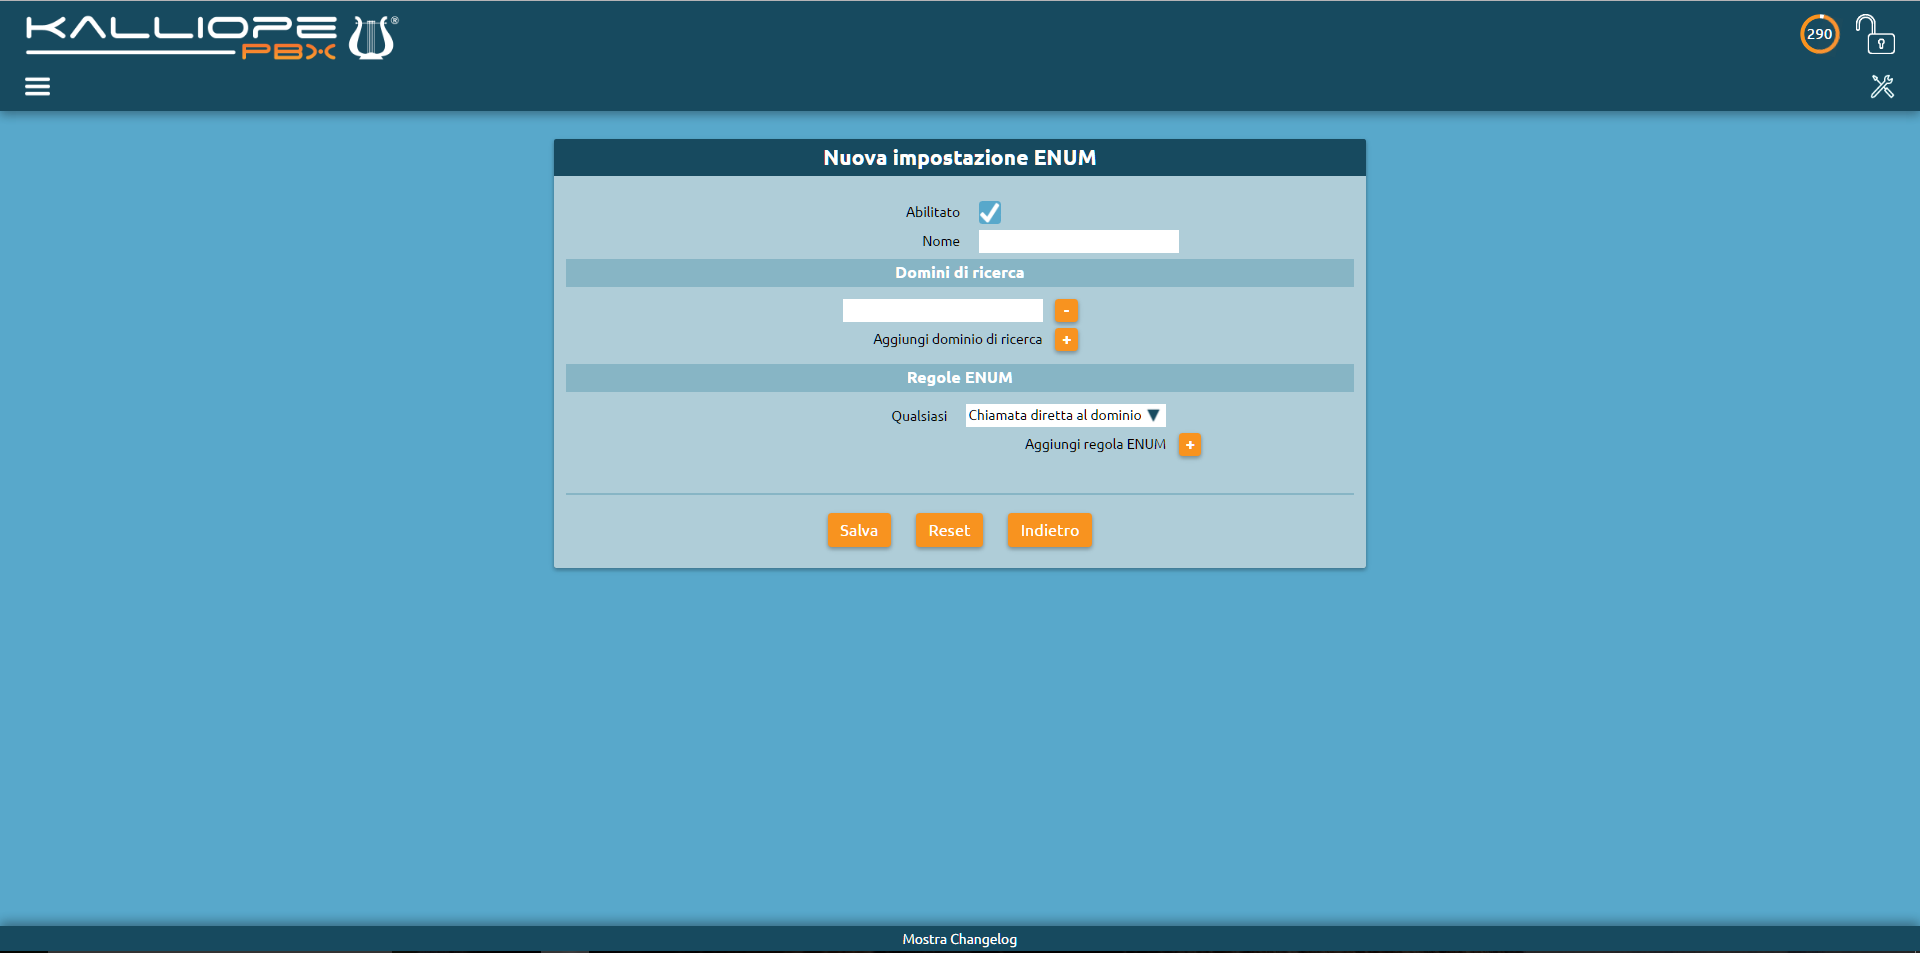
ENUM settings
An ENUM setting has two components.
A set of search domains on which to make DNS queries.
A list of rules to apply if the ENUM server gives a positive response. The behavior may be different depending on the hostname returned in the SIP URI.
Parameter |
Description |
Value |
|---|---|---|
Enabled |
Lets you disable an ENUM setting without losing its configuration. |
Yes / No |
Name |
ENUM setting identifier. |
Alphanumeric |
Search domains
Parameter |
Description |
Value |
|---|---|---|
Add search domain |
Lets you specify which search domains must be verified for this setting. |
Domain name |
ENUM rules
Parameter |
Description |
Value |
|---|---|---|
Add ENUM rule |
Lets you specify a rule to use for outbound call routing if the DNS query on a search domain has a positive result. The outbound line can coincide with the domain returned by the query (direct call to the domain); it is also possible to force a specific outbound line for on-net routing (for example, when it is necessary to use authentication credentials). |
Hostname + outbound line / direct call to domain |
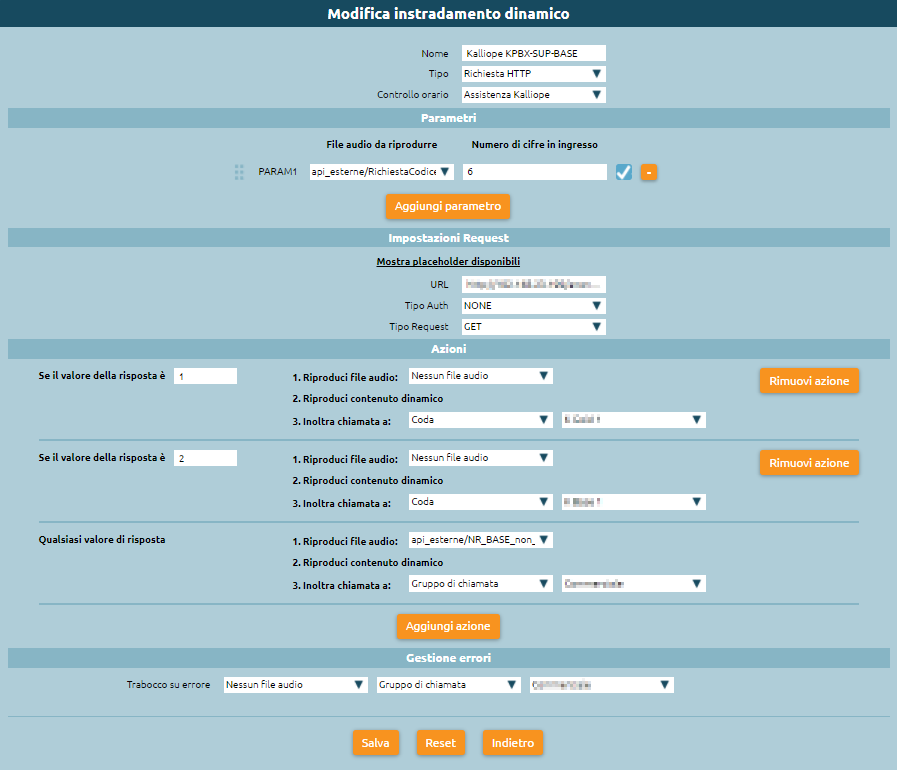
Dynamic Routing
This service enables inbound call routing based on the response of an HTTP API invoked on an external web server or upon matching one or more parameters specified in a file uploaded to the PBX.
This is done through a series of prerecorded voice prompts asking the caller to input numeric parameters.
Configuration
The service can be configures in the PBX applications -> Dynamic routing page.
During configuration, the following parameters must be specified:
Name: routing identifier.
Type: HTTP request (request to an external web server) / Extension (local file).
Checktime: the time check that must be verified before routing. For dynamic routing, the failover action must be “Return to previous level”.
Parameters: each numeric parameter can be linked to a voice prompt (such as an input request) and, optionally, it is possible to specify the maximum number of digits.
If this value is not specified, the system will assume that the user had finished dialing the parameter after 5 seconds or upon pressing #. If the user fails to input a digit, the prompt will play again, for a maximum of 3 times. The maximum number of parameters is 5.
It is also possible to enable confirmation requests through a checkbox; if enabled, the system will repeat the inputted digits to the caller and ask them to confirm by pressing “1”. If confirmation is not given, the system will repeat the request to insert the parameter.
Request settings
HTTP request The following settings need to be specified for HTTP requests:
URL: the URL to which the request must be made (HTTP and HTTPS are both supported).
- Auth type: the type of authentication used by the web server. Can be one of three values:
NONE: no authentication.
BASIC: Basic HTTP Authentication; in his case, you will need to specify the authentication credentials (username and password).
Client certificate integrated in the PBX (available with firware version 4.5.9 or later): request authentication is performed by comparing the identity of the requester through a unique client certificate. This certificate is integrated in each KalliopePBX, signed by CA Kalliope, and its CN is the serial number of the PBX (e.g. CN=KPBX40412345).
Request Type: the request method (GET and PST are supported). If POST is used, you can specify the format of the body of the request and the corresponding Content-Type.
The passage from parameters to API is executed through placeholders inserted in the URL or contained in the POST. The recognized placeholders are:
%CALLER_NUM%: the number of the caller;
%DNID%: the called number;
%PARAM1%, …, %PARAM5%: the 5 parameters that the caller is asked to insert through the interactive audio menu;
%UNIQUE_ID%: the unique ID of the call under which the call can be found in the CDR.
For example, with a GET request, the URL might be:
http://www.myserver.com/api?arg1=%CALLER_NUM%&arg2=%PARAM1%&arg3=%PARAM2%
For a POST request, the body might be:
<?xml version="1.0"?>
 <parameters>
     <caller>%CALLER_NUM%</caller>
     <param_01>%PARAM1</param_01>
     <param_02>%PARAM2</param_02>
 </parameters>
Internal
With an internal request, the file must be uploaded to the TFTP Access folder through the File Manager.
The supported file types are .xls/.xlsx/.ods/.csv and the file may or may not contain columns headers. If it does not, column mapping must be specified, specifying for each field the exact location in the file. It is important that the columns are numbered starting from 0.
The source file must follow this template:
| callerNum | calledNum | param1 | param2 | param3 | param4 | param5 | response | newCallerNameFull | newCallerNamePrefix | newCallerNum|}
Actions
This section contains the configuration of the routing rules to execute based on the response from the web server or file matching.
HTTP request
With an HTTP request, the system expects a “200 OK” type response from the web sever, the body of which must contain an XML text as follows:
<?xml version="1.0"?>
 <response>
     <message>
         <elem>digit:1</elem>
         <elem>number:200</elem>
         <elem>alpha:c234</elem>
         <elem>audio:custom/%TENANT_UUID%/sounds/misc/pluto</elem>
         <elem>number:201</elem>
         <elem>digit:123</elem>
         <elem>audio:custom/misc/pippo</elem>
     </message>
     <displayprefix>text</displayprefix>
     <value>105</value>
 </response>
Note
The string %TENANT_UUID% must be replaced with the actual value of the UUID specified in the “information” widget on the dashboard.
The <message> and <displayprefix> tags (available with firmware version 4.3.5 or later) are optional; <message> specifies the dynamic component of any audio prompt that is set to play to the caller, while <displayprefix> lets you change the Display Name of the call by adding in front of it the prefix specified in the tag itself.
The <value> tag is required and indicates the API response based on which the actions to be executed are defined.
Actions can be defined as follows:
Play a static audio file uploaded to the system;
Play dynamic content;
Forward the call to a new destination or hang up.
The dynamic content may be comprised of a series of concatenated messages based on the sequence of <elem> tags present in the <message> response. The following table lists the possible <elem> formats and the corresponding additions to the dynamic content:
<elem>…</elem> |
Example |
Firmware |
Description |
Example output |
|---|---|---|---|---|
digit:{digit_sequence} |
digit:1234 |
Plays the individual digits (numerical, from 0 to 9) of {digit_sequence} |
Plays the audio message “one two three four” |
|
number:{number} |
number:1234 |
Plays {number} |
Plays the audio message “One thousand two hundred thirty four” |
|
alpha:{alphanumeric_sequence} |
alpha:1a2b3c4d |
Plays the individual alphanumeric characters of the string {alphanumeric_sequence} |
Plays the audio message “One a two b three c four d” |
|
audio:{audio_file} |
audio:custom/misc/test |
Plays the audio file present on KalliopePBX identified by the name {audio_file} (including the path, as displayed in the “Sounds” -> “Audio files” page) |
Plays the audio message custom/misc/test |
|
dtmf:{dtmf_sequence},{intertone_pause},{duration} |
dtmf:123w*,200,350 |
4.5.12+ |
Plays DTMF tones (according to the mode specified for the channel from which the call originates) specified in {dtmf_sequence}; each tone lasts {duration} milliseconds (expressed as an integer) and separated by a pause of {intertone_pause} milliseconds. The allowed characters are the valid DTMF digits (0-9,*#,a-d,A-D) plus “w” and “W” to indicate a pause of 500 or 1000 milliseconds. N.B.: the inter-digit pause is inserted even for the “w” and “W” characters. |
Plays the following DTMF tones, each for 350 milliseconds: “1”, 200 ms pause, “2”, 200 ms pause, “3”, 200 + 500 + 200 ms pause, “*” |
pause:{duration} |
pause:450 |
4.5.12+ |
Inserts a pause of {duration} milliseconds |
Inserts a 450 milliseconds pause |
Routing rule
The forwarding action to be executed. In addition to normal actions, it is also possible to forward the call to the numbering plan, using the value contained in the response as the selection.
Extension
With internal requests, the system will verify the calling number, called number, and parameters on the file and return the value that will be used to choose which actions to execute from the corresponding response column.
If there is more than one row that matches the data, the action will be the one corresponding to the row with the most matches (best match).
In this case, dynamic content is not available and the available actions are therefore comprised of the following:
Play a static audio file uploaded to the system
Routing rule
At this point the forward action is defined. In addition to normal actions, it is also possible to forward the call to the numbering plan, using the value contained in the response as the selection.
If the parameters are incorrect, the call comes from a number not specified in the file, or no response value is specified, then the error management action will be executed.
It is also possible to change the name and number shown on the display of the called phone by inserting values in the newCallerNameFull, newCallerNamePrefix, newCallerNum fields.
Specifically, newCallerNameFull will replace the name of the caller, newCallerNamePrefix will be added before the calling number, and newCallerNum will replace the calling number.
Error management: if the request to the web server returns an error or the file matching is unsuccessful, the call will be handled as specified in this section.
Example of dynamic routing
callerNum |
calledNum |
param1 |
param2 |
param3 |
param4 |
param5 |
response |
newCallerNameFull |
newCallerNamePrefix |
newCallerNum |
|---|---|---|---|---|---|---|---|---|---|---|
102 |
simona |
111 |
||||||||
103 |
111 |
22 |
100 |
|||||||
123 |
123 |
333 |
123 |
123 |
100 |
321 |
After the exact selection for dynamic routing has been created in the numbering plan, an extension calls this number.
If the call comes from 102, the system will send response 200 and execute the associated action.
If the call comes from 103, an audio message will ask for the parameters; if the inputted values are correct the system will send response 100 and execute the associated action.
If the call comes from an unspecified extension, an audio message will ask for the parameters; if the inputted values are correct the system will send response 100 and execute the associated action.
In all other cases, the error management action will be executed.
Multilevel IVR
Description
The Interactive Voice Response allows the caller to be routed to a specific service according to the DTMF input.
Configuration
You can reach the IVR Menu selecting PBX Applications.
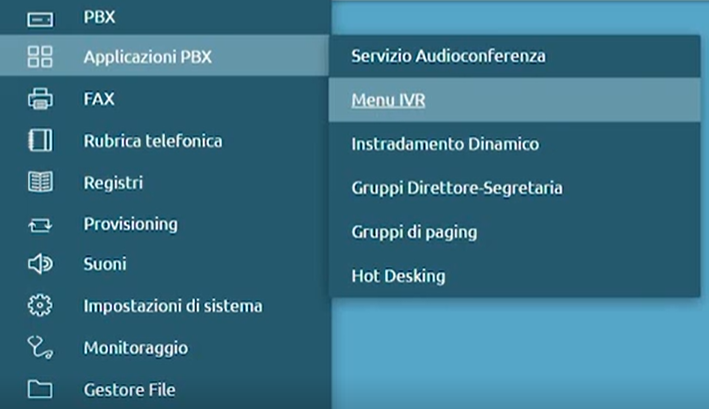
It’s possible to create an arbitrary number of IVR menu that can be drop-down menu or indipendent menu.
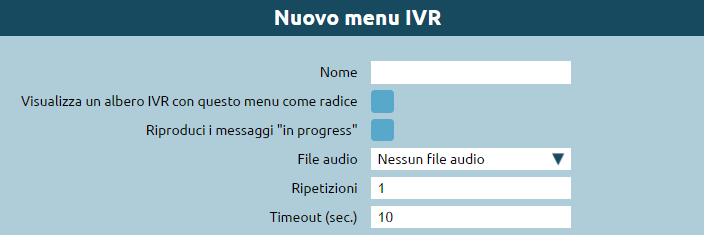
Name: you can fill this field with the IVR name you’ve chosen
If you want to create drop-down menus you can choose to Display the IVR tree visualization with the current menu as tree root.
The “Play messages “in progress”” checkbox plays the free audio message (triggered from SIP 183 Session Progress) before the dispatch of SIP message 200 OK that would trigger the beginning of the calling and the billing as a result. This feature is recommended for companies that have a toll-free number associated with the IVR, because the company itself pays the cost of the call and in this way can save precious seconds for each call received. The availability to accept the Session Progress SIP 183 message depends on the operator to which the central unit is connected and normally has a maximum duration of 59 seconds.
The Sound File selection allows you to select a pre-recorded track that contains various options the client can choose using the numeric keypad.
The “Repetitions” field can be filled with the number of time the audio file will be executed. You can’t choose 0 because that means the file audio won’t be executed.
Timeout (sec.) indicates the selection wait at the end of the audio message. The system is on hold for the indicated number of seconds before performing a second repetition (if there is any) or triggering the default action (field below).
Default Action
The default action is preset as “go to: Hangup” but there are other options in the drop-down menu. You can choose to play an audio file in case the user didn’t select anything so the user can notice the error and be forwarded on another list options.

Selections
In the Selections part you can associate the number typed by the user to a specific option in the drop-down menu. Some examples:
Hang-up: the call is over after the audio repetitions.
External number: the call is routed to an external number that can be a cell phone or a number that doesn’t belong to the PBX.
You can choose the CLID that is used to identify the phone number of the calling user.
Extension: the call is transferred to an extension number that you can chose using the box on the right.
Callgroup: the call can be reached from more than one extension, the available one can answer an inbound call. For more informations visit the Ring Groups page.
Callgroup (bypass checktime): time control on the call groups can be ignored using this option.
Queue: incoming calls don’t engage one or more destinations, but are placed in a queue. The call is removed from the queue when there are operators available to serve the customer. For more informations visit the ACD Service page.
Queue (bypass checktime): time control on the queues can be ignored using this option.
Checktime: is a way to manage the routing of calls on a time/manual basis. The time-based process consists of defining time slots that are detected in order: if current date and time match with one of these, the call is forwarded, otherwise a general action is performed. The manual mode consists in on/off switches that can be controlled thanks to a code typed from telephone and/or BLF key. For more informations visit the Checktime page.
IVR menu: allows you to select an existing IVR menu that will be linked to the current one, this creates a cascading menu.
Voicemail: allows a user to receive voice messages when they’re unable to answer a call (if busy or unavailable). For more informations visit the Voicemail page.
MeetMe Room: it’s possible to log into an audio conference service in which internal or external people are connected to. You can choose to ask the room number (PIN) or to directly send the user to the room.
Dynamic Routing: this service allows to manage the call whether by invoking an external web service (like the original application) or by finding the parameters on a XSL/CSV file loaded on the PBX. For more informations visit the Dynamic Routing page.
**FAX instance*: allows you to select a FAX instance that is considered a physical FAX that can be accessed by one or more users. For more informations visit the Fax Module page.
Numbering plan – custom selection: allows you to insert a selection that has already been configured in the numbering plan.
Numbering plan – ask for selection: an audio file that asks for selection will be played. This allows the caller to choose which extension wants to reach. The possibilities are listed in the audio file.
Allow digit exten enabled: allows the caller to type a number - if he already knows it - without listen to the possibililities. The number can be composed of several digits, so the IVR service will wait until the user finish, to avoid directing the customer to the wrong selection.
IVR submenu (in cascade)
To create a cascading IVR menu have to create another menu by proceeding in the same way. Before doing that, save the previously created IVR menu using the Save button. After that, you will be in the main screen. To add another menu, press Add IVR Menu.
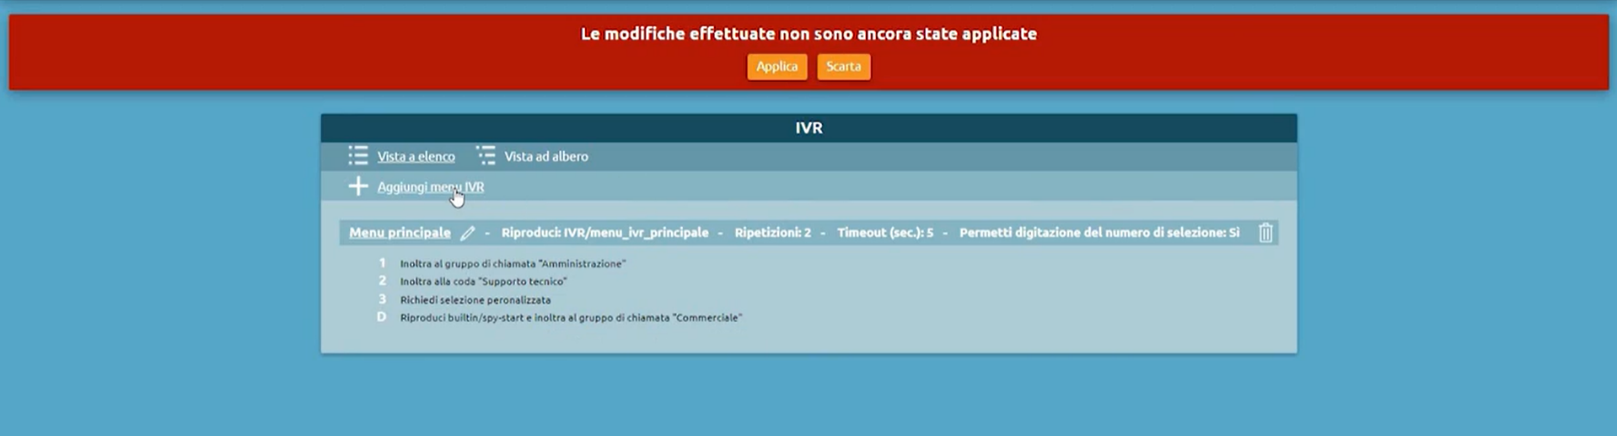
After configuring and saving the second menu you can find both on the main screen.

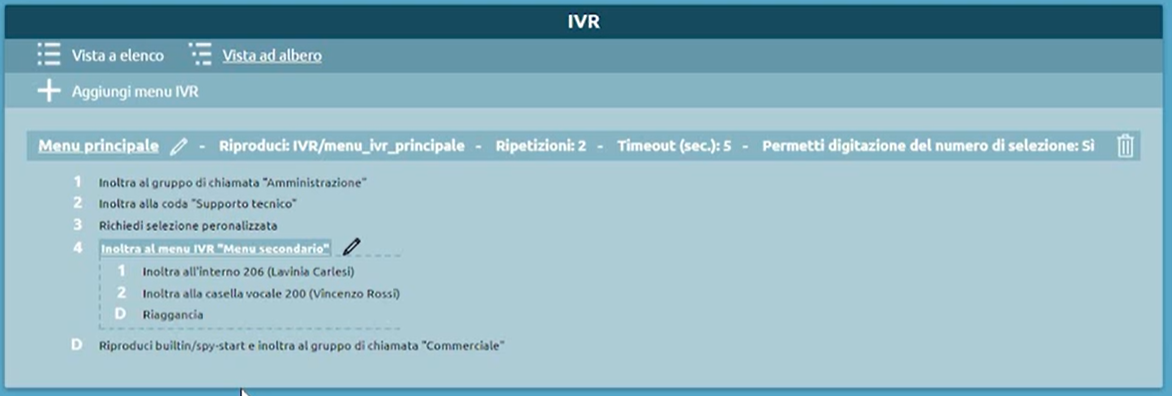
Then, editing the Main Menu you can select the option forward to: IVR Menu and choose the secondary menu in the last box on the right.

Back on the main page you can distinctly see the connection between the two menus by selecting the Tree View.
Electronic Lock
Description
The Electronic Lock service lets a user block calls from a device to certain external numbers. Calls to other extensions (including remote extensions) or PBX services are always accessible even from locked extensions.
A locked phone can only make calls enabled in the “restricted” routing class, while an unlocked one can make any call enabled in the “standard” routing class.
There are different unlock modes, and the duration the hone remains unlocked depends on the selected policy.
The electronic lock is configured per extension, so all accounts (devices) linked to the user will share electronic lock status.
The unlock modes are:
Open: the electronic lock is always disabled, and the standard outbound routing class is always applied.
Code: the electronic lock can be disabled or enabled with the unlock code specified in the numbering plan (by default 850 and 851 respectively).
Password: the electronic lock can be disabled or enabled with the unlock code specified in the numbering plan (by default 850 and 851 respectively) and the service PIN of the extension linked to the device.
The possible unlock policies are:
Per call: the lock must be disabled before every call.
Automatically block after the number of minutes below: The lock will be automatically enabled after the specified interval.
Unlocked until locked by the user: Once the lock is disabled, it will remain so until enabled again by the user.
A user who wishes to make a call on a device linked to a locked extension must follow this procedure.
call the unlock service (by default 850);
if the unlock mode is set to Password, the PBX will instruct the user to input their service PIN with the “Password” audio prompt;
the user must now dial their PIN followed by #;
the PBX will confirm that the lock has been disabled by playing the “Saved” audio file;
if an error occurs, the PBX will play the “Login error” audio file and hang up.
To lock the extension again (if the policy does not involve automatic lock) the user must follow this procedure:
call the lock service (by default 851);
the PBX will confirm the lock by playing the “Thank you” audio file.
Configuration
To configure the electronic lock it is first necessary to define the outbound routing classes that must be applied when the lock is enabled and disabled.
Afterwards, the following parameters need to be set in the Extensions page:
Standard outbound routing class
Restricted outbound routing class
Unlock mode
Unlock policy
Unlock duration (sec.)
Examples
International calls can only be made with a PIN: in this scenario, the restricted class allows all calls except international ones, which are allowed by the standard class. The unlock mode is “Password” and the unlock policy is “Per call”.
Calls can only be made with a code: the restricted class only allows emergency calls while the standard class allows all calls. The unlock mode is “Code” and the unlock policy automatically re-enables the lock after 30 seconds.
Completion of calls to busy subscriber (CCBS)
Description
With this service, a caller attempting to reach a busy extension can instruct the PBX to call them back once the other party is available. This service is exclusive to extensions calling other extensions.
If a user wishes to use this service, they must dial the CCBS code (disabled by default) within 20 seconds of the end of the call. KalliopePBX will confirm by playing the “Saved” audio file. When the busy user is free, the PBX will call the user who activated the service (their phone display will show the label c2c followed by the number of the extension they originally called), and once they answer, they will make the call to the other user.
If the user wishes to cancel the service, they must dial the CCBS cancel code (disabled by default). KalliopePBX will confirm by playing the “Saved” audio file.
This service is valid for one hour. If the service is activated again before the previous activation expires, the old one will be automatically canceled (only one instance can be active per extension).
Configuration
The service can be enabled/disabled in the PBX -> Numbering plan page.
The service code can be changed in the PBX -> Numbering plan page.
Interoperability
When using the CCBS service, it can be useful to have one key available to make the reservation and one to cancel it. This is normally done by configuring two Speed Dial type function keys with values equal to the reservation code and reservation cancellation, respectively.
Boss/secretary filter
Description
This service lets one or more users (secretaries) intercept calls to another extension (boss). Only the secretaries (and, optionally, other bosses in a customizable group) will be able to directly contact a boss on their extension. The secretaries have the task of answering calls, checking whether the boss is available, and, if necessary, forwarding them to the boss.
The secretaries have the task of answering calls, checking whether the boss is available, and, if necessary, forwarding them to the boss.
The service can be enabled or disabled on a group level (for all secretaries) or just for one. In practice, a boss enabling the service will usually enable it for all secretaries, while individual secretaries can choose to enter or exit the service. Even if the boss has not enabled the service, a secretary can do so for their own extension.
The boss/secretary service can be enabled by dialing the corresponding codes. The service can be enabled on a group level with the activation code (by default *521) followed by the extension number of the boss. KalliopePBX will confirm the activation by playing the “Saved” audio file. The service can be enabled for a specific secretary by adding to the global code * followed by the extension number of the secretary. KalliopePBX will confirm the activation by playing the “Saved” audio file.
Similarly, the service can be disabled by dialing the deactivation code (by default *520) followed by the extension number of the boss. KalliopePBX will confirm the activation by playing the “Saved” audio file. The service can be disabled for a specific secretary by adding to the global code * followed by the extension number of the secretary. KalliopePBX will confirm the activation by playing the “Saved” audio file.
There is also a code to invert the state of the service (by default *52). Similarly to activation/deactivation, the code must be followed by the extension number of the boss to act on a group level, while the state of the service can be inverted for an individual secretary by adding to the global code * followed by the extension number of the secretary. In both cases, KalliopePBX will confirm the activation by playing the “Saved” audio file.
These codes can only be used from a phone linked to an extension that belongs to the boss/secretary group.
Configuration
The service can be globally enabled and the service codes can be changed in the PBX -> Numbering plan page.
The configuration of the Director-Secretary groups is done in the panel Director-Secretary Groups. The parameters to be configured for the groups are as follows:
Parameter |
Description |
Value |
|---|---|---|
Enabled |
Lets you disable a boss/secretary filter without losing its configuration. |
Yes / No |
Name |
Boss/secretary group identifier. |
Alphanumeric |
Allow calls from other bosses |
If this option is enabled, extensions labeled as bosses in other groups will be able to call the boss directly without passing through the filter. |
Yes / No |
Select boss |
The extension whose calls will be intercepted by the secretaries. |
Extension |
Add secretary |
The list of extensions that will intercept the calls to the boss. |
Extension |
Failovers
Here failover actions are defined in case one of the overflow causes occurs for calls diverted to secretaries. The additional failover action “Forward to Director” is provided for this service
Parameter |
Description |
Value |
|---|---|---|
Extension |
Failover action on calls from extensions (including remote extensions). |
|
External |
Failover action on calls from external numbers. |
|
Transfer |
Failover action on call transfers |
|
Timeout (sec.) |
Interval of time at the end of which the configured failover action will be executed if the call is not answered (no secretary picks up the call in time). |
Numeric |
No answer |
The call is considered unanswered after the specified time has passed. |
Forward to the boss / Hang up / Custom selection / Ask for selection / External number / Extension / Group / Queue / Checktime / IVR / Voicemail / MeetMe room |
Busy |
All secretary extensions are busy. The extension is considered busy if the configured Busy Level has been reached, or if the terminal sends a 486 Busy Here SIP Response. |
Forward to the boss / Hang up / Custom selection / Ask for selection / External number / Extension / Group / Queue / Checktime / IVR / Voicemail / MeetMe room |
Not available |
All secretary extensions are unavailable. The extension is considered busy if the terminal is not registered or not reachable at an IP level, or if the terminal sends a 480 Temporarily Unavailable SIP Response. |
Forward to the boss / Hang up / Custom selection / Ask for selection / External number / Extension / Group / Queue / Checktime / IVR / Voicemail / MeetMe room |
Interoperability
When enabling/disabling the service from the phone, it can be useful to have a key (with Busy Lamp Field) that lets you verify the state of the service.
For monitoring, KalliopePBX sends SIP NOTIFY messages to communicate changes of state. The phone must send a SIP SUBSCRIBE message to request this information.
This operation is normally executed by configuring a BLF-type function key.
The object that needs to be monitored is bs<boss_extension> to monitor the state of the service on a group level and bs<boss_extension>*<secretary_extension> to monitor the state of the service for a secretary in a specific group. The state of the service on a group level will be active when is is enabled for at least one secretary.
Other than monitoring the state the service, it is also possible to invert it by pressing the corresponding function key.
The key to control the service on a group level is usually enabled on the boss’ phone, while the keys for specific extension are enabled on the secretary’s phone.
The keys can be configured for all members of the group to accommodate specific requirements (e.g. the boss might wish to set the state of specific secretaries or let the secretaries set the state on a group level).
Examples
On SNOM
Through the web GUI, you can configure function keys with:
Account: select the account from the drop-down (if only one account is configured on the phone, it will be the first in the list)
Type: BLF
value: bs<boss_extension> / bs<boss_extension>*<secretary_extension>
Or you can directly edit the configuration file or the template:
<fkey idx="%%id%%" context="%%line_id%%" label="" perm="">blf sip:bs<boss_extension>@%%KPBX_IP_ADDRESS%%;user=phone</fkey>
oppure
<fkey idx="%%id%%" context="%%line_id%%" label="" perm="">blf sip:bs<boss_extension>*<interno_segretaria>@%%KPBX_IP_ADDRESS%%;user=phone</fkey>
where %%id%% is the ID of the key to configure and %%line_id%% is the ID of the corresponding account (1 if the account is the only one on the phone).
Example:
<fkey idx="0" context="1" label="DirSeg 109" perm="">blf sip:bs109*105@192.168.23.112</fkey>
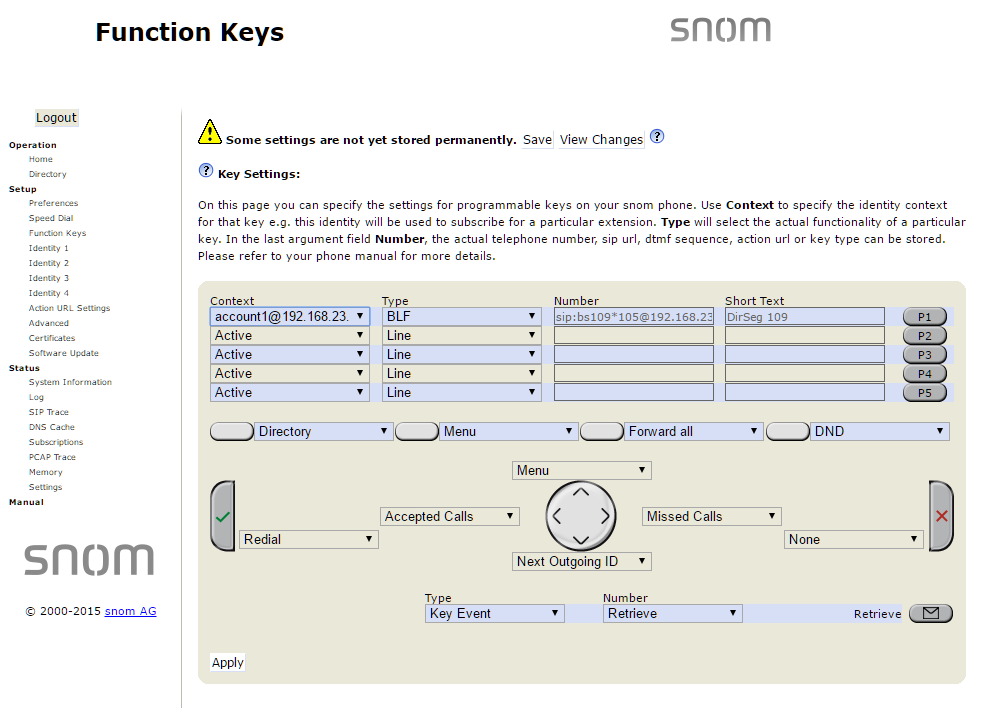
On YEALINK
Through the web GUI, you can configure DSS keys with:
Type BLF
Value: bs<boss_extension> / bs<boss_extension>*<interno_segretaria>
Line: The line associated with the account (Line 1 if the account is the only one on the phone)
Or you can directly edit the configuration file or the template:
memorykey.%%id%%.line=%%line_id%%>
memorykey.%%id%%.value=bs<boss_extension> / bs<boss_extension>*<interno_segretaria>
memorykey.%%id%%.type=16
where %%id%% is the ID of the key to configure
and %%line_id%% is the ID of the corresponding account (1 if the account is the only one on the phone).
Example:
memorykey.1.line = 1
memorykey.1.value = bs109*105
memorykey.1.type = 16
memorykey.1.pickup_value = %NULL%
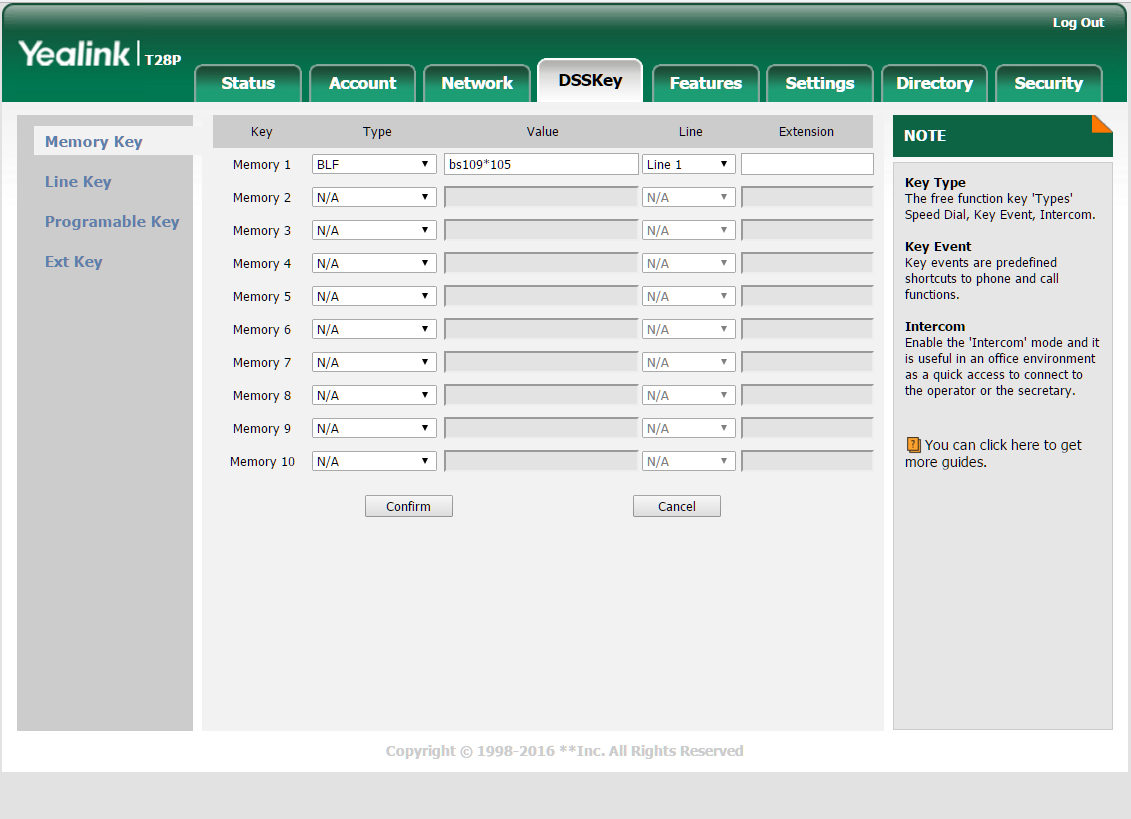
Paging service
Note
Introduced with firmware version 4.3.1
Description
The paging service lets a user send a live or prerecorded audio message to multiple destinations simultaneously, with the option of having devices answer automatically when they receive the message. This service is used to make informative or emergency announcements.
KalliopePBX lets you define an arbitrary number of “paging groups”. Each one is independent from the others and is fully configurable when it comes to permissions, choice of destinations, mode of operation, and messages.
An extension can make a call to a code comprised of a paging service prefix (set when enabling the service in the numbering plan, by default *53) followed by the paging group number (set in the configuration page for the group). If authentication is necessary, KalliopePBX will play the “Password” audio file and the user will need to input a PIN (the one set in the group configuration or their personal one) followed by #. If authentication is successful the paging group will be activated according to its configuration, detailed in the following section.
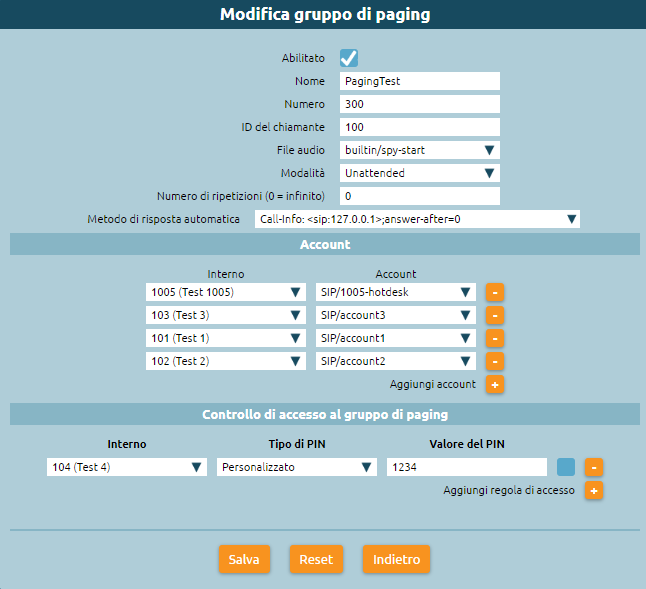
Configuration
Paging groups can be created and edited in the PBX -> Paging groups page.
The following table describes the configuration parameters of each group are:
Parameter |
Description |
Value |
|---|---|---|
Name |
Identifier assigned to the Paging group |
Alphanumeric |
Number |
Selection of Paging Service |
Numeric |
Caller ID |
Display Name for calls to destination terminals |
Alphanumeric |
Modality |
Mode of operation of the Paging group |
Live/Unattended |
Audio file |
Audio file containing a prerecorded message that is played at the destination terminals of the group. It is used differently in the case of Live or Unattended mode |
|
Repetitions number |
Number of times the prerecorded message must be played before the PBX automatically ends the call (configurable only in “Unattended” mode) |
Numeric (0 indicates that the message is to be played in a continuous loop) |
Automatic response method |
Header to be added to calls made to destination terminals in order to specify the automatic response request |
Manual configuration/Call-Info/Header Alert-Info |
Account
Parameter |
Description |
Value |
|---|---|---|
Extension |
Paging target terminals |
|
Account |
SIP account associated with the extension |
Controllo di accesso
Parameter |
Description |
Value |
|---|---|---|
Extension |
Caller extension |
“Any extension”/Extension |
PIN type |
Authentication mode required |
None/Custom/ Authentication mode required. |
Pin value |
Alphanumeric |
Modality
The operating mode of the paging groups: can be set as either “Live” or “Unattended”. In Live mode the extension making the call to the paging group will remain on call as the sole speaker; at the end of the call, they will hang up, and the calls to all destinations will themselves end. In Unattended mode the PBX hangs up the call made from the extension to the paging group and, after a few moments, proceeds to contact all destinations and play the message set under the “Audio file” item.
The audio file will be used differently depending on whether the mode is set to “Live” or “Unattended”:
Live: the message is played before the caller begins communication with the group. This can be used to mark the beginning of an announcement.
Unattended: the message is played to all destinations in the paging group. Depending on the following setting (Number of repetitions), the message can be played once or multiple times.
In Unattended mode a second call to the group number will stop message playback regardless of the number of repetitions set.
Note
The second call does not need to be made from the extension that activated the service as long as it is enabled to use the service according to the rules described below.
Access control specifies the permissions necessary to use the service. You can specify one or more access rules of the form, specifying which extensions can use the service (one, more than one, or any) and if an activation PIN is required.
An example of ACL is:
Extension |
Type of PIN |
Value of PIN |
|---|---|---|
101 (Extension 101) |
None |
|
102 (Extension 102) |
Extension service PIN |
|
Any |
Custom |
123123 |
In this example, extension 101 can activate the service (or deactivate it if it is set to “Unattended”) without needing to input any PIN. Extension 102 can use the service after dialing their service PIN, while all other extensions need to dial 123123.
Interoperability
The configuration of the automatic answer is tied to the terminals, as different devices might require different ways of signaling requests. The service has been tested with SNOM (firmware 8.7.5.13) and Yealink (firmware v80) terminals and requires the phone to be configured to accept requests. Other models are currently being tested and new headers will be added in the future if necessary.
Specifically:
- If the paging group is configured not to send additional headers (and therefore uses terminals dedicated to making announcements), automatic answer must be enabled on all phones. This can be done either through provisioning or through the web GUI of each phone. The relevant settings for each tested phone are:
SNOM: “Auto Answer” setting in the “Account -> SIP” page; (http://wiki.snom.com/wiki/index.php/Settings/user_auto_connect)
Yealink: “Auto Answer” setting in the “Account -> Basic” page.
- For non-dedicated terminals, it is necessary to send a header to request automatic answer. The terminals must be configured to accept the directions given by the header, otherwise it will be ignored and the user will need to answer manually.
SNOM: edit the “Intercom Policy” setting in the “Advanced -> Behavior” page (disabled by default). See http://wiki.snom.com/Settings/answer_after_policy for the configuration. Both headers were tested with positive outcome.
Note
upon automatic answer, the phone will, by default, emit an announcement tone; this can be disabled by editing the “Auto Connect Indication” setting (http://wiki.snom.com/Settings/auto_connect_indication).
Yealink: automatic answer headers (and announcement tones) can be enabled or disabled in the “Features -> Intercom” page.
Grandstream: automatic answer headers can be enabled in the “Accounts -> AccountX -> CallSettings -> Allow Auto Answer by Call-Info” page. Header Call-Info requests are required.