Traditional telephone services
Call Hold and Music on Hold
To put the current call on hold, you can work on the corresponding key of the phone terminal. The key can be physical (normally indicated with “Hold”) or dynamic in according to the specific phone terminal.
Call Pickup (direct and with invite)
Description
This service lets a PBX user pick up a direct call to another extension.
If an extension is ringing and the user cannot or does not want to answer, another user can answer the call from their phone rather than from the other extension.
Direct pickup is applied to all calls to an extension, including those received as part of a ring group or a queue.
KalliopePBX offers two ways of picking up calls:
Direct: the user who picks up the call has no information on the calling party.
With invite: the user who picks up the call can check the identity of the calling party before choosing whether to complete the transfer or not.
Direct pickup is performed by dialing the direct pickup code (by default **) followed by the number of the extension which is receiving the call. Conversation with the original calling party will begin directly.
Pickup with invite is performed by dialing the pickup with invite code (by default #*) followed by the number of the extension which is receiving the call. The user who is picking up the call will first receive a hang up signal; once they have done so, they will receive a call with the caller ID of the original calling party. The user can now choose whether to complete the transfer (by answering the call) or not (by refusing the call). The original extension will stop ringing only once the transfer is complete.
Configuration
The service can be enabled/disabled in the PBX -> Numbering plan page. The service codes can be changed in the PBX -> Numbering plan page.
Interoperability
When using this service, it can be useful to have a key (with Busy Lamp Field) that lets you check the state of the extension which is receiving a call.
For monitoring, KalliopePBX sends SIP NOTIFY messages to communicate changes of state. The phone must send a SIP SUBSCRIBE message to request this information.
This operation is normally executed by configuring a BLF-type function key.
Apart from monitoring the state of the extension, with many phones it is possible to pick up the call with the same key. In this case, the pickup code must be specified.
Examples
On SNOM –> Through the web GUI, you can configure function keys with: .. code-block:: console
Account: select the account from the drop-down (if only one account is configured on the phone, it will be the first in the list) Type: BLF Value: <extension>|**
Or you can directly edit the configuration file or the template: .. code-block:: console
<fkey idx=”%%id%%” context=”%%line_id%%” label=”” perm=””>blf sip:<interno>@%%KPBX_IP_ADDRESS%%;user=phone|**</fkey>
where %%id%% is the ID of the key to configure and %%line_id%% is the ID of the corresponding account (1 if the account is the only one on the phone).
Example:
<fkey idx="0" context="1" label="INTERNO103" perm="">blf sip:103@192.168.23.190;user=phone|**</fkey>
On YEALINK -> Through the web GUI, you can configure DSS keys with:
Type: BLF
Value: <extension>
Line: The line associated with the account (Line 1 if the account is the only one on the phone)
Extension: **
Or you can directly edit the configuration file or the template: .. code-block:: console
memorykey.%%id%%.line=%%line_id%% memorykey.%%id%%.value=<extension> memorykey.%%id%%.type=16 memorykey.%%id%%.pickup_value=**
where %%id%% is the ID of the key to configure and %%line_id%% is the ID of the corresponding account (1 if the account is the only one on the phone).
Example:
memorykey.1.line = 1
memorykey.1.value = 103
memorykey.1.type = 16
memorykey.1.pickup_value=**
For pickup with invite, you need to replace the direct pickup code (**) with the pickup with invite code (#*).
Calling Line Identification Restriction (CLIR)
Description
This service lets a user hide their caller ID when making a call. This way the called party will not be able to obtain the number of the caller, even if their device is CLIP (Calling Line Identification Presentation) enabled.
Obscuring caller ID is not always possible and may be subject to regulatory restrictions. Calls to emergency services will ignore CLIR through the Calling Line Identification Restriction Override (CLIRO) service, and some types of calls (e.g. commercial/marketing calls) are not allowed to hide the identity of the calling party.
This service is applied to calls between extensions as well as outbound calls. In order for the service to function correctly for outbound calls, outbound gateways must be configured correctly and/or the VoIP provider must support CLIR.
The service can be enabled/disabled on a call-by-call basis, and the default behavior can be configured for each extension.
The user can obscure their caller ID by dialing the CLIR “Setup” code (by default *671) followed by the number to call. If the user wishes to show their caller ID, they must dial the CLIR “Remove” code (by default *670) followed by the number to call.
Configuration
In order to use the service, it must be enabled in the numbering plan (where you can also edit the service codes).
Whether the service is enabled or disabled, as well as the default behavior, must be specified for each extension (this can be done through extension templates). Other than the default behavior for calls between extensions and calls to external numbers, the settings for each extension include the option to hide the caller ID if the calling device sends a Privacy: id SIP Header.
Interoperability
When CLIR is enabled, SIP signaling is modified as follows:
the user part of the From URI is replaced with anonymous (e.g. sip:anonymous@<telephone_ip_address>:<telephone_port>);
the user part of the Contact Header is replaced with anonymous (e.g. sip:anonymous@<ip_address_registrar>:<registrar_port>);
the Privacy: id SIP header is added.
Calls between extensions do not require additional configuration, while outbound calls might, depending on the type of outbound line.
VoIP Provider
Even if CLIR is enabled, it is still necessary to send the identity of the calling party to the provider. If this doesn’t happen, the provider will normally reject the outbound call. This information can be sent through P-Asserted-Identity Header or Remote-Party Header.
These headers must be enabled in the configuration of the outbound trunks (Gateways and VoIP Domains -> Trunk). The accepted format for the headers is usually the one suggested in the configuration page. If there are issues, you should check the required configuration with your service provider.
To prevent these headers from being overwritten, it is necessary to disable COLP in the outbound trunk configuration.
Group Call Pickup (direct and with invite)
Description
his service lets any PBX user pick up a direct call to any extension that belongs to a pickup group from which the user is authorized to pick up calls.
It is possible to configure which groups a user belongs to and which ones they are authorized to pick up calls from.
If there are multiple inbound calls, call pickup will be executed on the last one received by any of the groups from which the user is authorized to pick up calls.
Group call pickup is applied to all calls to an extension, including those received as part of a ring group or a queue.
KalliopePBX offers two ways of picking up calls: - Direct: the user who picks up the call has no information on the calling party. - With invite: the user who picks up the call can check who the calling party is before choosing whether to complete the transfer or not.
Direct pickup is performed by dialing the direct pickup code (by default *9). Conversation with the original calling party will begin directly.
Pickup with invite is performed by dialing the pickup with invite code (by default #9).
The user who is picking up the call will first receive a hang up signal; once they have done so, they will receive a call with the caller ID of the original calling party. The user can now choose whether to complete the transfer (by answering the call) or not (by refusing the call). The original extension will stop ringing only once the transfer is complete.
Configuration
The service can be enabled/disabled in the PBX -> Numbering plan page.
The service codes can be changed in the PBX -> Numbering plan page.
Ring groups and the corresponding call pickup authorization can be specified in the extensions page or though the extension templates.
Interoperability
When using this service, it can be useful to have a key that lets you make a quick call to the service code.
Examples
On SNOM -> Through the web GUI, you can configure function keys with:
Account: select the account from the drop-down (if only one account is configured on the phone, it will be the first in the list)
Type: Speed Dial
Value: *9
Or you can directly edit the configuration file or the template:
<fkey idx="%%id%%" context="%%line_id%%" label="" perm="">speed *9</fkey>
where %%id%% is the ID of the key to configure and %%line_id%% is the ID of the corresponding account (1 if the account is the only one on the phone).
Example:
On YEALINK -> Through the web GUI, you can configure DSS keys with:
Or you can directly edit the configuration file or the template:
memorykey.%%id%%.line=%%line_id%%
memorykey.%%id%%.value=*9
memorykey.%%id%%.type=13
where %%id%% is the ID of the key to configure and %%line_id%% is the ID of the corresponding account (1 if the account is the only one on the phone).
Example:
memorykey.1.line = 1
memorykey.1.value = *9
memorykey.1.type = 13
For pickup with invite, you need to replace the direct pickup code (*9) with the pickup with invite code (#9).
Wait queues (ACD)
Description
The Automatic Code Distribution (ACD) service, also known as the “waiting queue” service, provides professional telephone reception by keeping callers waiting until an operator becomes available. The incoming call is taken over by the central unit that presents the caller with a series of information through audio files, hold music, and puts the callers in a queue to distribute them to the various operators of the queue (or members) based on specific commitment policies that can be configured within each queue. The “Queues” are a mechanism analogous to the Ring Groups, from which they differ for the possibility of defining in a more refined way the ringing strategy and for the sorting of the incoming calls, which are queued and served with a FIFO (First In First Out) policy towards the members of the queue. Each queue can be associated with an arbitrary number of members (accounts), who will serve the calls addressed to it. It is important to remember that an operator can be busy on more than one queue at the same time. In case of concomitance of calls waiting on more than one queue, the service will present to the operator the call coming from the queue with the highest priority.
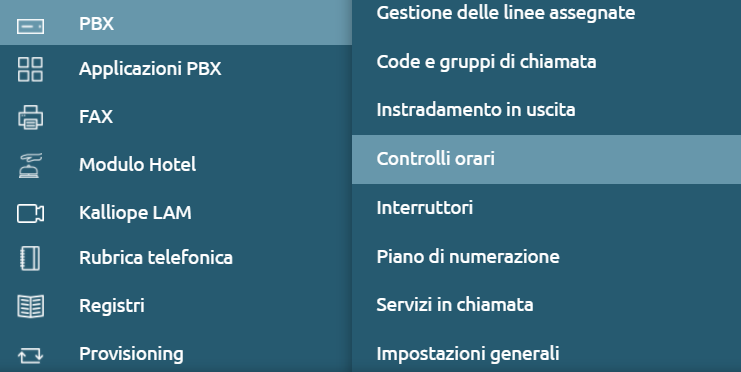
Configuration
To access the service just click on “PBX” > “Queues and Callgroups”. We’ll be on the page dedicated to the list of configured queues with the main parameters. By clicking on “Add new queue”, we can move on to the configuration of the new queue..


There are the following fields:
Enabled: a button that allows to select the queue as active/inactive
Name: you can insert the name you want to give to the queue (e.g. “Assistance”)
Priority: numerical value that allows you to define which queue should have priority over the others, the higher the value, the higher the priority
CLID name prefix: the prefix is added to the caller ID (CLID) and allows to indicate on the display of the telephone terminal the specific queue from which the call comes (e.g. “ASS” for “Assistance”)
Checktime: it is possible to choose the time controls already previously configured

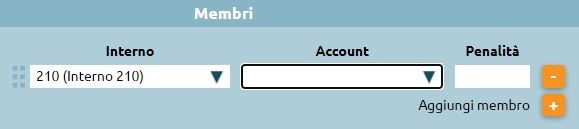
Members
We can defines the list of operators assigned to this queue. To add them, just click on the “Add Member” button, you can choose between several extensions and select account for each one. If the extension has more than one account assigned, you can choose on which account (terminal) to commit the extension. The Penalty is a value that can be assigned to each operator: the lower the value, the greater the chance of being engaged by the queuing engine. The lower the penalty, the more the operator is a holder of the service of that queue.
The distinction based on penalties means that only the available operators with the lowest penalty will go to be committed. Take, for example, the following list of members of a queue:
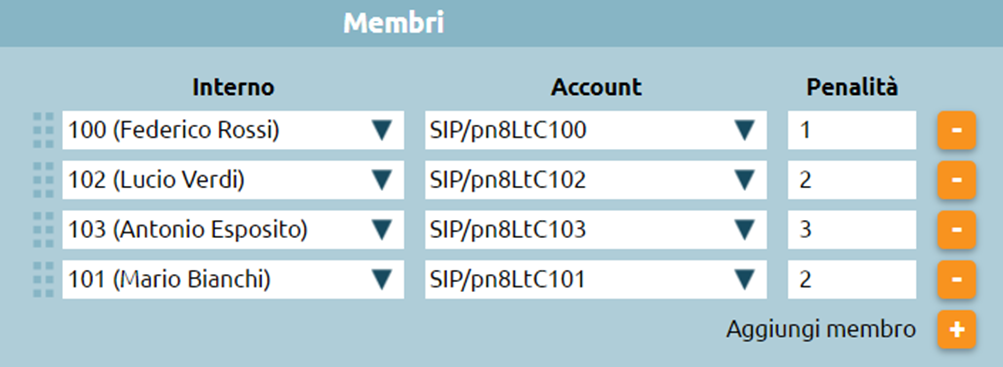
Only the available operators with the lowest penalty will ring. In the specific case of this example, if extension 100 should not be already busy, unregistered or paused, only it will ring. Otherwise, extensions 102 and 101 would ring simultaneously. If, on the other hand, the latter were busy, unregistered or paused, extension 103 would ring, even though it has a higher penalty.
Note
If an operator with the lowest penalty does not answer, also if it is available, the queuing engine will not pass the call to the operators with the next higher penalty but will continue to make the operator with the lowest penalty ring. In the specific example, if extension 100 is available, the queue will always let it ring until it answers, without scaling to extensions 102 and 101 with a higher penalty.
Queue Parameters

Auto pause enabled: feature that automatically pauses an operator who does not answer within their timeout or rejects a queue call.
The operation of this option varies depending on the ringing strategy one goes for; in the case of ringall it is not influential: automatic pause is not triggered. Similarly, automatic pause is not triggered if the caller drops out while an operator is ringing. The concept of automatic pause is introduced for callcenter features that allow the exchange to define the roles of supervisor and queue operator. Should a user be a queue operator, he or she has, among the options, the option of “pausing.” “Pause” means a user who is registered, available and free at the telephone level, but still cannot be engaged by the queue. The paused/unpause status is tracked within the central unit’s logs, so that the operator’s pause time is controlled. Pause is handled by codes that we have seen in the “Enumeration Plan” section, and by typing in the codes-customizable-you can pause or remove yourself from the pause. - Ring Strategy: drop-down menu that allows you to define the commitment policies of the operators on the queue, i.e. the way the system distributes the incoming calls in the queue to the various operators. Drop-down menu choices:
Ringall: the call arrives at the same time to all free operators in the queue, taking into account the penalty values.
Linear: the call is forwarded to the first free operator according to the sequence in which the members of the queue have been defined (from top to bottom) ignoring the concept of penalties which only applies to ringall
Less recent: assigns the call to extensions that have not answered the call for the longest time. The queuing engine of the central unit takes into account the last time the operator served a call from the queue and, consequently, assigns it exclusively to the extension that has not answered the call for the longest time
Fewestcalls: assigns the call to the operator who has answered the least number of calls that is calculated on the current day, unless the central unit restarts
Round robin memory: distributes calls with round robin mode among available operators and remembers the last one that tried to call
Round robin ordered: like RRMemory, but the order of the operators given in the configuration file is respected
Random: assigns the call randomly among the available operators
Ring timeout: indicates how many seconds the terminal of the engaged operator should ring (e.g. 15 sec). During these seconds, if the conditions change (another operator becomes free and we are in a ringall policy) the queue will not present the call to the operator who has just become free in the meantime, but will include him in the pull of the callable operators only at the expiration of the next ring timeout
Retry interval: the engaged operator rings for a specific number of seconds, there will be a wait of e.g. 5 seconds and then it will go to choose the next operator according to the selected ringing strategy; it will ring again for 15 sec. During the 5 seconds the caller is in the queue and no operator rings.
Rest interval: indicates the time (sec.) for which the operator who has just ended the call service (related to the queue), will not be engaged by the queue
Announce sound file: option that allows to select a previously loaded audio file. When the operator answers the call, before being connected to the caller, he will listen to an audio file that will remind him which queue the call came from. This kind of option is useful for multiservice call centers that answer on behalf of third parties, for the operator - sometimes - it is functional to present himself to the caller
Report hold time enabled: this option allows you to tell the operator how long the caller has been on hold.
Ring in use enabled: allows to activate an option if a queue is particularly important, for example related to a high priority service. When engaging operators you ignore
Max waiting time (sec.): parameter that monitors the maximum waiting time beyond which an overflow action is triggered (see below).
Max length: parameter that monitors the maximum number of users allowed in the queue beyond which an overflow action is triggered (see below). (e.g. by entering 0 there are no limitations)
Failover: We can perform an audio file and then an failover action, which can be chosen in the drop-down menu

Immediate failover for new calls if
If a caller enters one of the possibilities listed in the image below, an overflow can be triggered immediately, even if the maximum waiting time and the maximum number of users in the queue have not been reached.

Instant overflow for calls in queue
Immediate overflow for calls already in queue for a specific amount of time and in case of the possibilities listed in the image below

Queue users
Welcome sound file: you can select a previously loaded audio file
MOH class: the caller, after the welcome message, can listen to a hold music (previously loaded) or the normal ringing tone
Periodically position announce enabled: option that allows the caller to be informed about his queue position.
Periodically position announce frequency (sec.): insert a number that indicates every how many seconds to update the caller of his queue position
Estimated waiting time announce: calculated on the basis of the queuing engine statistics, you can choose whether to announce it every few seconds as the queue position announcement frequency, only once, or not to announce it.
This message is only triggered if the average waiting time is more than two minutes.

Custom Periodic Announce
This service can be used to communicate specific procedures to the caller. It is used to offer more frequent information in request to a specific queue
Periodic announce enabled: you can select to enable the announcement.
Periodic announce sound file: you can select a previously loaded audio file.
Periodic announce interval (sec.): insert the time (in sec.) after which the periodic announcement will start cyclically

On demand message
On demand play enabled: it is possible to select the engage of the message on demand
On demand play sound file: it is possible to select a previously loaded audio file
On demand play digit: sequence that the operator in conversation on this queue will have to type to trigger the loaded audio file. (E.g. the operator makes the customer listen to certain conditions by typing a customizable code)

Queue callback
Service enabled in case the callcenter license is assigned on the central unit. It allows the caller on hold not to remain physically on the phone for all the time before being taken over by an operator, but it gives the possibility - by pressing the key 5 - to remain virtually in the queue. A system IVR is executed, asking the caller if he wants to be called back on the current number or if he wants to be called back on another number (to be specified). The user remains virtually in the queue and his position does not change, at his turn the central unit calls the available operator who will tell the central unit to trigger the callback to the user who had booked.
Callback enabled: it is possible to select the callback on busy
Outbound Call Routing class: e.g. Italy no cell phones, if a cell phone number is inserted, the number will not be called back.
Outbound identity: s a call from the central unit to outside, you can treat the outgoing number as if the caller was an extension already configured

CTI integration
You can make use of certain features of the ACD service, such as adding dynamic operators, pausing operators, and accessing the supervisor panel, directly from Kalliope CTI and Kalliope Attendant Console.
You can, for example: - activate the Call Center license from System settings -> LIcenses; - in multi-tenant systems, assing the license to the desired tenant; - assign a role to a user.
Upon opening Kalliope CTI, you will have available:
a new tab allowing you to view the queues you belong to and change your pause status if necessary;
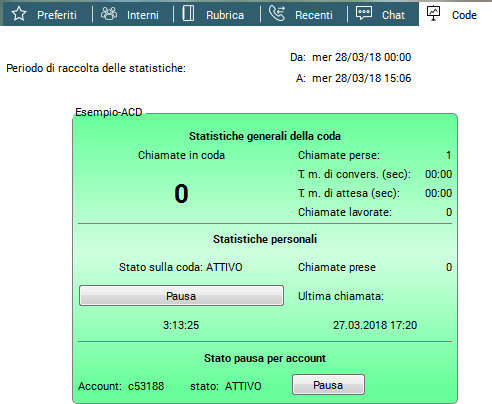
for supervisors, the supervisor panel.

Numbering Plan
Description
The internal numbering plan rules the routing of a call internally to the KalliopePBX The Numbering Plan is committed by calls generated by an extension, and also by calls coming from outside. To discriminate the different permissions associated with these two types of calls, the Numbering Plan has two columns, one with the enabled selections for calls originating from extensions (local and remote) and one for those originating from an outside line. The selection is matched on the numbering plan according to the displayed order, routing the call according to the following matching priority:
Services
Custom selections
List of extensions
Remote extensions
Other selections
Services
By clicking on the pencil icon, you can access the page for editing codes and enabling/disabling various services. If a service is enabled but has no assigned code, it will remain inactive.
These are the available services:
Group call pickup
Call pickup
Completion of calls to busy subscriber
Echo service
Voicemail
Audioconference
Electronic lock
Unconditional forward
Fork to Mobile
Switches
Passive listening (SPY service)
Work code
Queue pause
Call parking
We report below the default values of the services that can be activated at numbering plan level.
Description |
Selection (default) |
|---|---|
Call pickup |
*9 |
Direct pickup |
**<num.interno> |
Group call pickup with invite |
#9 |
Direct call pickup with invite |
#*<num.interno> |
CLIR (Set) |
*671 |
CLIR (Remove) |
*670 |
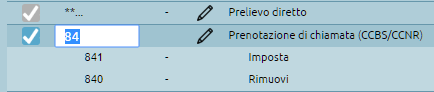
Call reservation - CCBS/CCNR (Set) |
841 |
Call reservation - CCBS/CCNR (Remove) |
840 |
Echo Service |
800 |
Voicemail |
801 |
Audioconference |
802 |
Electronick lock (Lock) |
850 |
Electronick lock (Unlock) |
851 |
Unconditional forward (Lock) |
811 |
Unconditional forward (Unlock) |
810 |
Fork to mobile (Switch) |
50 |
Fork to mobile (Enable) |
*501 |
Fork to mobile (Disable) |
*500 |
Fork to mobile (Check status) |
*509 |
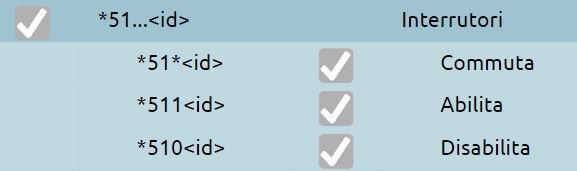
Switches (Switch) |
*51*<id> |
Switches (Abilita) |
*511<id> |
Switches (Disable) |
*510<id> |
Director-Secretary (Switch) |
|
Director-Secretary (Set) |
|
Director-Secretary (Remove) |
|
Paging groups (Login) |
*53<id> |
Hot Desking |
*401 |
Call parking (Extension) |
888 |
Call parking (First slot) |
890 |
Call parking (First slot) |
899 |
Personal Speed Dial |
#0<speed dial> |
System Speed Dial |
#<speed dial> |
Pause on queue (Imposta) |
*81 |
Pause on code (Rimuovi) |
*80 |
Work code |
<cod.commessa>*<dest> |
Passive listening (SPY service) |
<codice><Interno da ascoltare> Accessible only from an extension assigned to a supervisor role and usable only on “operator” extensions. When you are on a call, by dialing DTMF codes 4, 5 or 6 you can change the interaction mode (4=spy, 5=whisper, 6=barge). The default code doesn’t exists. It has to be set |
Custom codes
The second part of the numbering plan lets you customize routing based on specific codes or numbering ranges.
You can edit the code (by removing a certain number of digits and adding a prefix) before forwarding it to one of the destinations selectable on the contextual drop-down menu.
You can choose one of the following destinations:
An external number
An extension
A ring group (with or without considering any time checks)
A queue (with or without considering any time checks)
A time check
An IVR menu
A voicemail box
A specific audio conference MeetMe room
An external API
You can edit these settings by clicking on the pencil icon on the right; the page lists the defined custom forwarding rules and lets you edit, delete, and create them. Note that the rules will be automatically ordered as they are saved, with exact ones first and then prefix- or range-based ones.

Checktime and Switches
Description
Checktimes are a mechanism to manage call routing on a time and manual basis.
On a time basis because they are based on the definition of time slots encountered in sequence, for each of which it is possible to define the playback of a particular audio message and the subsequent forwarding of the call to a specific destination.
On a manual basis because the checktimes can use switches that are a particular element of the PBX, a flag with two states (on / off), controlled by a code that can be typed by telephone.
Usually, traditional PBX solutions often refer to the day/night service, i.e. the service that offers a courtesy message at office closing times, in this case, the checktime service allows many more choices. It is a transit entity that can be connected at different points in the call flow, since checktime can appear in the call forwarding selection drop-down menu when certain events occur.
Switch Configuration
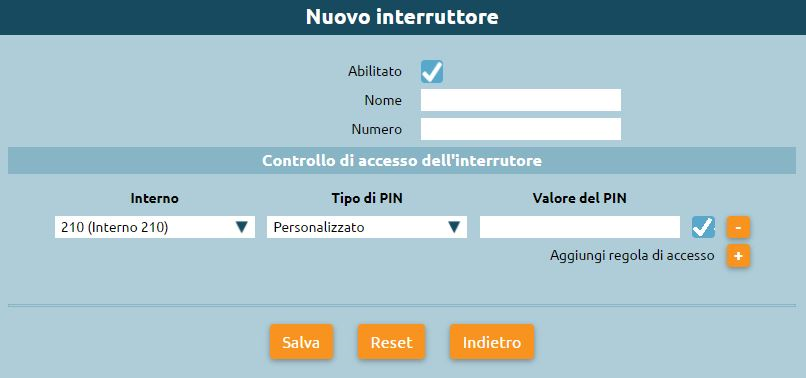
Let’s start by first configuring the switches through PBX > Switches.

The switch can have two states, on/off, it is a service that can be managed through the typing of a code entered by telephone or programmed on a function key of a terminal - since the PBX exposes a service Busy Lamp Field with the display of the state - to change a switch and check through the field lamps if the switch is on/off. We are on the Switch List page, clicking on “Add Switch” we can configure it.
**Enabled: Enable or disable a switch without losing its configuration
Name: Identifier of the switch
Number: Numeric ID of the switch to be used with the enable/disable/switch code.
Switch Access Control
Each switch provides an ACL on an internal basis for piloting and then possible authentication
Extension: Select the extension that is enabled to change the status of the switch
PIN Type: Select the authentication mode of the extension, which can be “None / Custom / Extension Services PIN”
PIN Value: Enter custom PIN, only if the previous value is set to Custom
n PBX > Numbering plan we can find the page for enable/disable/switch the switches.
e.g. To switch, digit on the telephone terminal:
*51*1, to go to change the state of switch 1, where 1 is the id of the switch
*5111 to force its opening, where 1 is the id of the switch
*5101 to force it to close, where 1 is the id of the switch
If the switch is turned off and you try to enter the disable code, it will remain off. If a PIN has been set for switch management, you will be prompted to enter the PIN or password after entering this code for the switch action to complete correctly.
Configuration of Checktime
We proceed by going to PBX > Timetable checks and clicking on “Add new Checktime”
Enabled: Allows you to disable a checktime without losing its configuration
Name: Identifier of the checktime
Backdoor enabled: code that allows bypassing the checktime, it will be applied to the incoming call the routing foreseen by the scenario outside the time slots, that is “Overflow outside the time slots”
Backdoor code: Allows defining the backdoor code to be used

If the backdoor code is typed, it will be forced to forward the overflow outside the time bands. This service is used to set a checktime for the opening/closing of some offices. It is helpful in case you want to leave to the employees or to the subjects with particular privileges, the possibility to bypass the limitations of the checktime, typing the code. For example, to communicate with an office of your company, even though the office is closed to the public.
Checktime Periods
You can indicate the opening time slots or the closing time slots of the company. We define standard checktime periods, during the time slots you can take all calls and turn them to the in periods failover which presents in the drop-down menu the various choices. The drop-down menu also presents the item “Return to parent” which allows you to go back to the entity that brought us to this checktime. See groups/code: call groups provided the ability to define a checktime, i.e. a service access policy. If we include this particular checktime within the configuration of a group or queue, to allow it to continue accessing the queue with which it is associated, we should select this item. This allows you to use the same checktime in multiple groups and queues.
Special situations: holidays We can establish during a given day, to proceed with different actions. For example, we can overwrite the failover that we have configured as standard and configure a different one. The graphical arrangement of the information has an important sense: the choices are made from top to bottom, so the more particular rules should be inserted at the top and then the general ones at the bottom.
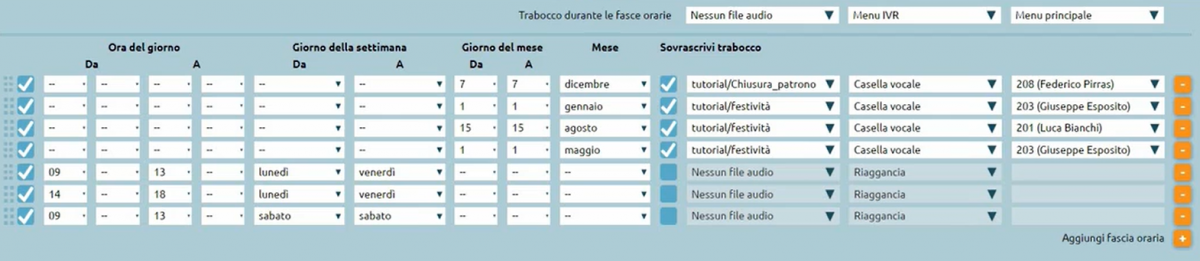
Out periods failover: Failover action outside of time checktime periods

Switches
Allows you to add manual day/night service. Selecting a previously created switch, such as in the example “Force Office Close”, if it is on and therefore I wanted to force the office to close, I would have to send the closing sound file and an action, e.g. “Hang Up”. If it was closed and we didn’t want to force close, we could select “Continue”, i.e. proceed to the next switch. Selecting “Force open office” will force the office open regardless of when we have configured the time control. If the switch is on, the same action configured in the failover will be performed during checktime periods. If neither of the two switches is on and involves a forcing, the checktime will behave according to the time slot configuration we have defined. The backdoor code only acts on the behavior of the time slots, if there is a manual open/close forcing, the backdoor code will not work.
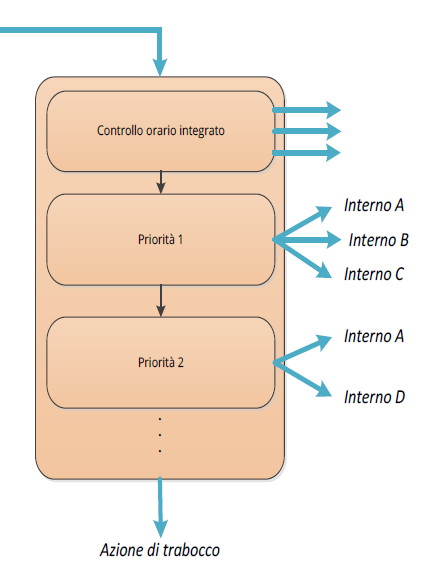
Ring groups
Description
The Call Group service is a call reception service that offers the caller an ordered sequence of extension priorities. The call will be distributed to one or more extensions in parallel. The call group is a grouping of extensions, distributed on different priorities with simultaneous ringing, which identifies the departments of an office.
Configuration
We can click on “PBX > Queues and callgroups”.
If we click on “Call groups list” we find the list of already configured groups. To move on to the configuration, we click on “Add new callgroup”.

The configuration includes the following fields:
Enabled: checkbox to enable or disable the group
Name: insert the name you prefer - Clid name prefix: prefix added to the caller ID (CLID) that allows indicating on the display of the telephone terminal the custom code of origin of that particular group of calls (e.g. “ASS” for “Assistance”) - Checktime: it is possible to define each callgroup its checktime to differentiate the behaviors according to days, months, etc. - Moh class: you can choose whether to present to the caller the ringing tone or one of the classes of hold music configured on the central unit - Failover: at the end of the consultation of all priority groups it is possible to define a failover action, so in case of no answer of any extension belonging to this group, it is possible to play one of the audio files that we will have set and then to perform one of the actions reported in the drop-down menu
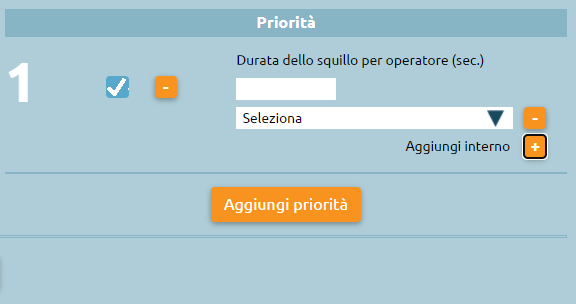
Priorities
We can click on “Add priority” to proceed to configuration.
Ring timeout (sec.): value that defines the ring duration of this priority 1 subgroup
Add Extension: we define the extensions belonging to the group of priority 1
Adding another group of priority 2 (clicking on “Add Priority”), sequentially to group 1, at the moment the ringing seconds of the first group pass, we proceed with the second one.
The groups are executed sequentially, if no subgroup answers the call, it will be diverted to the configured overflow.
Failover actions related to individual interns involved in the groups

If the call was directed to the group and not the individual extension, individual extension failover actions are not performed. If extension 210 has a failover configured on its extension for no answer to an external number, when this extension rings not because it is called directly, but because it belongs to the calling group, its overflow will not be considered. The same way, the central unconditional forwarding settings for individual extensions belonging to the group, are not taken into account. Suppose you configure a forwarding on the terminal set up with an account of a specific extension. In that case, it will be correctly executed because it is not managed by the central unit, but by the terminal. If the Fork2Mobile service is configured on the extension - to make the phone associated to the specific extension ring - the call is made in parallel also on the mobile associated with that extension.
In summary:
Failover actions for individual extensions will NOT be executed
Activating the “unconditional forward” service on the extensions will NOT cause the call to be forwarded
Activation call forward on one of the terminals of an extension will cause the call to be forwarded
The Fork2Mobile service of individual extensions that belong to the group will be activated for calls made to the group
Two methods can be used to forward an incoming call to the call group:
define in the numbering plan a custom selection associated with the call group

define in a VoIP gateway or domain a numbering that has as destination the call group

Unconditional Forward
Description
The unconditional forward service lets you divert a direct call to an extension to a different destination (local or external). This service can be used to divert calls to a colleague’s number or any other selection from the numbering plan (including ring groups or queues, or you own mobile phone when you’re away from your workstation).
Note
The service only applies to direct calls to the extension and not to calls originating from ring groups the extension belongs to or queues of which one or more accounts linked to the extension are members.
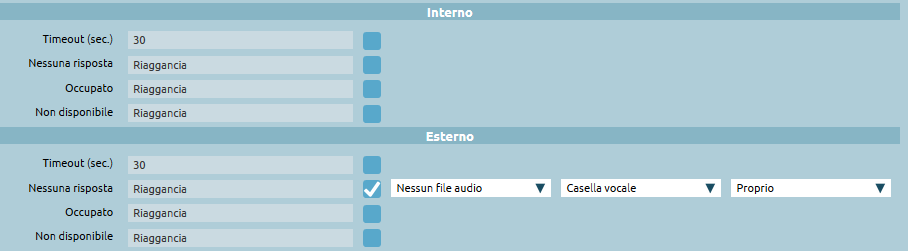
Every time a user activates the service, they must specify the number to which the call will be forwarded. KalliopePBX will forward the inbound call to this number. In case of failure, the failover action will be the one associated with the destination and not the original extension.
A call forwarded to an extension will show the original caller, while one forwarded to an external number will follow the outbound routing rules associated to the original extension, and the number displayed will be the one used by the extension when calling the public phone network.
Unconditional forwarding can be enabled/disabled in three ways:
From the phone: the service can be enabled by dialing the activation code (by default 811) followed by the number to which forwarding should be programmed. KalliopePBX will confirm the activation by playing the “Saved” audio file. If the user wishes to forward a call to an external number, the number must be preceded by the prefix for outbound calls. Similarly, the user can deactivate the service by dialing the deactivation code (by default 810). KalliopePBX will confirm the deactivation by playing the “Thank you” audio file. These codes can only be used on a device linked to the extension on which the service is to be enabled/disabled.
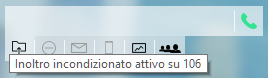
From KalliopeCTI Desktop (all modes): you can find the unconditional forward icon under the number dialing box. Clicking the icon will enable the service, shown by the icon changing to black color. Clicking on the icon again will disable the service. Hovering the cursor on the icon will display the number to which calls will be forwarded.
From KalliopeCTI Mobile: tap the settings icon on the lower right, then the forward icon. When the service is enabled, the icon will change and show the number to which calls will be forwarded. Tapping the icon again will disable the service.
When this service is enabled, the extension on which it is active will not receive the call; only the destination of the forward will ring. Other forwards associated to the extension will therefore not be applied.
Configuration
The unconditional forward service is always globally enabled.
Activation/deactivation codes are managed from the numbering plan.
Interoperability
When enabling/disabling this service through a phone, it can be useful to have a key (with Busy Lamp Field) that lets you check the state of the service.
For monitoring, KalliopePBX sends SIP NOTIFY messages to communicate changes of state. The phone must send a SIP SUBSCRIBE message to request this information.
This operation is normally executed by configuring a BLF-type function key. The object that needs to be monitored is ufwd<extension>.
Examples
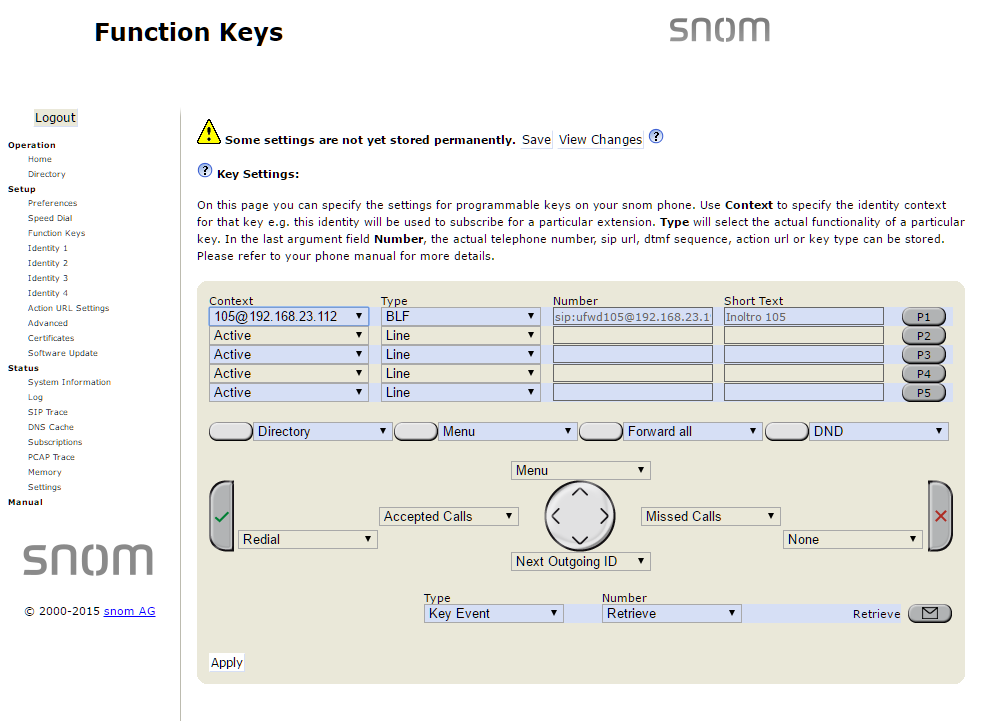
On SNOM
Through the web GUI, you can configure function keys with:
Account: select the account from the drop-down (if only one account is configured on the phone, it will be the first in the list)
Type: BLF
value: ufwd<extension>
Or you can directly edit the configuration file or the template:
<fkey idx="%%id%%" context="%%line_id%%" label="" perm="">blf sip:ufwd<interno>@%%KPBX_IP_ADDRESS%%;user=phone</fkey>
where %%id%% is the ID of the key to configure and %%line_id%% is the ID of the corresponding account (1 if the account is the only one on the phone).
Example:
<fkey idx="0" context="1" label="Stato Inoltro 105" perm="">blf sip:ufwd105@192.168.23.112</fkey>
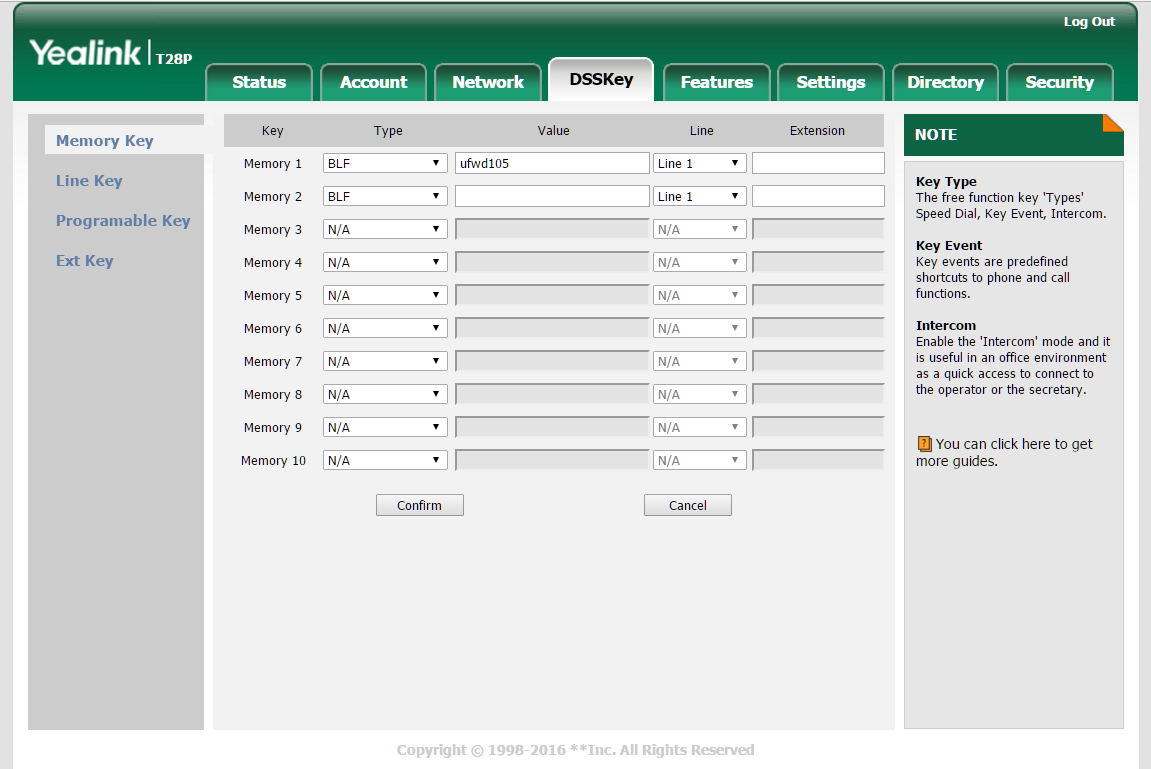
On YEALINK
Through the web GUI, you can configure DSS keys with:
Type BLF
Value: ufwd<extension>
Line: The line associated with the account (Line 1 if the account is the only one on the phone)
Or you can directly edit the configuration file or the template:
memorykey.%%id%%.line=%%line_id%%>
memorykey.%%id%%.value=ufwd<extension>
memorykey.%%id%%.type=16
where %%id%% is the ID of the key to configure
and %%line_id%% is the ID of the corresponding account (1 if the account is the only one on the phone)
Example:
memorykey.1.line = 1
memorykey.1.value = ufwd105
memorykey.1.type = 16
memorykey.1.pickup_value = %NULL%
memorykey.1.xml_phonebook = %NULL%
Call Parking
Description
This service offers the option to move an ongoing call into a parking slot.
When a call is in the parking slot, the interlocutor will be put on hold while the other user can resume the call from any phone (not just the one they parked the call from). The default configuration has 10 parking slots (890-899). If the call is not resumed after 90 seconds, it will automatically be presented to the device (not the extension) that parked it.
Call parking is performed by dialing the configured on-call service code (by default #8). KalliopePBX will reply with the number to call in order to resume the call. The user who parked the call can now hang up and resume conversation by dialing the number provided by KalliopePBX. This call parking mode requires Direct Media to be disabled for the ongoing call. If Direct Media is enabled, a call can be parked out by transferring it to an extension used for the call parking service (by default 888). In this case, once the attended transfer has been executed, KalliopePBX will reply with the number to call in order to resume the call. The user can now hang up and resume conversation by dialing the number provided by KalliopePBX.
Configuration
The service can be enabled/disabled in the PBX -> On-call services page.
The service code can be changed in the PBX -> On-call services page.
The number of parking slots and the corresponding extensions can be configured in the PBX -> numbering plan page.
Interoperability
When using the call parking service, it can be useful to have a key (with Busy Lamp Field) that lets you view whether or not each slot is occupied and, if necessary, resume the parked call.
For monitoring, KalliopePBX sends SIP NOTIFY messages to communicate changes of state. The phone must send a SIP SUBSCRIBE message to request this information.
This operation is normally executed by configuring a BLF-type function key.
The object that needs to be monitored is the extension that corresponds to the parking slot. Other than monitoring the state of occupation of the slot, it is also possible to resume the call by pressing the corresponding function key.
On SNOM
Through the web GUI, you can configure function keys with:
Account: select the account from the drop-down (if only one account is configured on the phone, it will be the first in the list)
Type: BLF
value: ufwd<extension>
Or you can directly edit the configuration file or the template:
<fkey idx="%%id%%" context="%%line_id%%" label="" perm="">blf sip:<interno>@%%KPBX_IP_ADDRESS%%;user=phone</fkey>
where %%id%% is the ID of the key to configure and %%line_id%% is the ID of the corresponding account (1 if the account is the only one on the phone).
Example:
<fkey idx="0" context="1" label="Parking slot 890" perm="">blf sip:890@192.168.23.190</fkey>
On YEALINK
Through the web GUI, you can configure DSS keys with:
Type BLF
Value: <extension>
Line: The line associated with the account (Line 1 if the account is the only one on the phone)
Or you can directly edit the configuration file or the template:
memorykey.%%id%%.line=%%line_id%%
memorykey.%%id%%.value=<extension>
memorykey.%%id%%.type=16
where %%id%% is the ID of the key to configure
and %%line_id%% is the ID of the corresponding account (1 if the account is the only one on the phone).
Example:
memorykey.1.line = 1
memorykey.1.value = 890
memorykey.1.type = 16
memorykey.1.pickup_value = %NULL%
memorykey.1.xml_phonebook = %NULL%
Echo Sevice
Description
You can access this service by calling the number specified in the numbering plan (by default 800). After a short message, you will hear your own audio played back to you, letting you verify the correct functioning of your terminal as well as estimate the delay introduced by the network.
Speed Dial
Description
This service lets you create short numbers linked to specific contacts (from either the shared or the personal phonebook).
To quickly call a number, you have to dial the service code (by default # for system speed dial and #0 for personal speed dial) followed by a previously configured code. KalliopePBX will then contact the number associated to the code. For external numbers, it will also add the prefix for outbound calls (specified in the PBX -> General settings page).
Configuration
The service can be enabled/disabled in the PBX -> On-call services page.
The service code can be changed in the PBX -> On-call services page.
Speed dial can be configured by editing the contact profile in the shared phonebook (for system speed dial) or in the personal phonebook.
Speed dial codes can be assigned only to numbers from the local shared contacts, not from remote contacts.
Interoperability
You can also use the Speed Dial function keys provided by your phone. In this case, unlike with speed dials handled through KalliopePBX, the speed dial value will have to include the outbound call prefix (specified in the PBX -> General settings page).
Attended Call Transfer and 3-Way Conference
Description
This service lets a user (transferer) consult another PBX user before transferring a call with a third party (transferred). With this service, the transferer can regain control of the call whenever they want.
If the addressee of the attended transfer does not answer the call (busy, not available, not registered), the failover action set for that specific extension in the Extensions page is executed.
Once consultation has begun, the transferer can switch between two users or convert the transfer into a three-way conference.
An attended transfer is performed by dialing the configured on-call service code (by default #4). KalliopePBX will play audio instructions and ask for the extension number of the addressee. The transferer will then dial the desired extension number and press the # key or wait for default timeout (2 seconds). In the meantime, the transferred party will hear the hold music configured in the Music on Hold page. During consultation with the other user (even if they have not answered yet or if a failover action is executed) the transferer can at any moment cancel the transfer by dialing the necessary code (by default *0).
Once the addressee has answered and is talking to the transferer, the following situations might occur:
the transferer decides to cancel the transfer by dialing the corresponding code (by default *0);
the transferer switches between the transferred party and the addressee by dialing the corresponding code (by default *9);
the transferer converts the transfer into a three-way call by dialing the corresponding code (by default *3);
the addressee refuses the transfer by hanging up, and the original conversation is automatically restored;
The addressee accepts the call, the transferer hangs up, and conversation begins between the transferred party and the addressee.
As for every on-call service, attended transfer requires Direct Media to be disabled for the ongoing call. If Direct Media is enabled, a blind transfer can be executed by pressing the specific function key made available by the specific phone model. In this case, failover actions on transfer will not be executed.
Configuration
The service can be enabled/disabled in the PBX -> On-call services page.
The service codes can be changed in the PBX -> On-call services page.
Blind Call Transfer
Description
This service allows a user (transferer) to directly transfer a call with a third party (transferred) to another PBX user. When blind transfer is used, the transferer loses control over the call as soon as they begin the transfer.
If the addressee of the blind transfer does not answer the call (busy, not available, not registered), the failover action set for that specific extension in the Extensions page is executed.
The default failover action for a blind transfer is Return to transferer: the call is returned to transferer and the prefix “R:” is added to the CallerID to notify that it is a return of a call transfer.
As for every on-call service, blind transfer requires Direct Media to be disabled for the ongoing call. If Direct Media is enabled, a blind transfer can be executed by pressing the specific function key made available by the specific phone model.
A blind transfer is performed by dialing the configured on-call service code (by default #4). KalliopePBX will play audio instructions and ask for the extension number of the addressee. The transferer will then dial the desired extension number and press the # key or wait for default timeout (2 seconds). In the meantime, the transferred party will hear the hold music configured in the Music on Hold page. When the addressee answers, they will immediately begin conversation with the transferred party, and the blind transfer will be complete.
Configuration
The service can be enabled/disabled in the PBX -> On-call services page.
The blind transfer service code can be specified in the PBX -> On-call services page.
Voicemail
Description
This service lets a KalliopePBX user receive voice messages even when they are unable to answer a call.
Each voicemail box is linked to an extension. Enabling a voicemail box does not mean that calls to that extension will be sent to voicemail, simply that a voicemail box exists for the user. Whether or not a call is forwarded to voicemail depends on the configured failover actions for the user (as well as other failover/routing rules).
Once a message has been recorded, the user can be notified in various configurable ways:
a LED that lights up whenever a message is in the voicemail box (MWI – Message Waiting Indicator);
a notification email;
an email containing the audio file of the message in the voicemail box.
Whenever a caller is redirected to the voicemail box, before leaving a message they will hear an “audio guide” comprised of two parts:
a greeting message that corresponds to the audio file: “the extension XXX is currently unavailable/busy” (depending on the reason the call was forwarded to voicemail);
an instructional message corresponding to the audio file: “please leave a message after the tone, then hang up or press #”.
After the message, the caller will be able to record their message.
Note
The system will not record messages shorter than 3 seconds.
To listen to messages in their voicemail box, the user must dial the voicemail service code (by default 801) followed by their extension number. KalliopePBX will then ask them to input their password, i.e. the service PIN of their extension.
If the user does not dial their extension number, KalliopePBX will play an audio message prompting them to do so.
Once the user has been authenticated, the audio guide will present the options to listen to, delete, or archive messages.
The user can also consult their voicemail box directly from KCTI Mobile. In this case, if the option to send audio messages via email is enabled then “Delete forwarded messages from Kalliope” must not be selected.
Configuration
The service can be enabled/disabled in the PBX -> Numbering plan page.
The service code can be changed in the PBX -> Numbering plan page.
Enabling extensions to use a voicemail box and configuring the voicemail itself is done through the PBX -> Extensions page.
In this page you can also enable email notifications for new messages, audio file forwarding, and audio file deletion.
You can also enable and configure voicemail boxes by importing auto provisioning files for extensions. The columns to fill in are the following:
voicemailEmailAddress: email address;
notifyEnabled: enable email notifications;
attachEnabled: forward messages as email attachments;
deleteEnabled: delete forwarded messages from Kalliope;
voicemailEnabled: enable voicemail box;
As for the customization of the voice guide, the first part is editable through the phone by contacting the voicemail service code and following the instructions given by the “voice guide. The KalliopePBX after authenticating the user prompts you to , press zero to access the mailbox options and then press 4 to record your temporary greeting message (N.B. you can also record a one-second blank message without voice if you do not want to hear anything). The first part is editable through the phone by calling 801 (or related number modified by the numbering plan) and following the instructions (it will first ask for the voice mailbox (i.e., extension), then for the password (of the voice mailbox), then press zero for the mailbox options, and finally press 4 to record your own tentative greeting message (N.B. you can also record a one-second voiceless blank message if you don’t want to hear anything). The second part of the message currently cannot be deleted or edited.
Note
Our roadmap includes the option to configure this message as well. Once this has been implemented, changes will be logged in the changelog and this paragraph will be updated.
Configuration example
Voicemail can be enabled/disabled in the extension configuration page.

Once enabled, voicemail is available as a failover action for the extension.
Interoperability
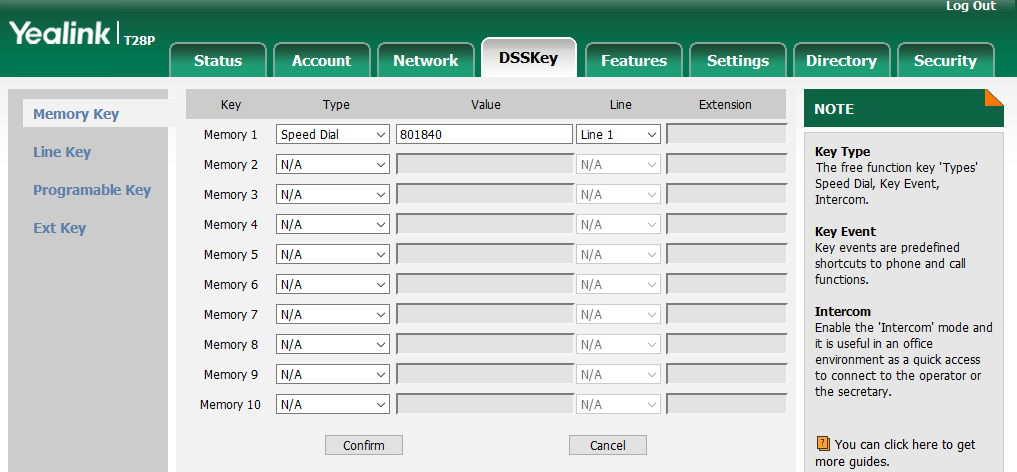
You can set a function key to directly access the voicemail box. This can be done simply by setting a Speed Dial key with the voicemail service code followed by the extension number as a value (e.g. if the service code is 801 and the extension is 840, the value should be 801840).
Once the button has been pressed, the phone will dial this number, and the user will be immediately asked to dial their password to access their voicemail box.
An example for a Yealink T28P phone is shown below.